

Documentation Index
Fetch the complete documentation index at: https://docs.landerlab.io/llms.txt
Use this file to discover all available pages before exploring further.
Connect ClickFlare to your landing pages in LanderLab to capture click IDs from incoming traffic, fire server-to-server postback conversions when a lead is submitted, and pass the full tracking data back to ClickFlare automatically.
What is ClickFlare and Why Does This Integration Matter?
ClickFlare is a performance tracking platform used by affiliates, media buyers, and performance marketers to track clicks, conversions, and revenue across campaigns. It works by assigning a unique click ID to every visitor that comes through a ClickFlare campaign link. This click ID is the key that connects an ad click to a conversion. When you send traffic to a LanderLab landing page through ClickFlare, the click ID arrives as a URL parameter (e.g.?clickid=abc123). For ClickFlare to register a conversion when someone submits a form on your landing page, it needs to receive that click ID back via a server-to-server (S2S) postback URL.
Without this integration, ClickFlare has no way of knowing that the visitor who clicked your ad later converted on your landing page. The LanderLab ClickFlare integration closes this loop automatically:
- A visitor arrives on your landing page with a ClickFlare click ID in the URL
- LanderLab captures the click ID from the URL parameter you specify
- When the visitor submits a form, LanderLab fires a postback request to ClickFlare with the click ID
- ClickFlare registers the conversion and attributes it to the correct campaign, traffic source, and visitor
ClickFlare integrations are not saved globally. Each integration is configured per landing page, so you will need to set up a new ClickFlare connection for each landing page where you want to track conversions.
How to Add ClickFlare Tracking
The ClickFlare setup uses a 3-step wizard: configure the connection, map your fields, and review before connecting.Step 1: Configure the Connection
Go to your landing page
Navigate to Landing Pages and click the name of the landing page where you want to add ClickFlare tracking.
Select ClickFlare
From the list of available integrations, find ClickFlare and click on it. The configuration wizard will open.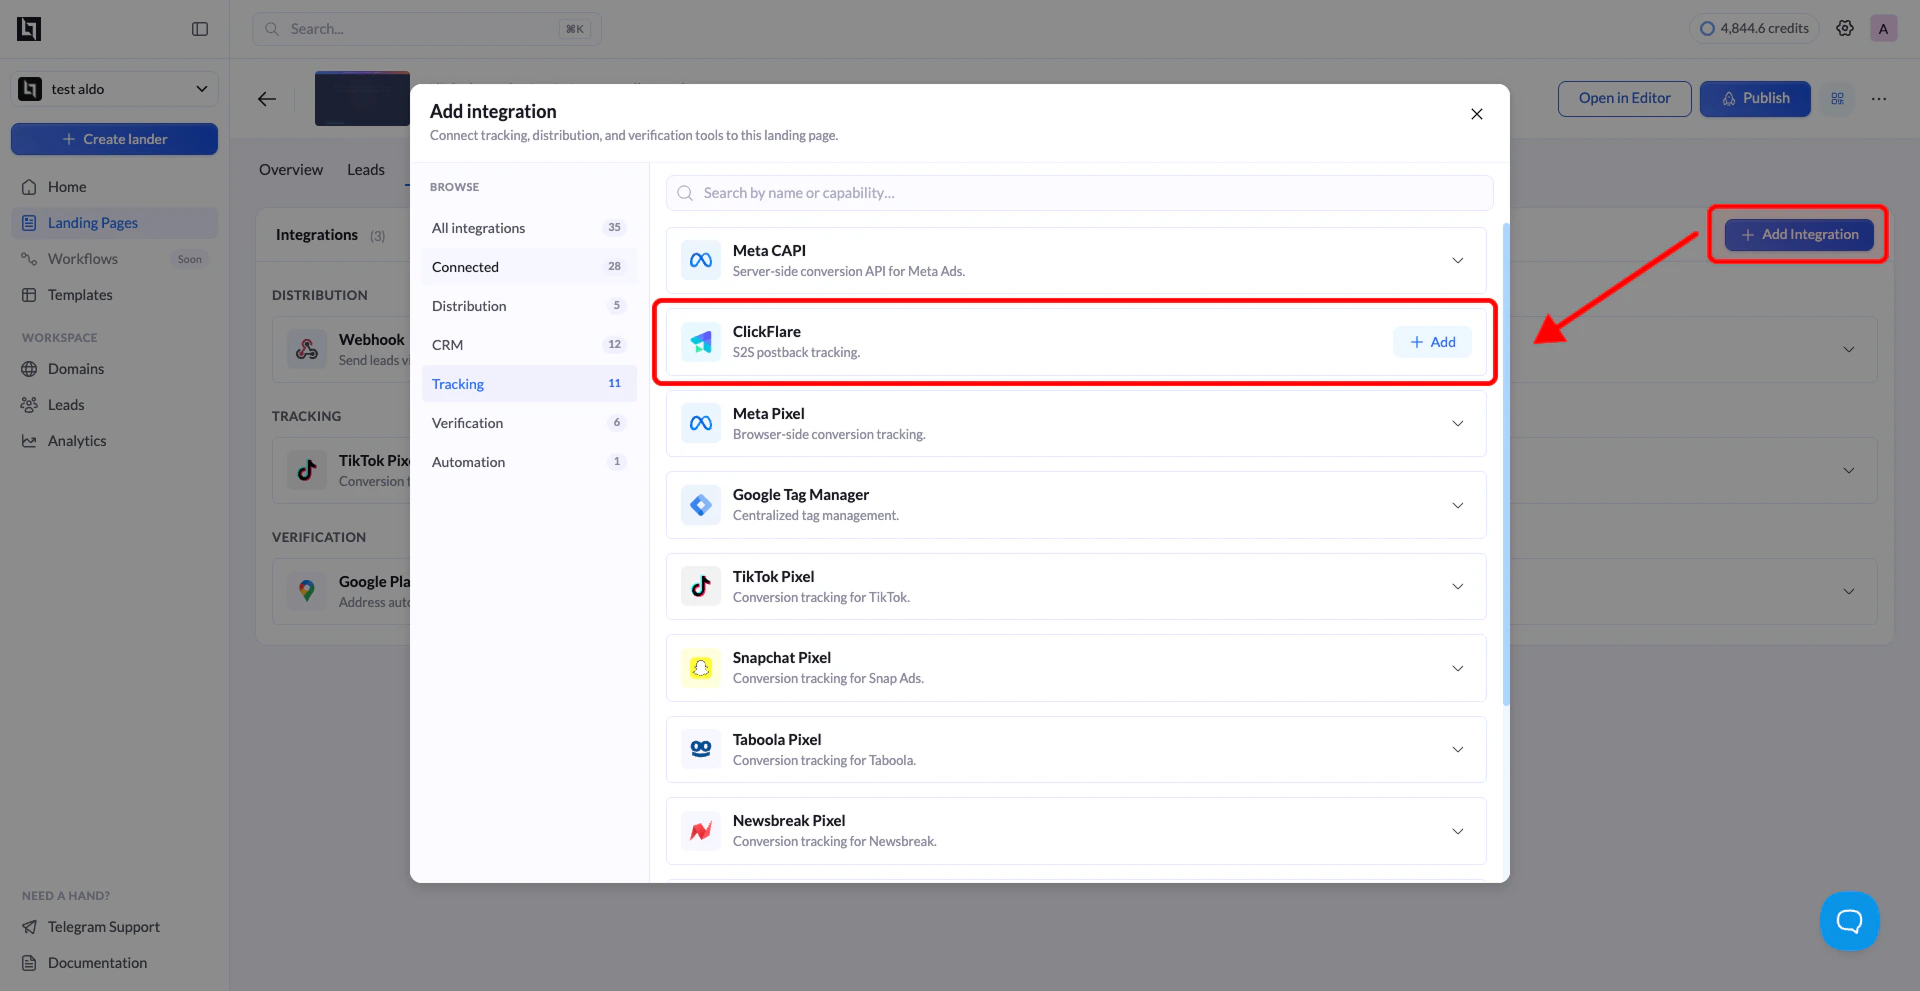
Fill in the connection details
Enter the following details:
| Field | Description |
|---|---|
| Name | A label to identify this integration (e.g. “ClickFlare - Auto Insurance”). Helps you recognize it in the list. |
| Postback URL | The ClickFlare postback URL that LanderLab will call when a lead is submitted. This is where ClickFlare registers the conversion. |
| Click ID URL Parameter | The name of the URL parameter that ClickFlare uses to pass the click ID to your landing page (typically clickid). This tells LanderLab where to read the click ID from the incoming URL. |
Step 2: Map Your Fields
In this step, you configure which data fields are sent with the postback when a conversion fires. LanderLab automatically includes the ClickFlare Click ID as a mapped field.Review the default ClickFlare field
By default, the field mapping includes:
The
| Form Field | Postback Parameter | Description |
|---|---|---|
| ClickFlare Click ID | click_id | The unique click ID captured from the URL when the visitor arrived on your page. This is required for ClickFlare to match the conversion to the correct visit. |
click_id parameter is what ClickFlare expects to receive in the postback URL.Add additional parameters (optional)
Under the Additional fields section, click + Add field to pass extra data with the postback. This is useful if your ClickFlare setup requires additional parameters like payout, transaction ID, or custom conversion type.Common examples:
| Key | Value example | Description |
|---|---|---|
payout | 10.00 | The conversion payout value. Use a static amount or a dynamic token if your setup supports it. |
txid | {{Lead ID}} | A unique transaction ID to distinguish multiple conversions from the same click ID (useful for upsells or multi-step funnels). |
ct | lead | The custom conversion type. Used to track different conversion events like lead, purchase, or trial. |
Only add extra parameters if your ClickFlare postback URL or campaign setup requires them. For a basic lead generation setup, the
click_id field alone is sufficient.Step 3: Review and Connect
Review your ClickFlare integration
The final step shows a complete summary of the integration. Review the postback URL, the click ID URL parameter, and all mapped fields to make sure everything is correct before activating.If anything looks wrong, click Back to return to the previous steps.
How to Find Your ClickFlare Postback URL
The postback URL is the URL that LanderLab calls when a conversion happens. Here is how to find it inside ClickFlare:Open Tracking URLs
Click the gear icon in the top left corner of ClickFlare to open the Settings menu. Select Tracking URLs.
Copy the Postback URL
In the Tracking URLs section, find the S2S Postback URL. It will look similar to:Copy this URL. This is the value you paste into the Postback URL field in LanderLab.
Identify your Click ID parameter
ClickFlare does not automatically append the click ID to your landing page URL. You need to manually add the click ID parameter when setting up the lander URL inside your ClickFlare campaign settings.In your ClickFlare campaign, go to the lander settings and add the click ID parameter to your landing page URL. It should look like this:The parameter name before
= (in this example, clickid) is what you enter in the Click ID URL Parameter field in LanderLab. This tells LanderLab which URL parameter to read the click ID from when a visitor arrives on your page.ClickFlare uses two interchangeable macros for the click ID:
{cf_click_id} and {click_id}. Both work the same way. The parameter name you choose (e.g. clickid, sub1, s1) is what matters, not the macro name.Understanding the Full Tracking Flow
Here is the complete picture of how a ClickFlare conversion gets tracked through LanderLab:- Visitor clicks your ad - ClickFlare generates a unique click ID and appends it to the landing page URL:
https://yourdomain.com/landing-page?clickid=abc123xyz - Visitor lands on your LanderLab page - LanderLab reads the
clickidparameter from the URL and stores the valueabc123xyzin the session. - Visitor submits the form - LanderLab fires a GET request to your ClickFlare postback URL with the click ID:
- ClickFlare registers the conversion - ClickFlare matches
abc123xyzto the original click record and attributes the conversion to the correct campaign, traffic source, ad, and creative. - Conversion appears in ClickFlare reports - You can verify the conversion in ClickFlare under Logs > Conversion Logs.
Tips for ClickFlare Integration
- Match the parameter name exactly - The value you enter in the Click ID URL Parameter field must match the parameter name used in your ClickFlare campaign’s lander URL exactly (case-sensitive). If your lander URL uses
clickid, enterclickid. If it usessub1, entersub1. - Test with a live click - The best way to verify the integration is working is to click your actual ClickFlare campaign link (not just open the landing page URL directly), submit a test lead, and then check Logs > Conversion Logs in ClickFlare within a minute to confirm the conversion was registered.
- Check your postback URL format - The postback URL from ClickFlare may already include
{clickid}as a placeholder. LanderLab replaces this automatically with the real click ID value when firing the postback. You do not need to manually replace it. - Use txid for multi-step funnels - If your funnel has multiple conversion events (such as a lead submission followed by an upsell), add a unique
txidparameter in the Additional fields section to distinguish each conversion event for the same click ID.