

Estimated time: about 10 minutes. You complete this once per sending account, then connect it to each landing page.
Before you start
Google account ready
A Gmail or Google Workspace address to send notifications from.
2-Step Verification on
Required before you can create an app password.
LanderLab access
Edit access to the landing page project.
Recipient address
The inbox that should receive the lead notifications.
Part 1: Generate a Gmail app password
1
Enable 2-Step Verification
Open your Google Account, go to the Security tab, and turn on 2-Step Verification if it is not already active.
Google requires 2-Step Verification to be on before the app password option becomes available.
2
Open the app passwords page
3
Create the password
In the App name field, type a clear label so you can find it later, for example 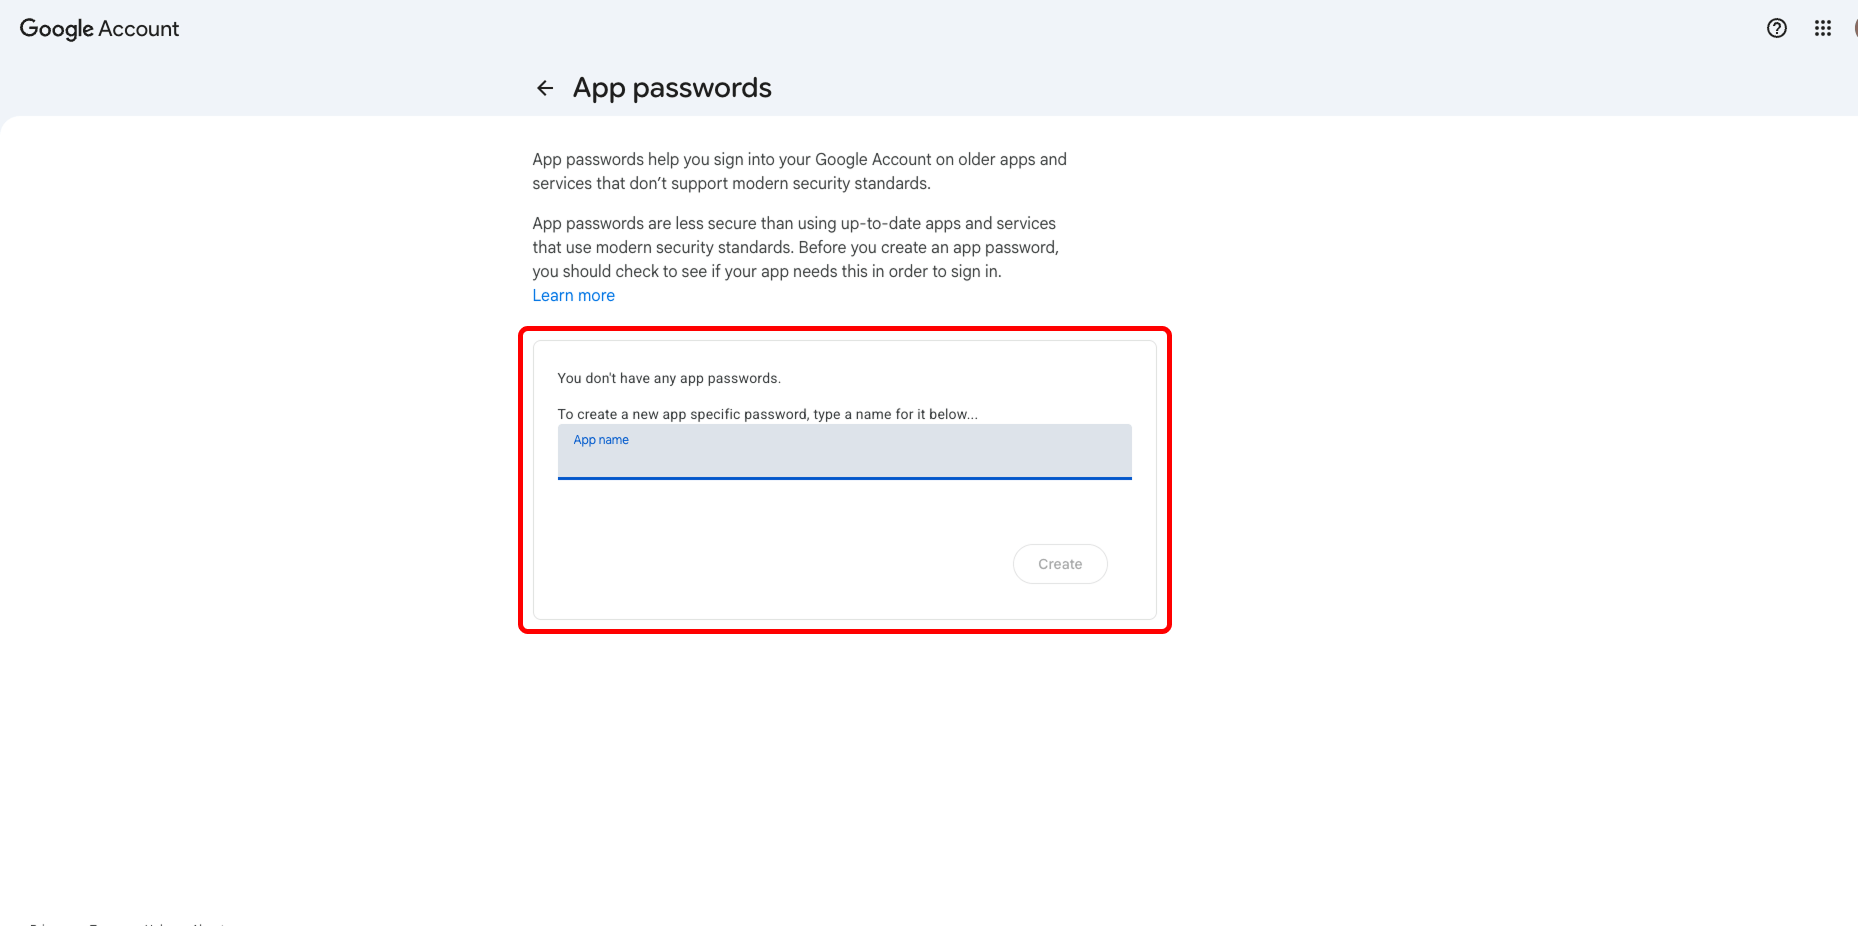
Landerlab. Click Create.4
Copy the 16-character password
Google shows a 16-character password once. Copy it now and remove any spaces so it pastes as one unbroken string.
Part 2: Add the email integration in LanderLab
1
Open the integration browser
Open the LP project, go to the Integrations area, then click Add integration. In the search box, type 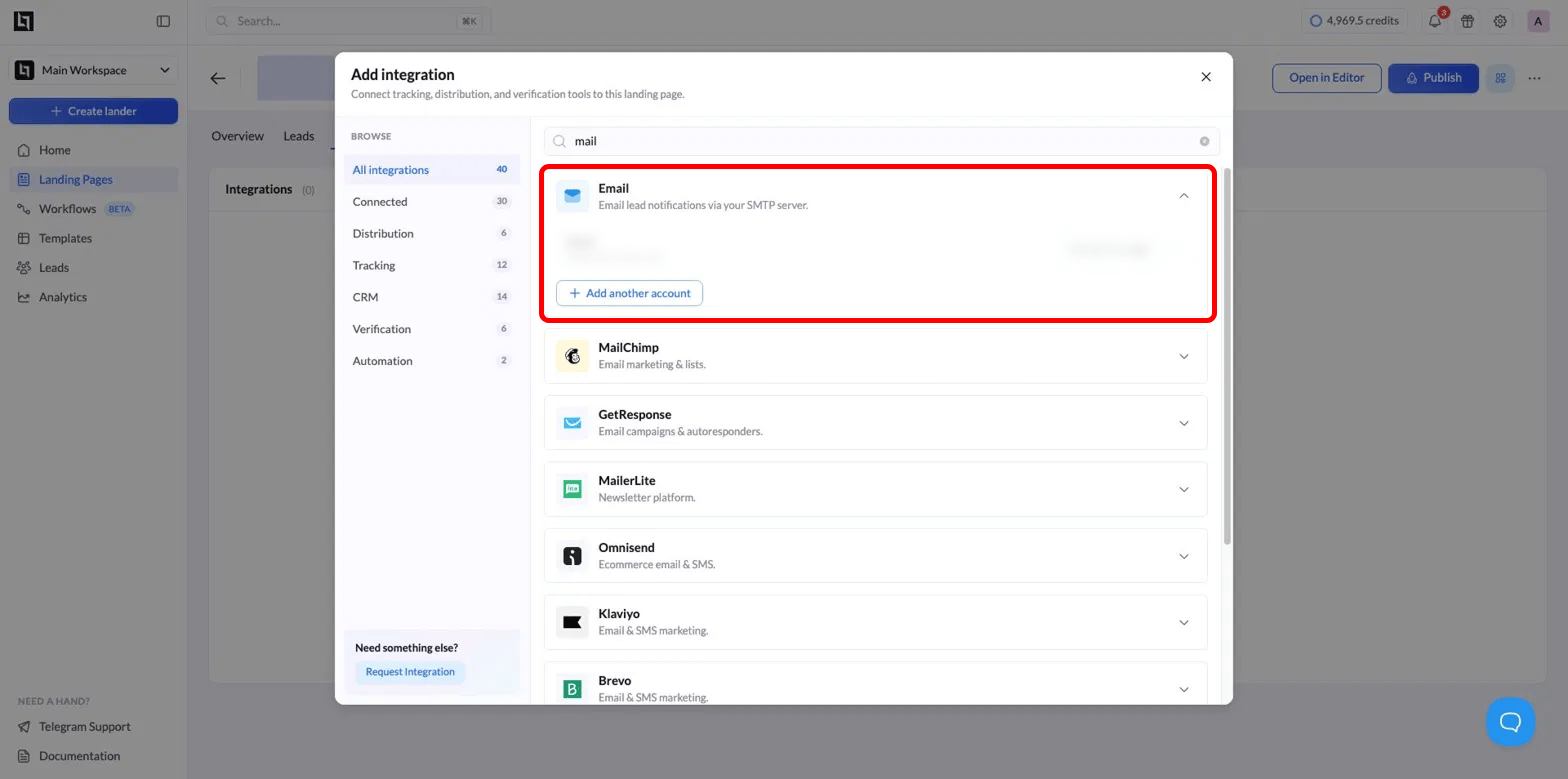
mail.2
Expand the Email option
Find the Email result labeled “Email lead notifications via your SMTP server” and expand it.
3
Fill the SMTP connection form
Enter these values for Gmail: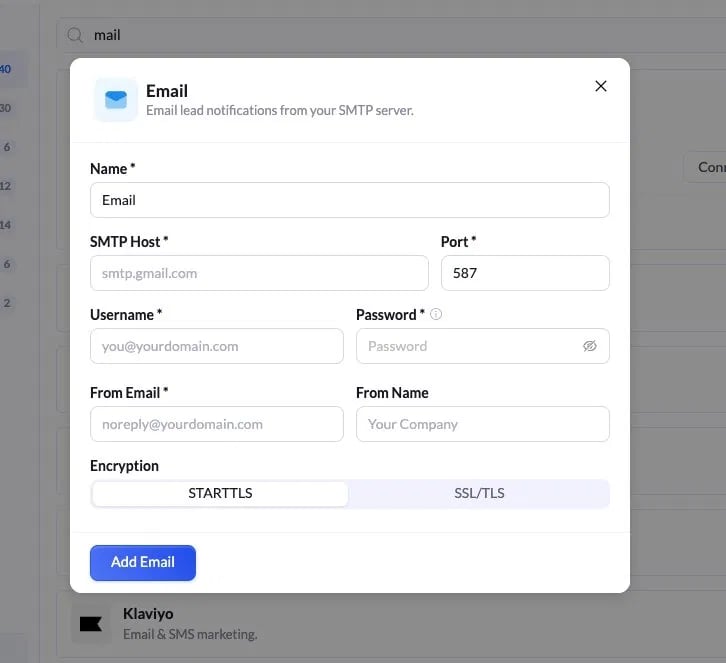
4
Save the connection
Click Add Email. The account now appears in your integrations list as connected, with the time it was added.
To use more than one sending account, click Add another account rather than overwriting the existing one.
Part 3: Connect the email to the page
Adding the SMTP account only stores the credentials. You still have to connect it to the landing page and choose who receives leads.1
Start the connection
On the Email integration row, click Connect to page.
2
Set recipients
Fill the recipient fields: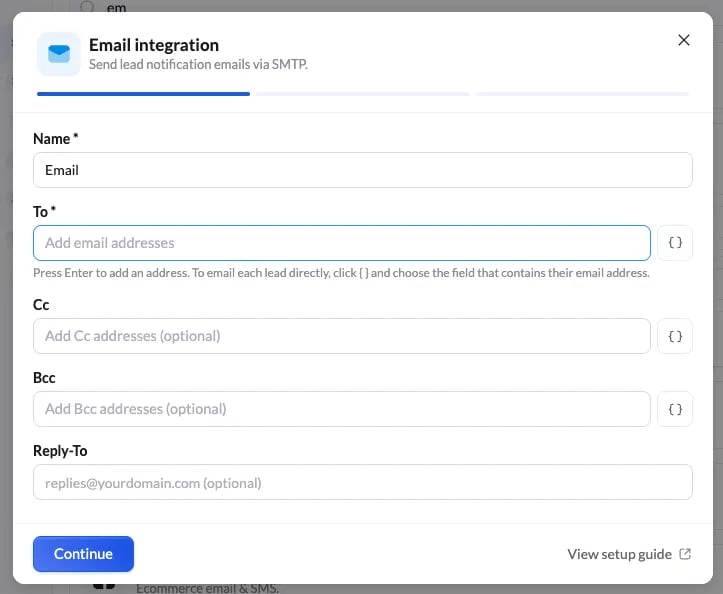
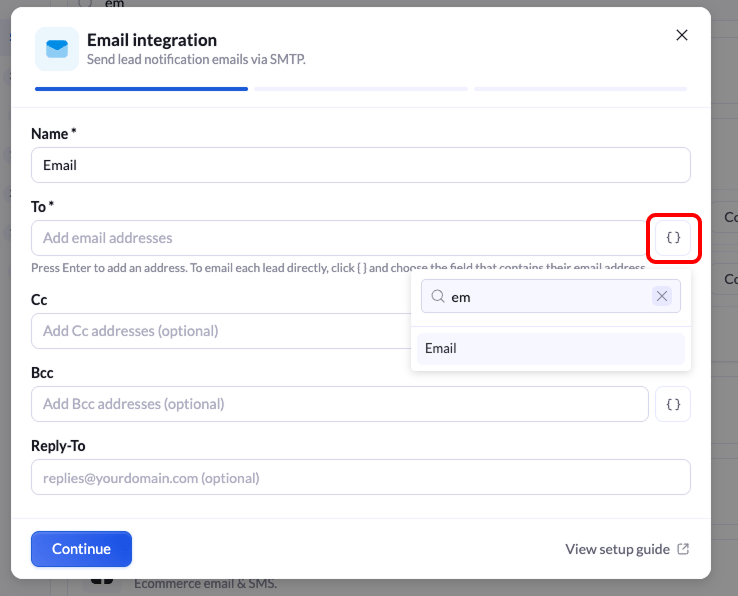
Send the email to the lead instead of a fixed address
Next to To, Cc, and Bcc you will see a{ } button. This lets you pick a form field instead of typing a fixed address, so each notification goes to the address that visitor submitted.1
Click the { } button
Click
{ } next to the field you want to fill.2
Search for the field
Start typing the field name, for example
em, and select Email from the list.3
Save the recipient
The field is added as a recipient. Every lead now receives the notification at the email address they entered on the form.
3
Set the email content
Choose what the notification looks like: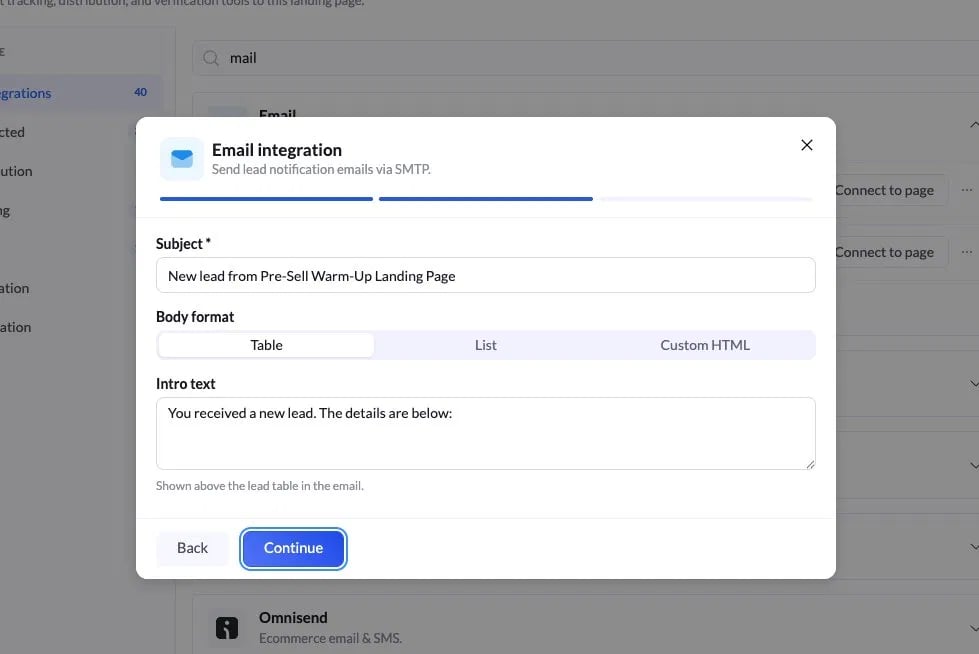
Click Continue.
4
(Optional) Build a custom HTML body
If you select Custom HTML, you can lay out the email yourself and insert LanderLab merge fields. Type 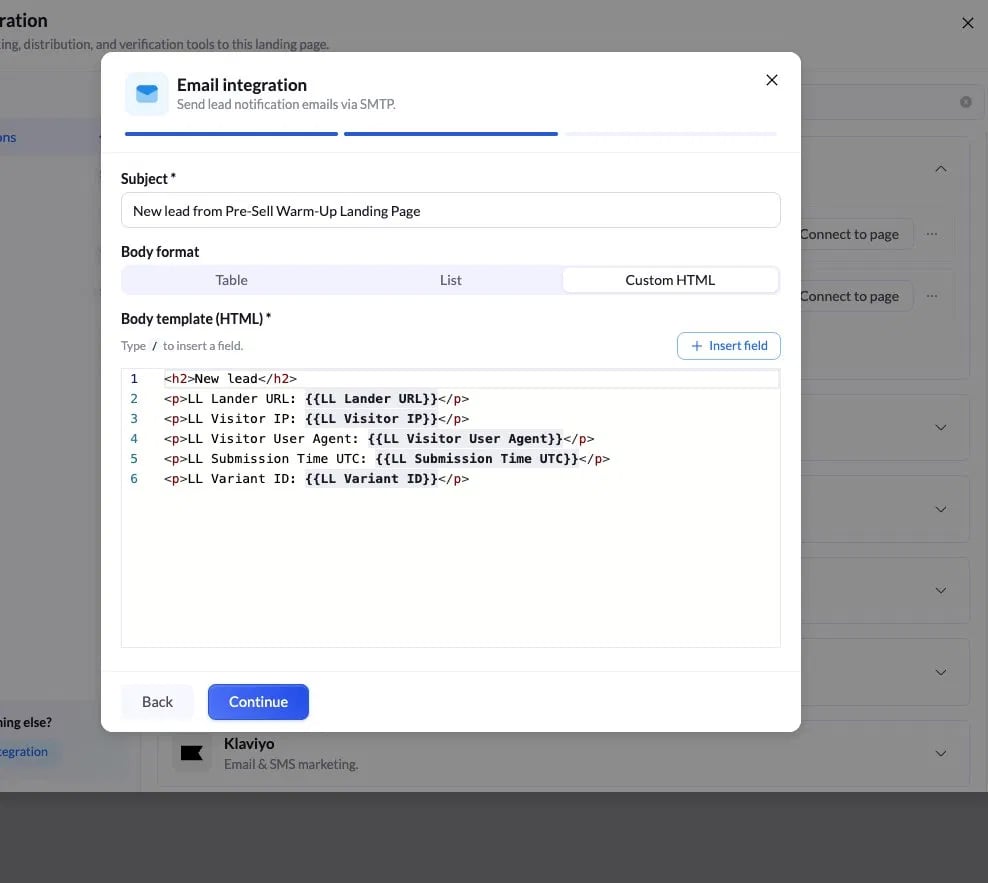 Common fields:Click Continue to finish.
/ in the editor or use Insert field.{{LL Lander URL}}: landing page the lead came from{{LL Visitor IP}}: visitor IP address{{LL Visitor User Agent}}: visitor browser and device{{LL Submission Time UTC}}: when the lead was submitted{{LL Variant ID}}: which LP variant the lead came from
Custom HTML body
Part 4: Verify it works
1
Submit a test lead
Open the LP preview and submit a test lead through the form.
2
Confirm delivery
Check that the notification email arrives at the To address. If it does not arrive within a minute or two, check the spam folder.
3
Check the content
Confirm the subject line and body fields render as expected.
When a test lead lands in your inbox with the correct subject and fields, the integration is live.
Troubleshooting
Authentication failed when saving
Authentication failed when saving
The normal Gmail password was used. Replace it with the 16-character app password from Part 1.
Cannot create an app password
Cannot create an app password
2-Step Verification is not enabled on the Google account. Turn it on in the Security tab, then retry.
Connection times out or is refused
Connection times out or is refused
The port and encryption do not match. Use
587 with STARTTLS, or 465 with SSL/TLS.App password rejected
App password rejected
Spaces were left in the pasted value. Remove all spaces so it is exactly 16 characters.
The lead did not receive the email
The lead did not receive the email
The To field holds a fixed address instead of a form field. Open the connection, click
{ } next to To, and select the Email field.The Email field is missing from the { } picker
The Email field is missing from the { } picker
The form has no email field. Add one in the editor, save the page, then reopen the integration and select it.
Emails stop sending at high volume
Emails stop sending at high volume
Standard Gmail caps at 2,000 messages per day. For higher volume, use the Google Workspace SMTP relay (
smtp-relay.gmail.com).No email after a real lead
No email after a real lead
The account was added but never connected to the page. Run Part 3. Adding the account and connecting it to the LP are two separate steps.
Quick reference
Gmail SMTP settings