> ## Documentation Index
> Fetch the complete documentation index at: https://docs.landerlab.io/llms.txt
> Use this file to discover all available pages before exploring further.
# 将 LanderLab MCP 连接到 Codex
> 通过 MCP 将 LanderLab 连接到 Codex。在 Codex CLI、IDE 扩展或桌面应用中添加服务器,登录一次,即可管理落地页、线索和数据分析。
通过 MCP 将 LanderLab 连接到 Codex,即可在终端、编辑器或桌面应用中管理落地页、线索、数据分析和 A/B 测试。你只需添加一次 LanderLab 服务器,并使用你的 LanderLab 账户登录,无需 API 密钥。
## 准备工作
* 一个 LanderLab 账户。
* 在你的电脑上安装 Codex:Codex CLI、Codex IDE 扩展或 ChatGPT 桌面应用。安装详情请参见 [Codex MCP 文档](https://developers.openai.com/codex/mcp)。
Codex CLI、IDE 扩展和桌面应用共享同一份 MCP 配置。在其中任意一个中设置好 LanderLab,三者都可以使用。
## 如何将 LanderLab 连接到 Codex
选择你使用的 Codex 客户端。所有方式使用的服务器 URL 都相同:
```text theme={null}
https://api.landerlab.dev/mcp
```
Codex CLI 在你的终端中运行。你可以在同一个窗口中添加 LanderLab 并登录。
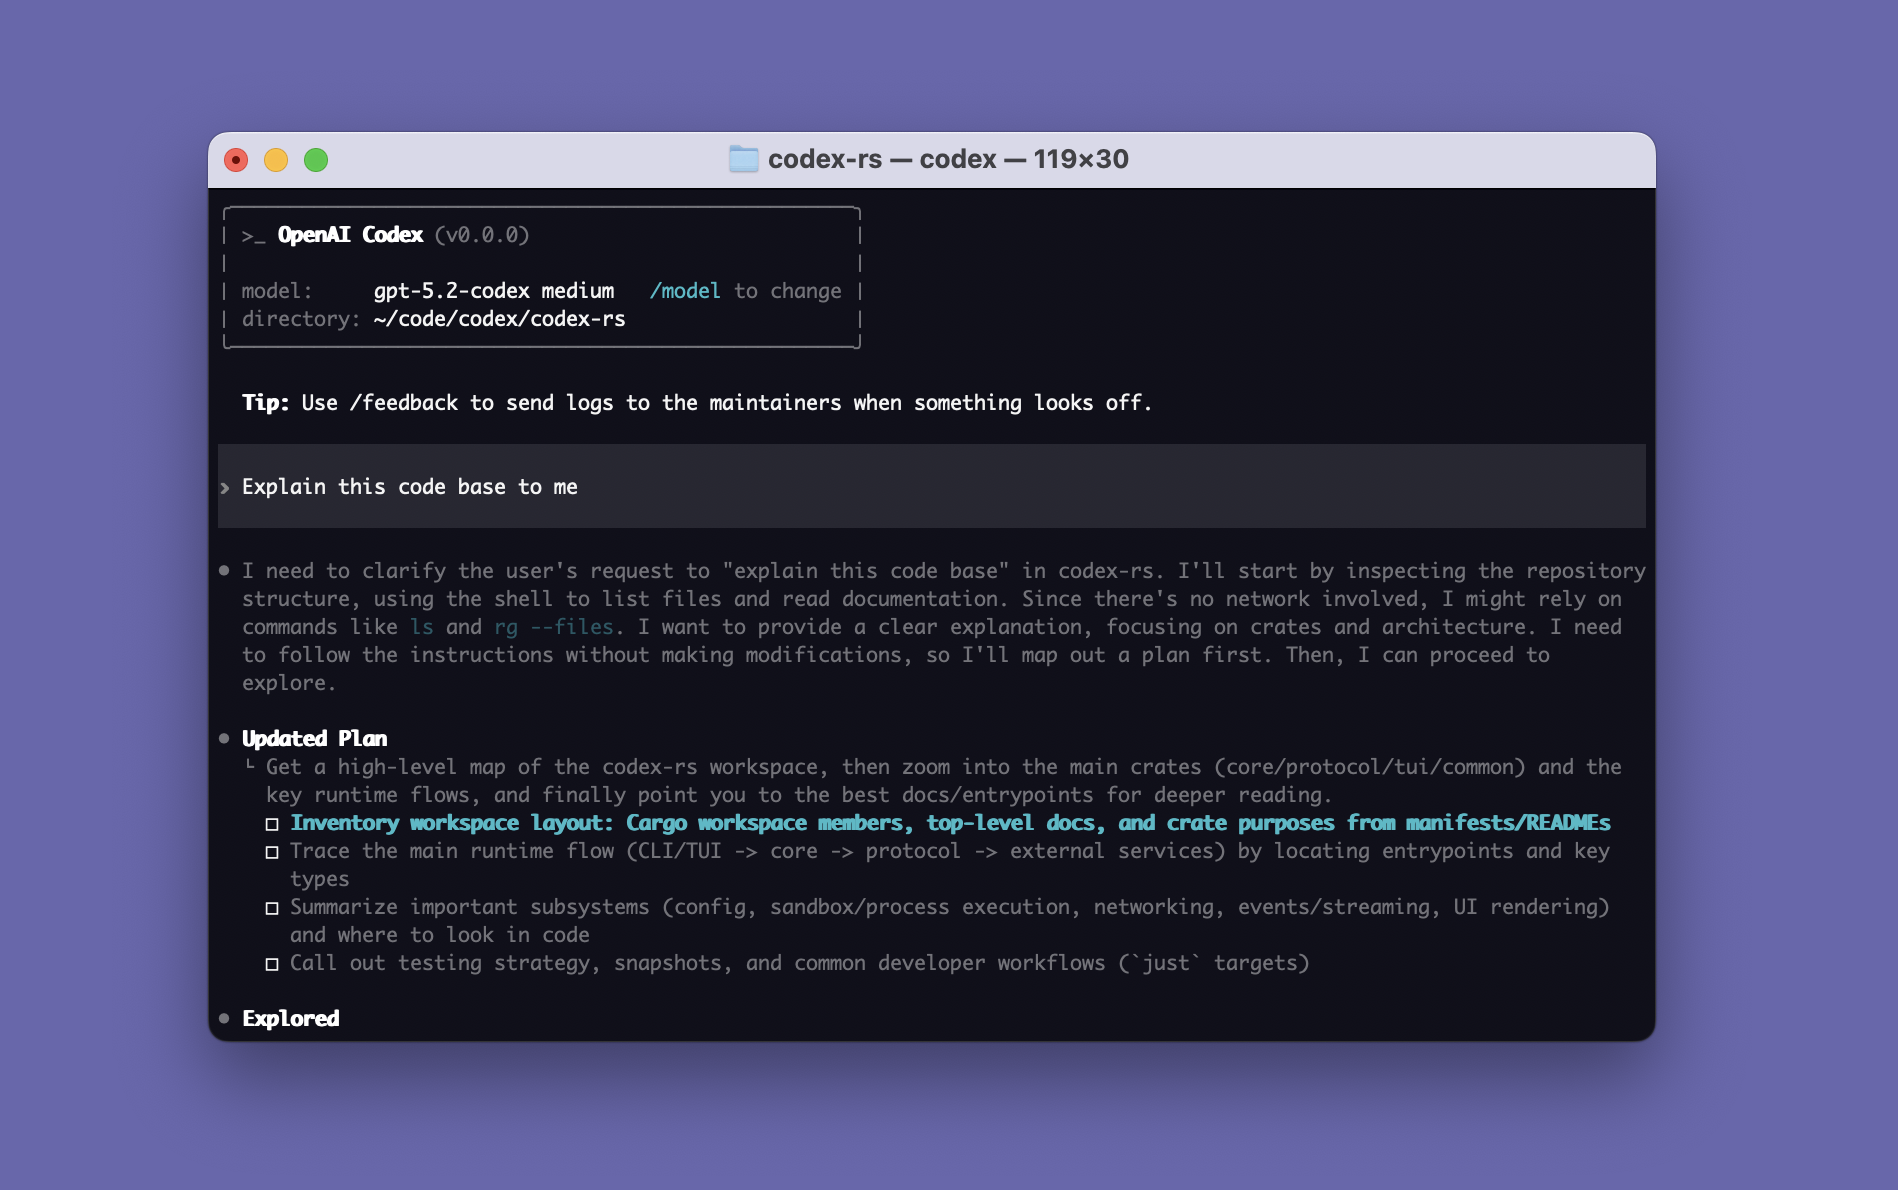 打开终端并运行:
```bash theme={null}
codex mcp add landerlab --url https://api.landerlab.dev/mcp
```
无需 API 密钥,也无需请求头。
如果添加服务器后 Codex 没有自动开始登录,请运行:
```bash theme={null}
codex mcp login landerlab
```
浏览器会打开 LanderLab 登录页面。登录后查看访问请求并点击 **Authorize**。终端确认登录成功后,返回终端即可。
在左侧边栏中点击 **Customize** 图标,打开 **Plugins** 页面。
点击右上角的 **Add**,然后选择 **Create MCP App**。
打开终端并运行:
```bash theme={null}
codex mcp add landerlab --url https://api.landerlab.dev/mcp
```
无需 API 密钥,也无需请求头。
如果添加服务器后 Codex 没有自动开始登录,请运行:
```bash theme={null}
codex mcp login landerlab
```
浏览器会打开 LanderLab 登录页面。登录后查看访问请求并点击 **Authorize**。终端确认登录成功后,返回终端即可。
在左侧边栏中点击 **Customize** 图标,打开 **Plugins** 页面。
点击右上角的 **Add**,然后选择 **Create MCP App**。
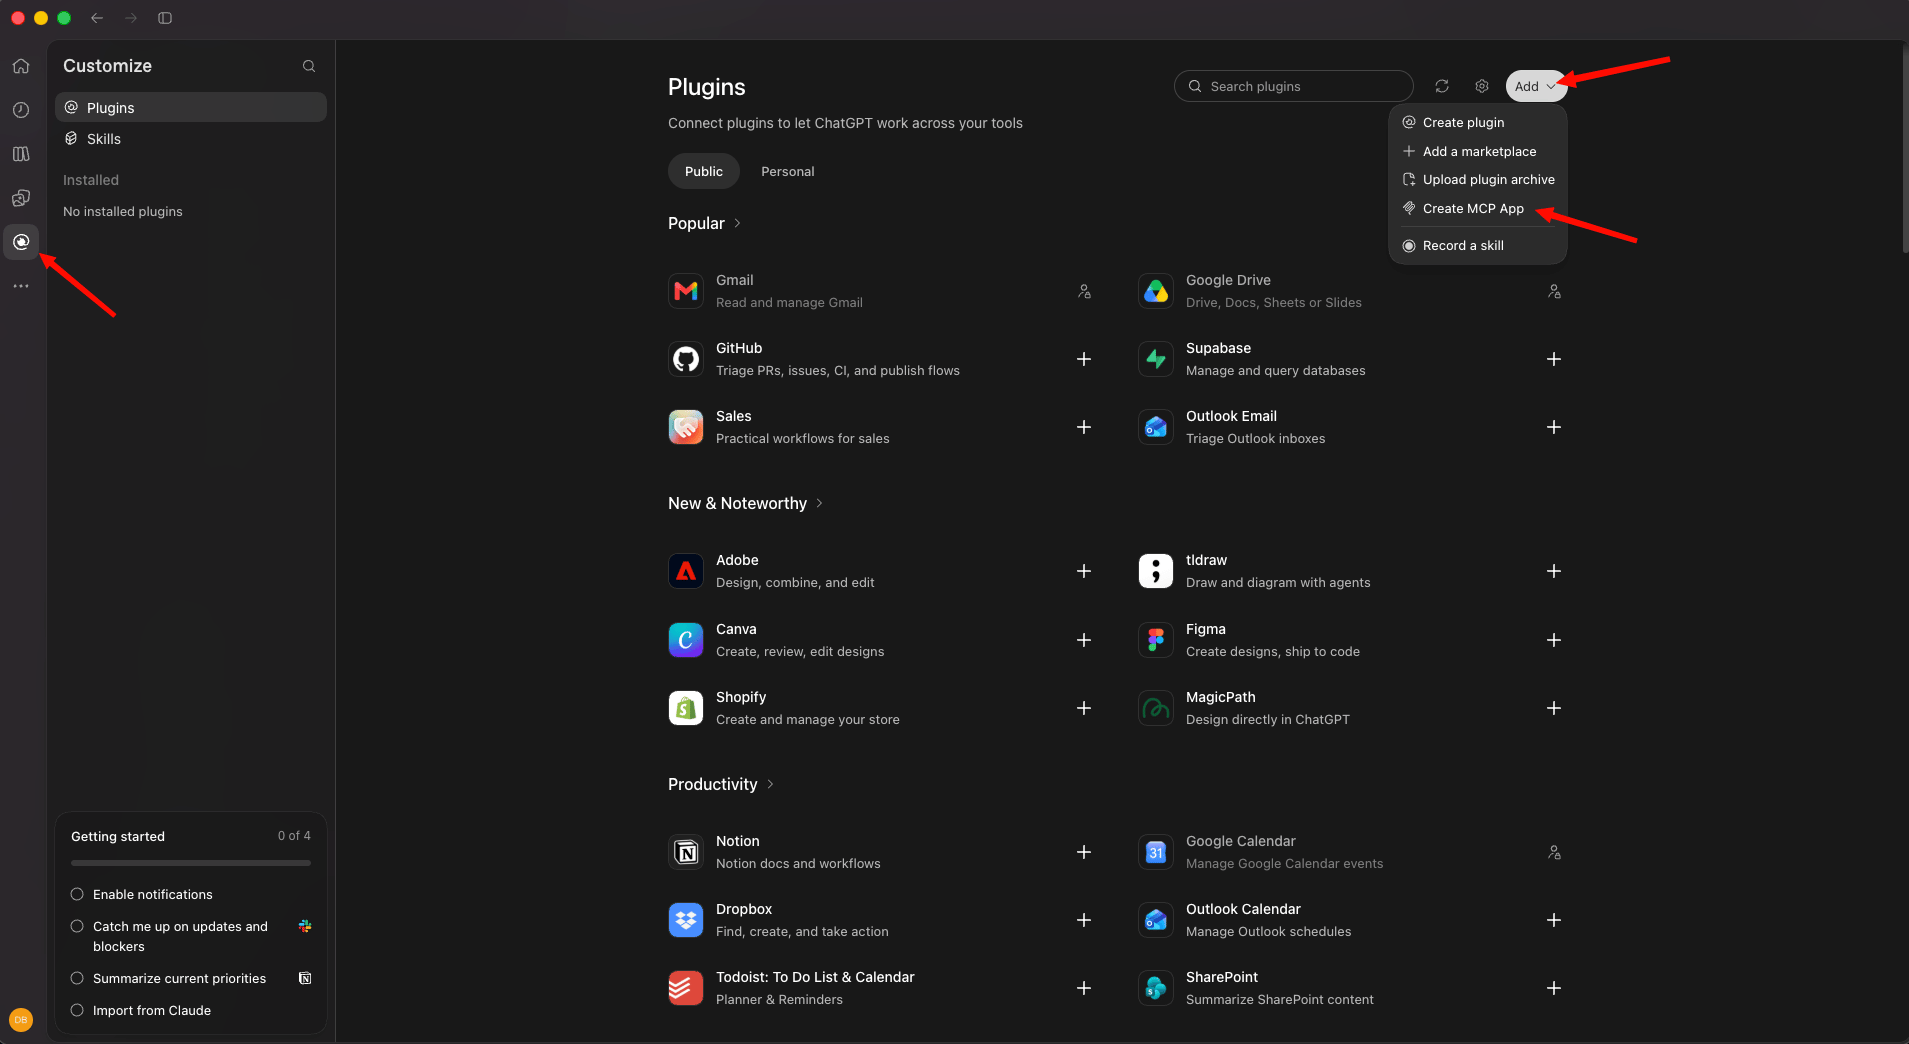 在 **New Plugin** 窗口中,将 **Name** 设为 `LanderLab`。在 **Connection** 下,保持选中 **Server URL**,并粘贴 `https://api.landerlab.dev/mcp`。**Authentication** 保持为 **OAuth**。你无需修改 **Advanced OAuth settings**。
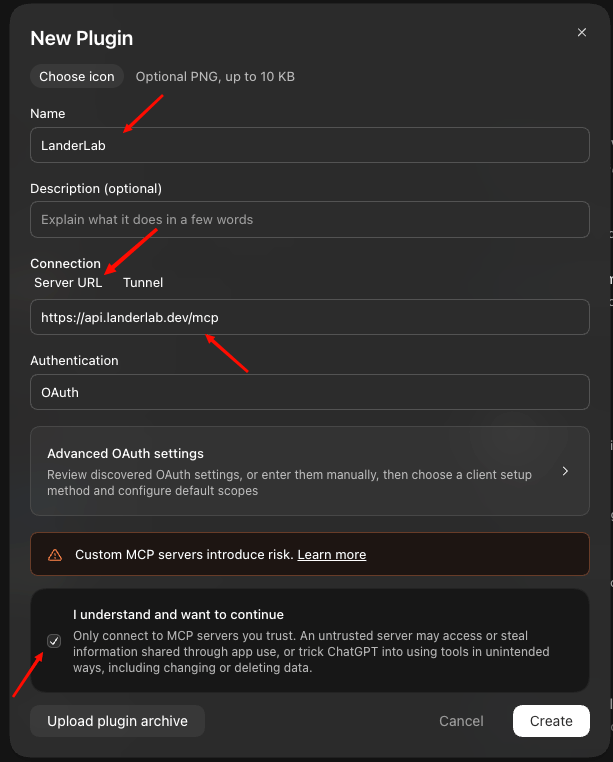 勾选 **I understand and want to continue**,然后点击 **Create**。
浏览器会打开 LanderLab 登录页面。登录后查看访问请求并点击 **Authorize**。
在 Codex IDE 扩展中,打开齿轮菜单并选择 **MCP settings** > **Open config.toml**。你也可以直接打开 `~/.codex/config.toml` 文件。
添加以下代码块并保存文件:
```toml theme={null}
[mcp_servers.landerlab]
url = "https://api.landerlab.dev/mcp"
```
如果文件中已有其他服务器,请将此代码块添加到它们下方。
在终端中运行:
```bash theme={null}
codex mcp login landerlab
```
浏览器会打开 LanderLab 登录页面。登录后查看访问请求并点击 **Authorize**。
## 验证连接
在 Codex 会话中输入 `/mcp`。`landerlab` 服务器应出现在活跃服务器列表中。你也可以在终端中运行 `codex mcp list` 检查其状态。
然后输入:
```text theme={null}
List my LanderLab workspaces
```
Codex 会调用 `workspaces_list` 并返回结果。
## 示例提示词
* “列出我所有的落地页及其发布状态”
* “显示落地页 X 最近 7 天的数据分析”
* “取消发布落地页 X”
* “将落地页 X 的 A/B 测试权重设置为 60/40”
## 管理访问权限
你的连接会一直保持有效,直到你撤销它。要断开连接,可以在终端中运行 `codex mcp logout landerlab`,或在 LanderLab 中打开 **Settings > Connected Apps** 并在那里撤销访问权限。要从 Codex 中彻底移除该服务器,请运行 `codex mcp remove landerlab`。
## 故障排查
**"OAuth authorization endpoint origin does not match the authorization server origin without issuer-bound callbacks"** - 有些 Codex 版本会在浏览器打开之前中止 LanderLab 登录。请改用 `mcp-remote` 桥接连接,它会在 Codex 之外处理登录。此方式需要 [Node.js](https://nodejs.org)。将 `~/.codex/config.toml` 中的 `landerlab` 代码块替换为:
```toml theme={null}
[mcp_servers.landerlab]
command = "npx"
args = ["-y", "mcp-remote", "https://api.landerlab.dev/mcp"]
startup_timeout_sec = 60
```
重启 Codex。服务器首次启动时,浏览器会打开 LanderLab 登录页面。
**LanderLab 工具不可用** - 检查 `config.toml` 是否为有效的 TOML,并且使用的是 `[mcp_servers.landerlab]`,而不是 `mcpServers`。每次修改后都要重启 Codex。
**服务器已列出但未登录** - 重新运行 `codex mcp login landerlab`。如果浏览器没有打开,请复制终端中输出的 URL 并手动打开。
**401 Unauthorized** - 你的会话已过期,或访问权限已在 LanderLab 中被撤销。先运行 `codex mcp logout landerlab`,再运行 `codex mcp login landerlab`。
**服务器已添加到项目中但未加载** - Codex 只会在受信任的项目中读取项目级的 `.codex/config.toml`。请信任该项目,或改为将服务器添加到 `~/.codex/config.toml`。
**从 API 密钥方式迁移** - 从 `landerlab` 代码块中删除 `http_headers`、`env_http_headers` 或 `bearer_token_env_var` 行以及旧的 `url` 值,然后按照上述步骤操作。
## 相关内容
* [通过 MCP 将 AI 助手连接到 LanderLab](/zh/mcp/overview)
* [将 LanderLab 连接到 ChatGPT](/zh/mcp/ai-assistants/chatgpt)
* [将 LanderLab MCP 连接到 Claude Code](/zh/mcp/ai-assistants/claude-code)
* [将 LanderLab MCP 连接到 Cursor](/zh/mcp/ai-assistants/cursor)
This documentation is built and hosted on [Mintlify](https://mintlify.com), a developer documentation platform.
勾选 **I understand and want to continue**,然后点击 **Create**。
浏览器会打开 LanderLab 登录页面。登录后查看访问请求并点击 **Authorize**。
在 Codex IDE 扩展中,打开齿轮菜单并选择 **MCP settings** > **Open config.toml**。你也可以直接打开 `~/.codex/config.toml` 文件。
添加以下代码块并保存文件:
```toml theme={null}
[mcp_servers.landerlab]
url = "https://api.landerlab.dev/mcp"
```
如果文件中已有其他服务器,请将此代码块添加到它们下方。
在终端中运行:
```bash theme={null}
codex mcp login landerlab
```
浏览器会打开 LanderLab 登录页面。登录后查看访问请求并点击 **Authorize**。
## 验证连接
在 Codex 会话中输入 `/mcp`。`landerlab` 服务器应出现在活跃服务器列表中。你也可以在终端中运行 `codex mcp list` 检查其状态。
然后输入:
```text theme={null}
List my LanderLab workspaces
```
Codex 会调用 `workspaces_list` 并返回结果。
## 示例提示词
* “列出我所有的落地页及其发布状态”
* “显示落地页 X 最近 7 天的数据分析”
* “取消发布落地页 X”
* “将落地页 X 的 A/B 测试权重设置为 60/40”
## 管理访问权限
你的连接会一直保持有效,直到你撤销它。要断开连接,可以在终端中运行 `codex mcp logout landerlab`,或在 LanderLab 中打开 **Settings > Connected Apps** 并在那里撤销访问权限。要从 Codex 中彻底移除该服务器,请运行 `codex mcp remove landerlab`。
## 故障排查
**"OAuth authorization endpoint origin does not match the authorization server origin without issuer-bound callbacks"** - 有些 Codex 版本会在浏览器打开之前中止 LanderLab 登录。请改用 `mcp-remote` 桥接连接,它会在 Codex 之外处理登录。此方式需要 [Node.js](https://nodejs.org)。将 `~/.codex/config.toml` 中的 `landerlab` 代码块替换为:
```toml theme={null}
[mcp_servers.landerlab]
command = "npx"
args = ["-y", "mcp-remote", "https://api.landerlab.dev/mcp"]
startup_timeout_sec = 60
```
重启 Codex。服务器首次启动时,浏览器会打开 LanderLab 登录页面。
**LanderLab 工具不可用** - 检查 `config.toml` 是否为有效的 TOML,并且使用的是 `[mcp_servers.landerlab]`,而不是 `mcpServers`。每次修改后都要重启 Codex。
**服务器已列出但未登录** - 重新运行 `codex mcp login landerlab`。如果浏览器没有打开,请复制终端中输出的 URL 并手动打开。
**401 Unauthorized** - 你的会话已过期,或访问权限已在 LanderLab 中被撤销。先运行 `codex mcp logout landerlab`,再运行 `codex mcp login landerlab`。
**服务器已添加到项目中但未加载** - Codex 只会在受信任的项目中读取项目级的 `.codex/config.toml`。请信任该项目,或改为将服务器添加到 `~/.codex/config.toml`。
**从 API 密钥方式迁移** - 从 `landerlab` 代码块中删除 `http_headers`、`env_http_headers` 或 `bearer_token_env_var` 行以及旧的 `url` 值,然后按照上述步骤操作。
## 相关内容
* [通过 MCP 将 AI 助手连接到 LanderLab](/zh/mcp/overview)
* [将 LanderLab 连接到 ChatGPT](/zh/mcp/ai-assistants/chatgpt)
* [将 LanderLab MCP 连接到 Claude Code](/zh/mcp/ai-assistants/claude-code)
* [将 LanderLab MCP 连接到 Cursor](/zh/mcp/ai-assistants/cursor)
This documentation is built and hosted on [Mintlify](https://mintlify.com), a developer documentation platform.