> ## Documentation Index
> Fetch the complete documentation index at: https://docs.landerlab.io/llms.txt
> Use this file to discover all available pages before exploring further.
# Connect LanderLab MCP to Codex
> Connect LanderLab to Codex using MCP. Add the server in the Codex CLI, IDE extension, or desktop app, sign in once, and manage landers, leads, and analytics.
Connect LanderLab to Codex with MCP to manage landing pages, leads, analytics, and A/B tests from your terminal, editor, or desktop app. You add the LanderLab server once and sign in with your LanderLab account. No API key is required.
## What You Need
* A LanderLab account.
* Codex on your machine: the Codex CLI, the Codex IDE extension, or the ChatGPT desktop app. See the [Codex MCP documentation](https://developers.openai.com/codex/mcp) for installation details.
The Codex CLI, IDE extension, and desktop app share the same MCP configuration. Set up LanderLab in one of them and it is available in all three.
## How to Connect LanderLab to Codex
Choose the Codex client you use. The server URL is the same in every option:
```text theme={null}
https://api.landerlab.dev/mcp
```
The Codex CLI runs in your terminal. You add LanderLab and sign in from the same window.
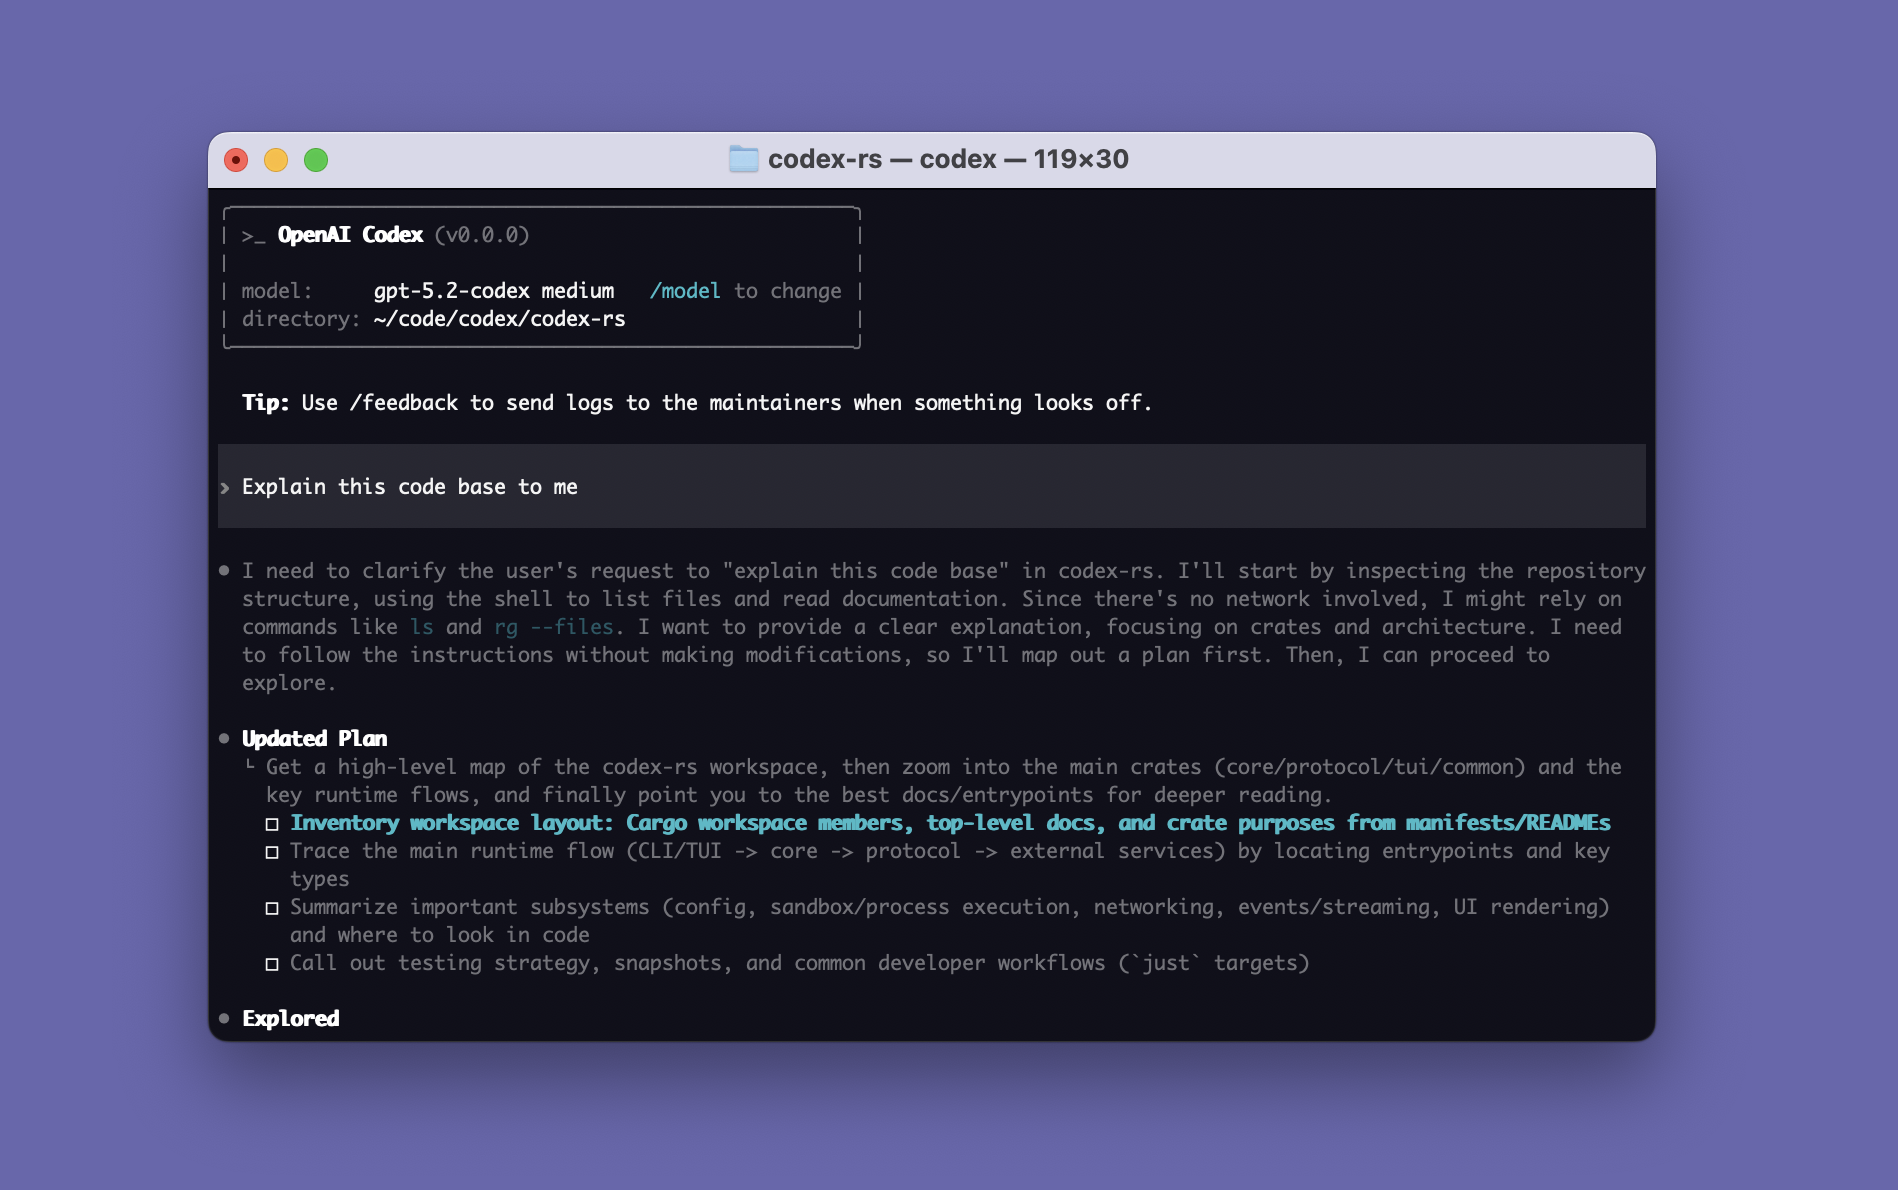 Open your terminal and run:
```bash theme={null}
codex mcp add landerlab --url https://api.landerlab.dev/mcp
```
No API key and no headers are needed.
If Codex does not start the sign-in automatically after adding the server, run:
```bash theme={null}
codex mcp login landerlab
```
Your browser opens a LanderLab sign-in page. Log in, review the access request, and click **Authorize**. Return to the terminal once it confirms the login.
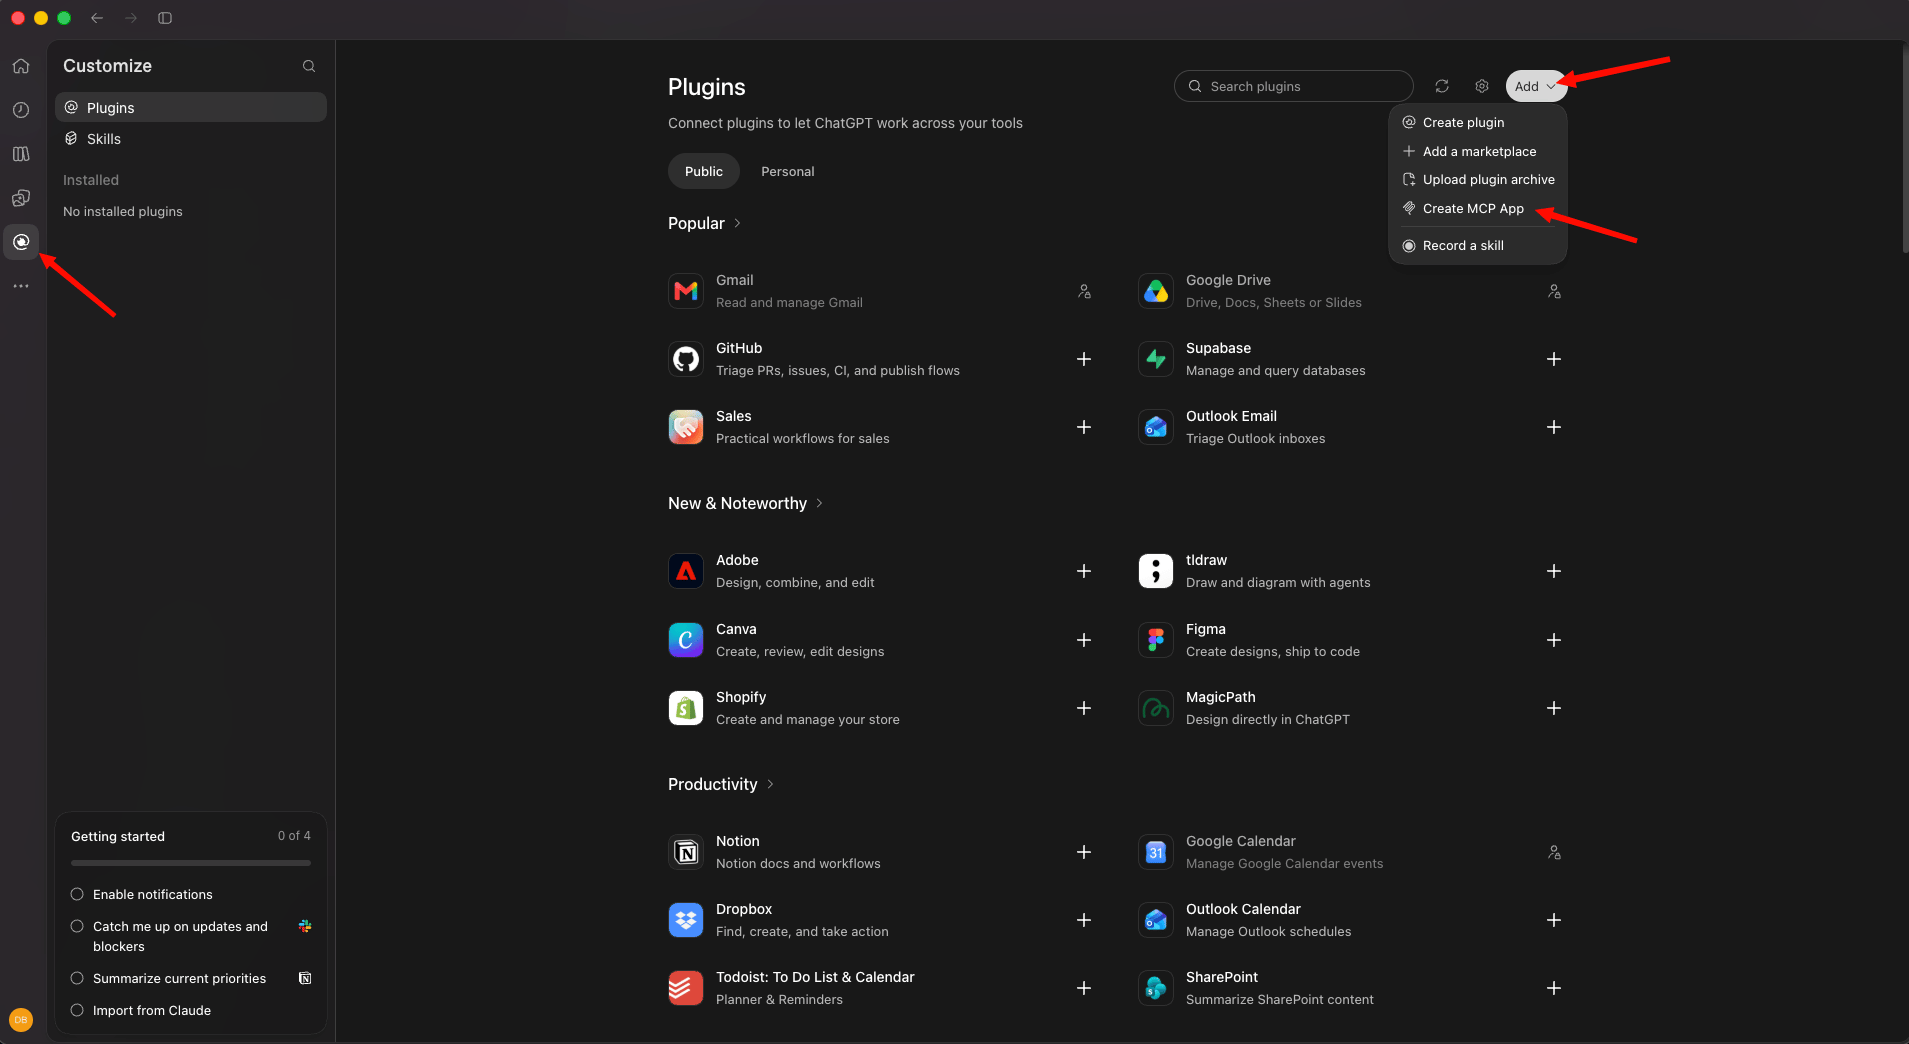
In the left sidebar, click the **Customize** icon. The **Plugins** page opens.
Click **Add** in the top-right corner, then select **Create MCP App**.
Open your terminal and run:
```bash theme={null}
codex mcp add landerlab --url https://api.landerlab.dev/mcp
```
No API key and no headers are needed.
If Codex does not start the sign-in automatically after adding the server, run:
```bash theme={null}
codex mcp login landerlab
```
Your browser opens a LanderLab sign-in page. Log in, review the access request, and click **Authorize**. Return to the terminal once it confirms the login.
In the left sidebar, click the **Customize** icon. The **Plugins** page opens.
Click **Add** in the top-right corner, then select **Create MCP App**.
 In the **New Plugin** window, enter `LanderLab` as the **Name**. Under **Connection**, keep **Server URL** selected and paste `https://api.landerlab.dev/mcp`. Leave **Authentication** set to **OAuth**. You do not need to change **Advanced OAuth settings**.
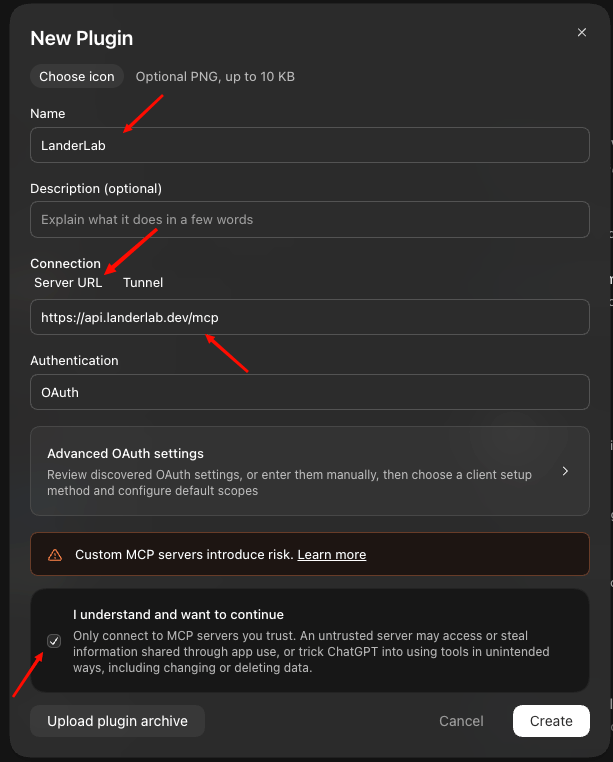 Check **I understand and want to continue**, then click **Create**.
Your browser opens a LanderLab sign-in page. Log in, review the access request, and click **Authorize**.
In the Codex IDE extension, open the gear menu and select **MCP settings** > **Open config.toml**. You can also open the file directly at `~/.codex/config.toml`.
Add the following block and save the file:
```toml theme={null}
[mcp_servers.landerlab]
url = "https://api.landerlab.dev/mcp"
```
If the file already has other servers, add this block below them.
In your terminal, run:
```bash theme={null}
codex mcp login landerlab
```
Your browser opens a LanderLab sign-in page. Log in, review the access request, and click **Authorize**.
## Verify the Connection
In a Codex session, type `/mcp`. The `landerlab` server should appear in the list of active servers. From the terminal, you can also run `codex mcp list` to check its status.
Then ask:
```text theme={null}
List my LanderLab workspaces
```
Codex calls `workspaces_list` and returns your results.
## Example Prompts
* "List all my landers and their publish status"
* "Show analytics for lander X over the last 7 days"
* "Unpublish lander X"
* "Set A/B test weights to 60/40 for lander X"
## Managing Access
Your connection stays active until you revoke it. To disconnect, run `codex mcp logout landerlab` in your terminal, or open **Settings > Connected Apps** in LanderLab and revoke access there. To remove the server from Codex completely, run `codex mcp remove landerlab`.
## Troubleshooting
**"OAuth authorization endpoint origin does not match the authorization server origin without issuer-bound callbacks"** - Some Codex versions stop the LanderLab sign-in before the browser opens. Connect through the `mcp-remote` bridge instead, which handles sign-in outside Codex. It requires [Node.js](https://nodejs.org). Replace the `landerlab` block in `~/.codex/config.toml` with:
```toml theme={null}
[mcp_servers.landerlab]
command = "npx"
args = ["-y", "mcp-remote", "https://api.landerlab.dev/mcp"]
startup_timeout_sec = 60
```
Restart Codex. The first time the server starts, your browser opens the LanderLab sign-in page.
**LanderLab tools not available** - Check that `config.toml` is valid TOML and uses `[mcp_servers.landerlab]`, not `mcpServers`. Restart Codex after any change.
**Server listed but not logged in** - Run `codex mcp login landerlab` again. If the browser does not open, copy the URL printed in the terminal and open it manually.
**401 Unauthorized** - Your session expired or access was revoked in LanderLab. Run `codex mcp logout landerlab`, then `codex mcp login landerlab`.
**Server added to a project but not loading** - Codex only reads a project-level `.codex/config.toml` in trusted projects. Trust the project or add the server to `~/.codex/config.toml` instead.
**Migrating from the API key setup** - Remove the `http_headers`, `env_http_headers`, or `bearer_token_env_var` line and the old `url` value from the `landerlab` block, then follow the steps above.
## Related
* [Connect AI Assistants to LanderLab via MCP](/mcp/overview)
* [Connect LanderLab to ChatGPT](/mcp/ai-assistants/chatgpt)
* [Connect LanderLab MCP to Claude Code](/mcp/ai-assistants/claude-code)
* [Connect LanderLab MCP to Cursor](/mcp/ai-assistants/cursor)
Check **I understand and want to continue**, then click **Create**.
Your browser opens a LanderLab sign-in page. Log in, review the access request, and click **Authorize**.
In the Codex IDE extension, open the gear menu and select **MCP settings** > **Open config.toml**. You can also open the file directly at `~/.codex/config.toml`.
Add the following block and save the file:
```toml theme={null}
[mcp_servers.landerlab]
url = "https://api.landerlab.dev/mcp"
```
If the file already has other servers, add this block below them.
In your terminal, run:
```bash theme={null}
codex mcp login landerlab
```
Your browser opens a LanderLab sign-in page. Log in, review the access request, and click **Authorize**.
## Verify the Connection
In a Codex session, type `/mcp`. The `landerlab` server should appear in the list of active servers. From the terminal, you can also run `codex mcp list` to check its status.
Then ask:
```text theme={null}
List my LanderLab workspaces
```
Codex calls `workspaces_list` and returns your results.
## Example Prompts
* "List all my landers and their publish status"
* "Show analytics for lander X over the last 7 days"
* "Unpublish lander X"
* "Set A/B test weights to 60/40 for lander X"
## Managing Access
Your connection stays active until you revoke it. To disconnect, run `codex mcp logout landerlab` in your terminal, or open **Settings > Connected Apps** in LanderLab and revoke access there. To remove the server from Codex completely, run `codex mcp remove landerlab`.
## Troubleshooting
**"OAuth authorization endpoint origin does not match the authorization server origin without issuer-bound callbacks"** - Some Codex versions stop the LanderLab sign-in before the browser opens. Connect through the `mcp-remote` bridge instead, which handles sign-in outside Codex. It requires [Node.js](https://nodejs.org). Replace the `landerlab` block in `~/.codex/config.toml` with:
```toml theme={null}
[mcp_servers.landerlab]
command = "npx"
args = ["-y", "mcp-remote", "https://api.landerlab.dev/mcp"]
startup_timeout_sec = 60
```
Restart Codex. The first time the server starts, your browser opens the LanderLab sign-in page.
**LanderLab tools not available** - Check that `config.toml` is valid TOML and uses `[mcp_servers.landerlab]`, not `mcpServers`. Restart Codex after any change.
**Server listed but not logged in** - Run `codex mcp login landerlab` again. If the browser does not open, copy the URL printed in the terminal and open it manually.
**401 Unauthorized** - Your session expired or access was revoked in LanderLab. Run `codex mcp logout landerlab`, then `codex mcp login landerlab`.
**Server added to a project but not loading** - Codex only reads a project-level `.codex/config.toml` in trusted projects. Trust the project or add the server to `~/.codex/config.toml` instead.
**Migrating from the API key setup** - Remove the `http_headers`, `env_http_headers`, or `bearer_token_env_var` line and the old `url` value from the `landerlab` block, then follow the steps above.
## Related
* [Connect AI Assistants to LanderLab via MCP](/mcp/overview)
* [Connect LanderLab to ChatGPT](/mcp/ai-assistants/chatgpt)
* [Connect LanderLab MCP to Claude Code](/mcp/ai-assistants/claude-code)
* [Connect LanderLab MCP to Cursor](/mcp/ai-assistants/cursor)