> ## Documentation Index
> Fetch the complete documentation index at: https://docs.landerlab.io/llms.txt
> Use this file to discover all available pages before exploring further.
# How to Use LanderLab: Platform Guide to Key Features
> Learn how to use LanderLab end to end: build landing pages and quiz funnels, publish on your domain, route leads, automate workflows, and track results.
This guide shows how to use LanderLab, from your first page to a live campaign that collects and routes leads. It walks through every main area of the platform in the order most teams use it, with a link to the full guide for each feature.
## How to use LanderLab, step by step
Most campaigns follow the same path. Each step links to the section of this guide that covers it.
Generate a landing page with AI, start from a template, or import one you already have. See [create a landing page](#how-to-create-a-landing-page).
Change content in the visual editor by hand, or ask the AI Assistant to do it. See [edit in the visual editor](#how-to-edit-a-page-in-the-visual-editor).
Add a form or a multi-step quiz funnel. See [build a quiz funnel](#how-to-build-a-quiz-funnel).
Send leads to your CRM or buyer and add your ad pixels. See [connect integrations and pixels](#how-to-connect-integrations-and-pixels).
Connect a domain and put the page live. See [publish on your own domain](#how-to-publish-on-your-own-domain).
Read analytics, review leads, and A/B test new versions. See [measure and improve results](#how-to-measure-and-improve-results).
## How to find your way around
Everything starts from the left sidebar. Use the **workspace selector** at the top to switch workspaces, then open the area you need.
| Area | What you do there |
| - | - |
| **Landing Pages** | Create, organize, publish, and open every page and quiz funnel. |
| **Workflows** | Automate what happens after a lead comes in. |
| **Reporting** | Compare performance across all your landing pages. |
| **Integrations** | Save the accounts you connect, such as CRMs, pixels, and Stripe. |
| **Assets > Global Blocks** | Build sections once and reuse them on every page. |
| **Settings** | Manage domains, workspaces, users, AI skills and connectors, logs, and security. |
## How to create a landing page
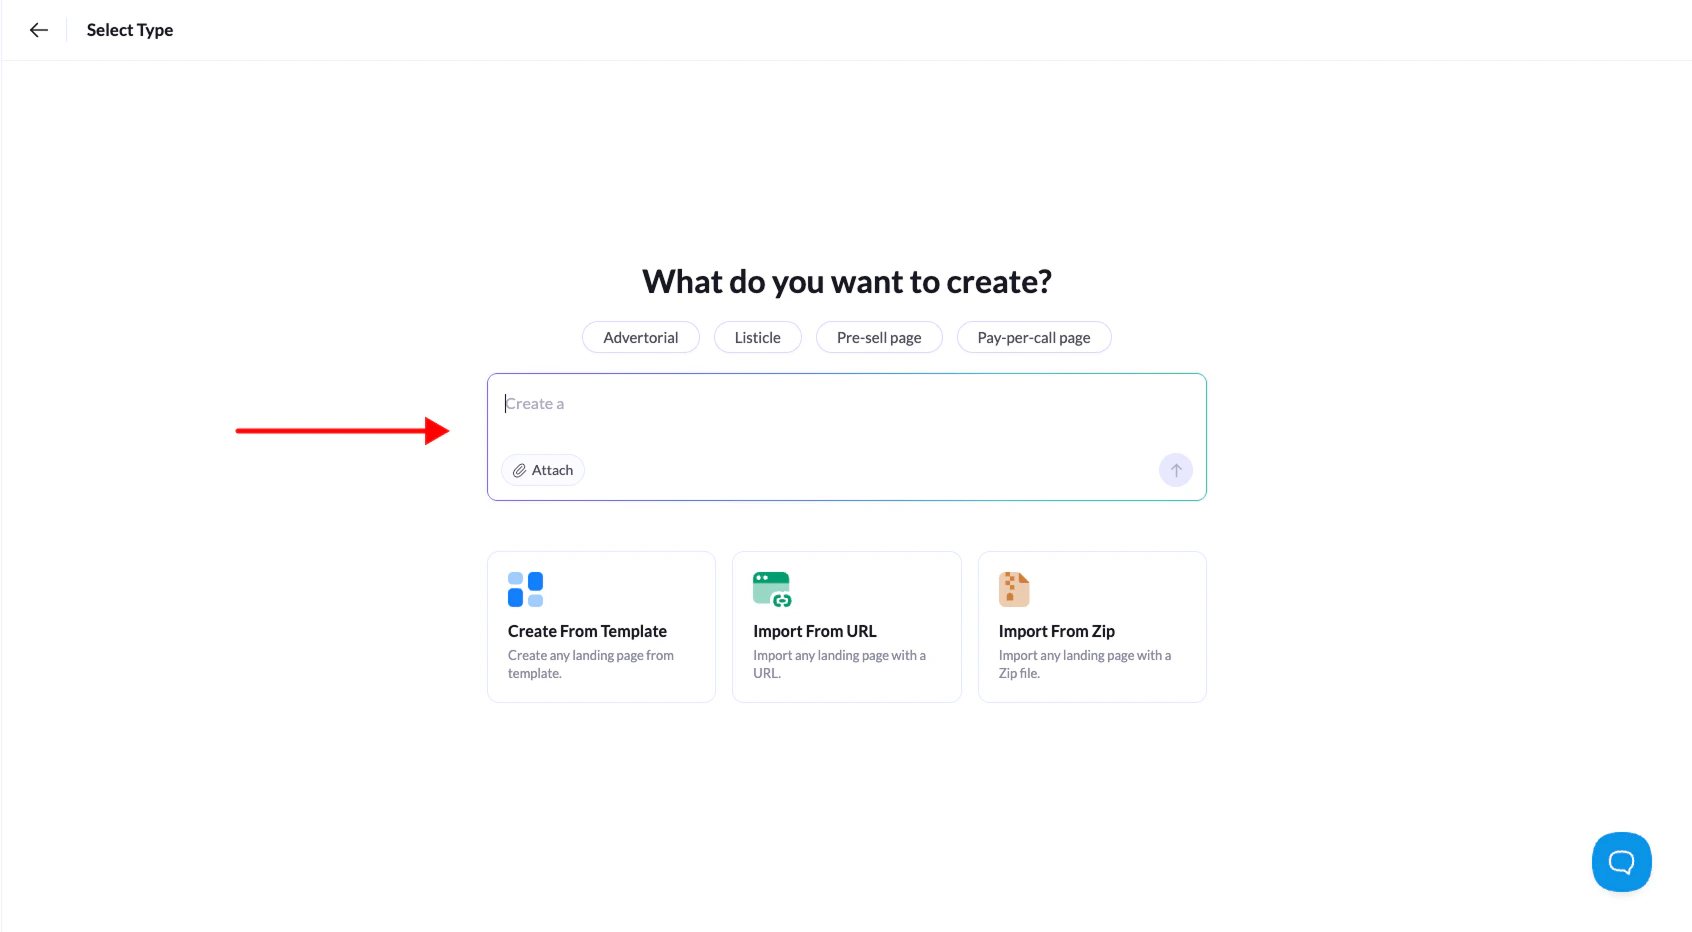 Every page starts from **Landing Pages > Add Landing Page**. Pick the method closest to what you already have.
| Method | Best for |
| - | - |
| [AI Lander Builder](/features/landing-pages/create/with-ai) | A complete first draft in seconds from a short description. |
| [Template](/features/landing-pages/create/from-template) | A proven layout for advertorials, presell pages, or listicles. |
| [From scratch](/features/landing-pages/create/from-scratch) | Full control, starting from a blank page. |
| [Import from URL](/features/landing-pages/create/import-from-url) | Recreating a public page you want to model. |
| [ZIP upload](/features/landing-pages/create/with-zip) | Bringing in a page you already designed and coded. |
Keep pages organized with [folders](/features/landing-pages/folders/create). To reuse a layout that works, [duplicate](/features/landing-pages/operations/duplicate) the page.
## How to edit a page in the visual editor
The visual editor is a drag and drop canvas. Pages are built from [sections](/features/editor/elements/section), and every element lives inside a section. Select any element to change its content and style in the side panel.
* **Elements:** text, images, lists, video, countdowns, accordions, forms, [custom code](/features/editor/elements/custom-code), and [Stripe Checkout](/features/editor/elements/stripe-checkout). Connect your Stripe account in **Integrations** first.
* **Style Manager:** [layout](/features/editor/styles/layout), [spacing](/features/editor/styles/spacing), [typography](/features/editor/styles/typography), [animation](/features/editor/styles/animation), and [device visibility](/features/editor/styles/visibility).
* **Theme:** set brand [colors](/features/editor/theme/colors) and [fonts](/features/editor/theme/fonts) once, and every element follows them.
* **Pop-ups:** build [pop-ups](/features/editor/popup/create) that open on page load, after a delay, on scroll, or on exit intent.
* **Quick actions:** [replace text](/features/editor/quick-actions/replace-text) or [links](/features/editor/quick-actions/replace-links) across the page, [compress images](/features/editor/quick-actions/compress-images), and [pass URL parameters](/features/editor/quick-actions/pass-through-url-parameters) to every link.
* **Structure:** use [Layers](/features/editor/layers) to select nested elements, and save sections as [reusable components](/features/editor/how-to-save-and-reuse-components).
* **Safety nets:** [Version History](/features/editor/version-history) restores earlier versions. [Live Mode](/features/editor/toolbar/live-mode) previews JavaScript effects before you publish.
## How to build and edit with the AI Assistant
Every page starts from **Landing Pages > Add Landing Page**. Pick the method closest to what you already have.
| Method | Best for |
| - | - |
| [AI Lander Builder](/features/landing-pages/create/with-ai) | A complete first draft in seconds from a short description. |
| [Template](/features/landing-pages/create/from-template) | A proven layout for advertorials, presell pages, or listicles. |
| [From scratch](/features/landing-pages/create/from-scratch) | Full control, starting from a blank page. |
| [Import from URL](/features/landing-pages/create/import-from-url) | Recreating a public page you want to model. |
| [ZIP upload](/features/landing-pages/create/with-zip) | Bringing in a page you already designed and coded. |
Keep pages organized with [folders](/features/landing-pages/folders/create). To reuse a layout that works, [duplicate](/features/landing-pages/operations/duplicate) the page.
## How to edit a page in the visual editor
The visual editor is a drag and drop canvas. Pages are built from [sections](/features/editor/elements/section), and every element lives inside a section. Select any element to change its content and style in the side panel.
* **Elements:** text, images, lists, video, countdowns, accordions, forms, [custom code](/features/editor/elements/custom-code), and [Stripe Checkout](/features/editor/elements/stripe-checkout). Connect your Stripe account in **Integrations** first.
* **Style Manager:** [layout](/features/editor/styles/layout), [spacing](/features/editor/styles/spacing), [typography](/features/editor/styles/typography), [animation](/features/editor/styles/animation), and [device visibility](/features/editor/styles/visibility).
* **Theme:** set brand [colors](/features/editor/theme/colors) and [fonts](/features/editor/theme/fonts) once, and every element follows them.
* **Pop-ups:** build [pop-ups](/features/editor/popup/create) that open on page load, after a delay, on scroll, or on exit intent.
* **Quick actions:** [replace text](/features/editor/quick-actions/replace-text) or [links](/features/editor/quick-actions/replace-links) across the page, [compress images](/features/editor/quick-actions/compress-images), and [pass URL parameters](/features/editor/quick-actions/pass-through-url-parameters) to every link.
* **Structure:** use [Layers](/features/editor/layers) to select nested elements, and save sections as [reusable components](/features/editor/how-to-save-and-reuse-components).
* **Safety nets:** [Version History](/features/editor/version-history) restores earlier versions. [Live Mode](/features/editor/toolbar/live-mode) previews JavaScript effects before you publish.
## How to build and edit with the AI Assistant
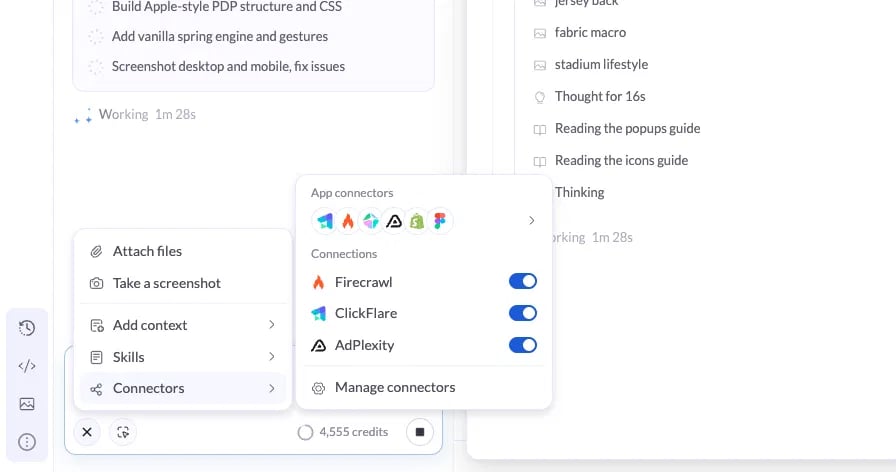 The [AI Assistant](/features/ai/overview) sits next to the canvas in the editor. Describe what you want in plain English. It plans the work, then builds, rewrites, or fixes the page for you.
Click **+** in the prompt box to give it more to work with:
* **Attach files, take a screenshot, or add context** from another landing page. See [add context](/features/ai/add-context).
* **Skills** are reusable instructions for tasks like CRO audits or offer copy. Manage them from **+ > Skills > Manage skills** or **Settings > Skills**. See [skills](/features/ai/skills).
* **Connectors** let the AI use data from other apps and MCP servers. Add one from **Settings > Connectors > Add connector**. See [connectors](/features/ai/connectors).
Every request uses AI credits, and your balance is shown below the prompt box. For prompt tips, see [optimize with AI](/features/ai/optimize-landing-pages).
## How to build a quiz funnel
The [AI Assistant](/features/ai/overview) sits next to the canvas in the editor. Describe what you want in plain English. It plans the work, then builds, rewrites, or fixes the page for you.
Click **+** in the prompt box to give it more to work with:
* **Attach files, take a screenshot, or add context** from another landing page. See [add context](/features/ai/add-context).
* **Skills** are reusable instructions for tasks like CRO audits or offer copy. Manage them from **+ > Skills > Manage skills** or **Settings > Skills**. See [skills](/features/ai/skills).
* **Connectors** let the AI use data from other apps and MCP servers. Add one from **Settings > Connectors > Add connector**. See [connectors](/features/ai/connectors).
Every request uses AI credits, and your balance is shown below the prompt box. For prompt tips, see [optimize with AI](/features/ai/optimize-landing-pages).
## How to build a quiz funnel
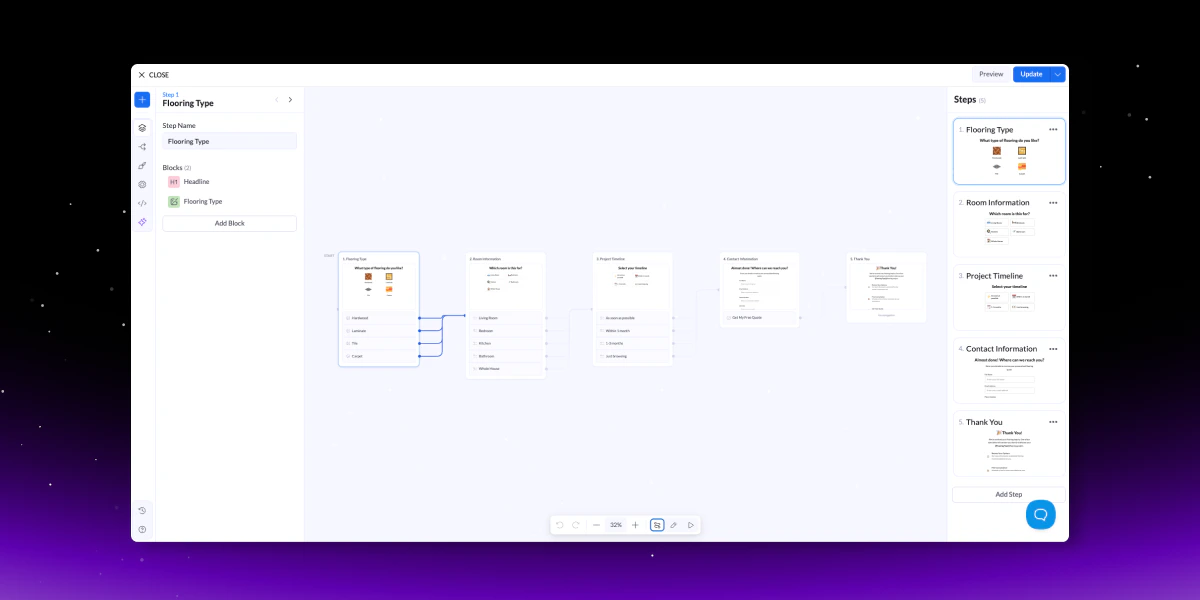 A [quiz funnel](/features/quizzes/get-started) is a multi-step flow that qualifies visitors before they submit. You add it as a **Quiz** element inside a landing page, so it uses the same domains, integrations, and analytics as any page.
Drag the Quiz element onto the canvas. Then [generate it with AI](/features/quizzes/create/with-ai), [start from a template](/features/quizzes/create/from-template), or [build it from scratch](/features/quizzes/create/from-scratch).
| Feature | What it does |
| - | - |
| [Steps](/features/quizzes/managing-steps) and [blocks](/features/quizzes/blocks/multiple-choice) | Questions, image choices, input fields, hidden fields, signatures, and file uploads. |
| [Validation](/features/quizzes/validation/general) | Checks emails and phone numbers, and verifies phones by SMS with the [OTP block](/features/quizzes/validation/one-time-password). |
| [Conditional logic](/features/quizzes/conditions/conditional-logic) | Sends visitors down different paths based on their answers. [Advanced rules](/features/quizzes/conditions/advanced-navigation-rules) combine answers across steps. |
| [Visibility conditions](/features/quizzes/conditions/visibility) | Shows or hides blocks based on earlier answers. |
| [Formulas](/features/quizzes/formulas) | Calculates values such as a score or savings estimate from answers, and shows the result in any step. |
| [Drop-offs](/features/quizzes/drop-off) | Shows where visitors leave the quiz. |
## How to reuse sections with Global Blocks
A [quiz funnel](/features/quizzes/get-started) is a multi-step flow that qualifies visitors before they submit. You add it as a **Quiz** element inside a landing page, so it uses the same domains, integrations, and analytics as any page.
Drag the Quiz element onto the canvas. Then [generate it with AI](/features/quizzes/create/with-ai), [start from a template](/features/quizzes/create/from-template), or [build it from scratch](/features/quizzes/create/from-scratch).
| Feature | What it does |
| - | - |
| [Steps](/features/quizzes/managing-steps) and [blocks](/features/quizzes/blocks/multiple-choice) | Questions, image choices, input fields, hidden fields, signatures, and file uploads. |
| [Validation](/features/quizzes/validation/general) | Checks emails and phone numbers, and verifies phones by SMS with the [OTP block](/features/quizzes/validation/one-time-password). |
| [Conditional logic](/features/quizzes/conditions/conditional-logic) | Sends visitors down different paths based on their answers. [Advanced rules](/features/quizzes/conditions/advanced-navigation-rules) combine answers across steps. |
| [Visibility conditions](/features/quizzes/conditions/visibility) | Shows or hides blocks based on earlier answers. |
| [Formulas](/features/quizzes/formulas) | Calculates values such as a score or savings estimate from answers, and shows the result in any step. |
| [Drop-offs](/features/quizzes/drop-off) | Shows where visitors leave the quiz. |
## How to reuse sections with Global Blocks
 A [global block](/features/global-blocks/get-started) is a section, such as a navbar, footer, or offer CTA, that you build once and place on many pages. Edit the original, and every page that uses it updates automatically.
Open **Assets > Global Blocks**, click **Add Global Block**, and create it with AI, from a preset, or from scratch. Then [add it to any page](/features/global-blocks/use-global-block).
Put your offer link inside a global block. Swapping offers then becomes one change instead of one edit per page.
## How to publish on your own domain
A [global block](/features/global-blocks/get-started) is a section, such as a navbar, footer, or offer CTA, that you build once and place on many pages. Edit the original, and every page that uses it updates automatically.
Open **Assets > Global Blocks**, click **Add Global Block**, and create it with AI, from a preset, or from scratch. Then [add it to any page](/features/global-blocks/use-global-block).
Put your offer link inside a global block. Swapping offers then becomes one change instead of one edit per page.
## How to publish on your own domain
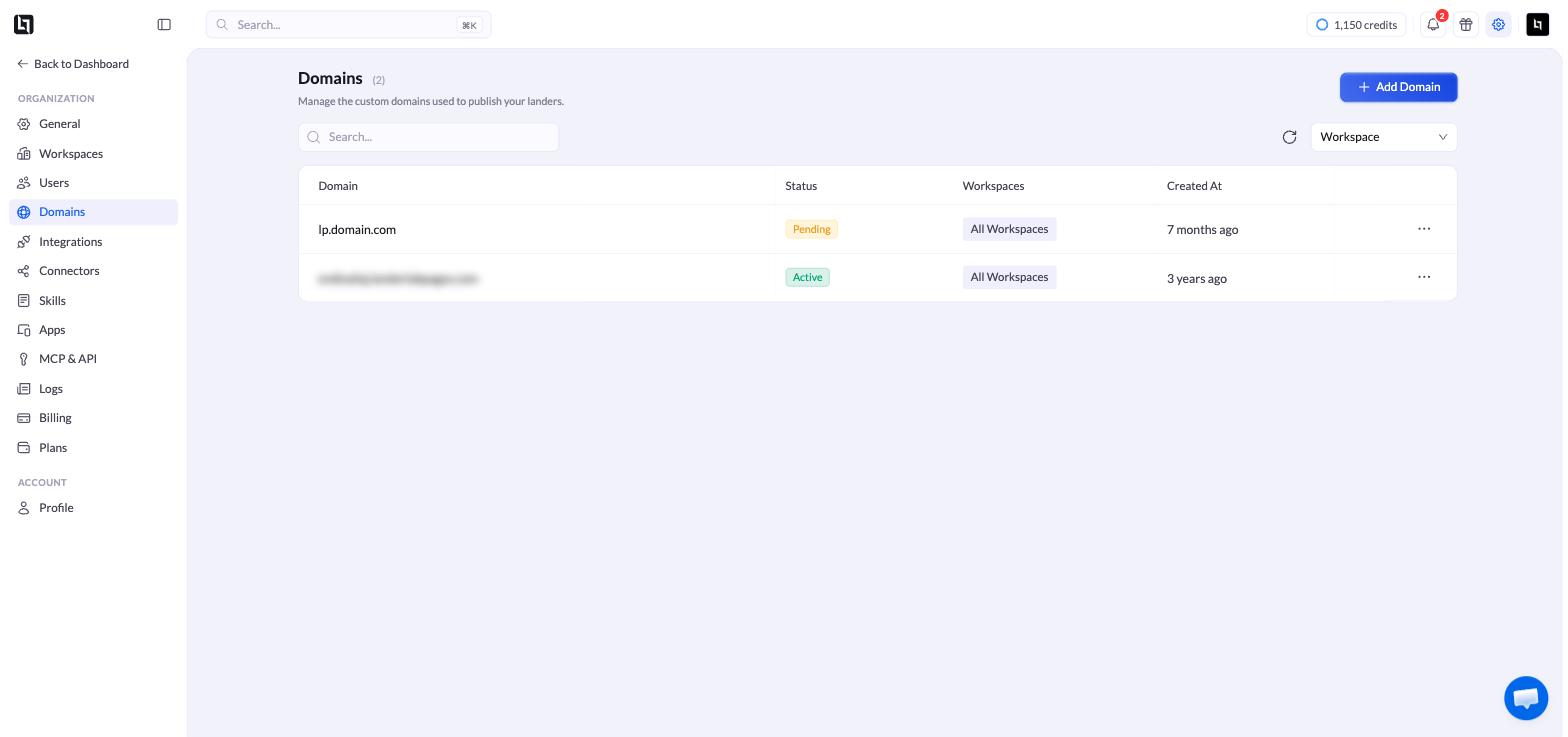 Go to **Settings > Domains** and click **Add Domain**. LanderLab checks your DNS and recommends [Cloudflare](/features/domain/connect-domain-cloudflare) or [Manual DNS](/features/domain/manual-connection). Only admins can add domains.
The domain shows as **Pending** until your DNS changes propagate, then switches to **Active**.
Open the page, click **Publish**, and choose the domain and URL path. See [publish a landing page](/features/landing-pages/operations/publish).
Changes do not go live on their own. After you edit a page or add an integration, [republish](/features/landing-pages/operations/republish) it.
Once a domain is active, its **Settings** let you [disable indexing](/features/domain/settings/disable-indexing) for the whole domain, set a [custom 404 page](/features/domain/settings/404), and add [global scripts](/features/domain/settings/global-scripts) to every page on it.
## How to connect integrations and pixels
Go to **Settings > Domains** and click **Add Domain**. LanderLab checks your DNS and recommends [Cloudflare](/features/domain/connect-domain-cloudflare) or [Manual DNS](/features/domain/manual-connection). Only admins can add domains.
The domain shows as **Pending** until your DNS changes propagate, then switches to **Active**.
Open the page, click **Publish**, and choose the domain and URL path. See [publish a landing page](/features/landing-pages/operations/publish).
Changes do not go live on their own. After you edit a page or add an integration, [republish](/features/landing-pages/operations/republish) it.
Once a domain is active, its **Settings** let you [disable indexing](/features/domain/settings/disable-indexing) for the whole domain, set a [custom 404 page](/features/domain/settings/404), and add [global scripts](/features/domain/settings/global-scripts) to every page on it.
## How to connect integrations and pixels
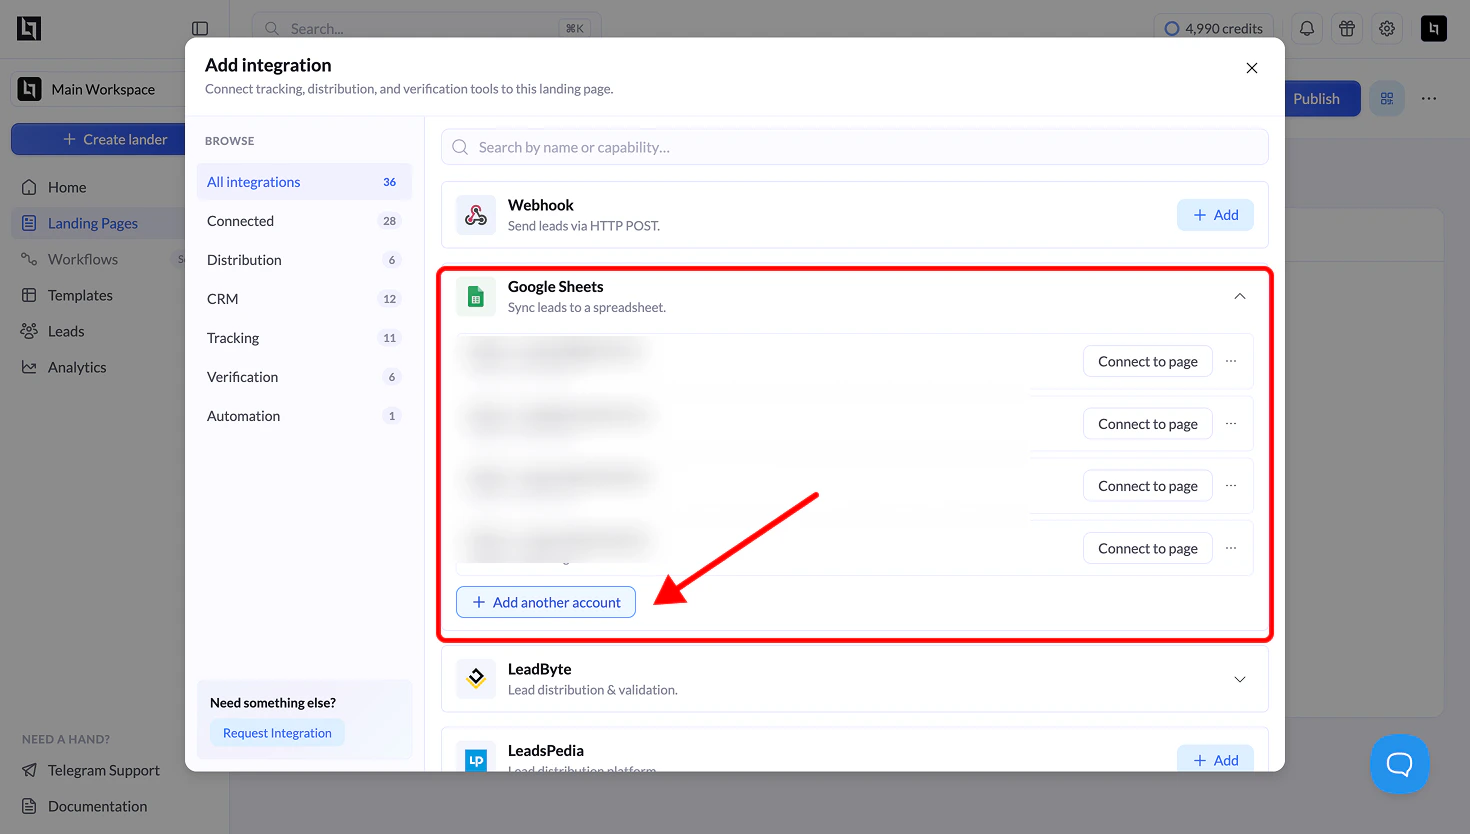 Integrations send your leads and conversion events to other tools. To connect one, open a landing page and click **Add Integration**.
| Category | Examples |
| - | - |
| **Pixels** | [Meta Pixel](/integrations/pixels/meta-pixel), [Meta CAPI](/integrations/pixels/meta-capi), [TikTok](/integrations/pixels/tik-tok), [Taboola](/integrations/pixels/taboola), [Outbrain](/integrations/pixels/outbrain-pixel) |
| **Analytics and tracking** | [Google Analytics](/integrations/analytics/google-analytics), [Microsoft Clarity](/integrations/analytics/microsoft-clarity), [ClickFlare](/community/tracking/track-lead-generation-campaigns-with-clickflare-and-landerlab) |
| **CRM and email marketing** | [HubSpot](/integrations/crm/hub-spot), [Klaviyo](/integrations/crm/klaviyo), [ActiveCampaign](/integrations/crm/active-campaign), [GoHighLevel](/integrations/crm/go-high-level) |
| **Lead distribution** | [Webhook](/integrations/lead-distribution/webhook), [Google Sheets](/integrations/lead-distribution/google-sheets), [LeadByte](/lead-distribution/lead-byte), [LeadsPedia](/integrations/lead-distribution/leads-pedia) |
| **Call tracking** | [Ringba](/integrations/call-tracking/ringba), [Retreaver](/integrations/call-tracking/retreaver) |
| **Lead certification and bot protection** | [TrustedForm](/integrations/lead-certification/trusted-form), [Jornaya](/integrations/lead-certification/journaya), [Cloudflare Turnstile](/integrations/lead-certification/cloudflare-turnstile) |
| **Notifications** | [Slack](/integrations/crm/slack), [Telegram](/integrations/crm/telegram), [Gmail](/integrations/email/gmail) |
Most integrations, including CRMs, pixels, and LeadByte, are saved **globally** and reused across pages. [Webhook](/integrations/lead-distribution/webhook), [LeadsPedia](/integrations/lead-distribution/leads-pedia), [LeadProsper](/integrations/lead-distribution/leadprosper), and [Phonexa](/integrations/lead-distribution/phonexa) are set up on each page instead. CRM integrations also require you to map the email field before you can continue.
## How to manage your leads
Integrations send your leads and conversion events to other tools. To connect one, open a landing page and click **Add Integration**.
| Category | Examples |
| - | - |
| **Pixels** | [Meta Pixel](/integrations/pixels/meta-pixel), [Meta CAPI](/integrations/pixels/meta-capi), [TikTok](/integrations/pixels/tik-tok), [Taboola](/integrations/pixels/taboola), [Outbrain](/integrations/pixels/outbrain-pixel) |
| **Analytics and tracking** | [Google Analytics](/integrations/analytics/google-analytics), [Microsoft Clarity](/integrations/analytics/microsoft-clarity), [ClickFlare](/community/tracking/track-lead-generation-campaigns-with-clickflare-and-landerlab) |
| **CRM and email marketing** | [HubSpot](/integrations/crm/hub-spot), [Klaviyo](/integrations/crm/klaviyo), [ActiveCampaign](/integrations/crm/active-campaign), [GoHighLevel](/integrations/crm/go-high-level) |
| **Lead distribution** | [Webhook](/integrations/lead-distribution/webhook), [Google Sheets](/integrations/lead-distribution/google-sheets), [LeadByte](/lead-distribution/lead-byte), [LeadsPedia](/integrations/lead-distribution/leads-pedia) |
| **Call tracking** | [Ringba](/integrations/call-tracking/ringba), [Retreaver](/integrations/call-tracking/retreaver) |
| **Lead certification and bot protection** | [TrustedForm](/integrations/lead-certification/trusted-form), [Jornaya](/integrations/lead-certification/journaya), [Cloudflare Turnstile](/integrations/lead-certification/cloudflare-turnstile) |
| **Notifications** | [Slack](/integrations/crm/slack), [Telegram](/integrations/crm/telegram), [Gmail](/integrations/email/gmail) |
Most integrations, including CRMs, pixels, and LeadByte, are saved **globally** and reused across pages. [Webhook](/integrations/lead-distribution/webhook), [LeadsPedia](/integrations/lead-distribution/leads-pedia), [LeadProsper](/integrations/lead-distribution/leadprosper), and [Phonexa](/integrations/lead-distribution/phonexa) are set up on each page instead. CRM integrations also require you to map the email field before you can continue.
## How to manage your leads
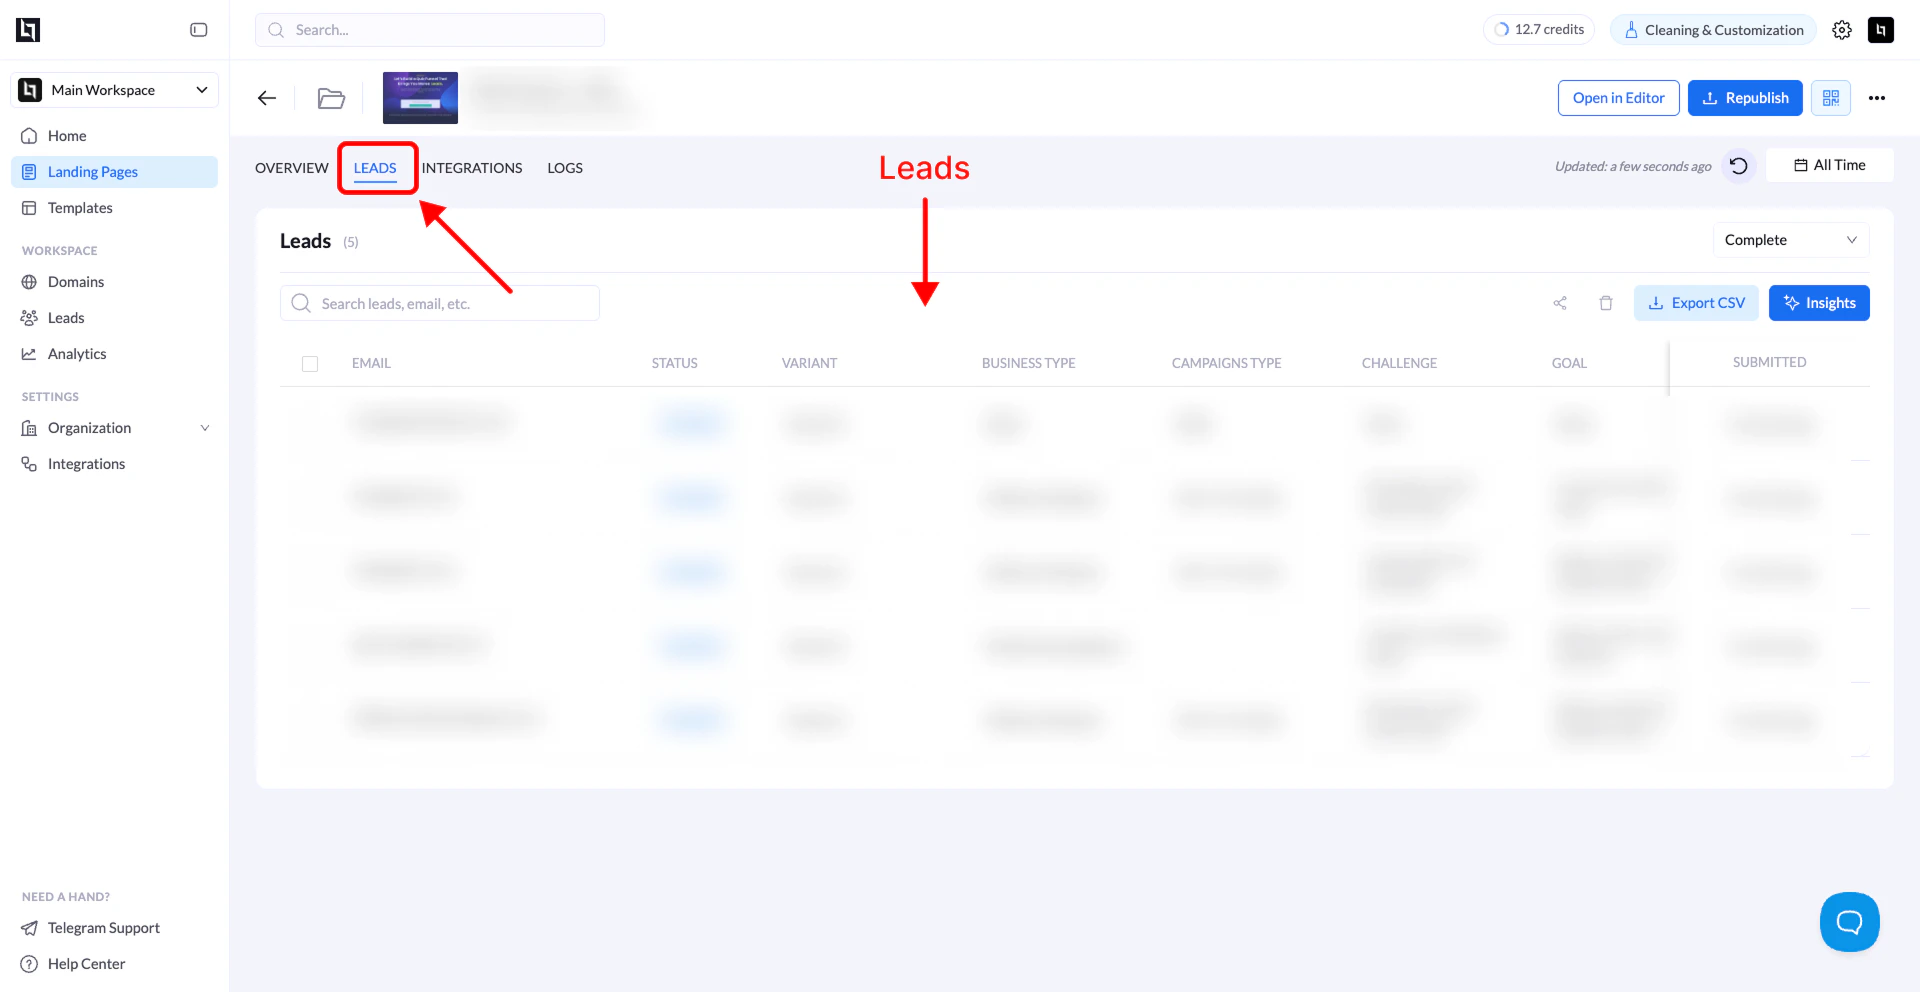 Every form and quiz submission is stored as a lead. Open a landing page and click the **Leads** tab to view, filter, [export, or delete](/features/leads/managing) leads.
* [Partial leads](/features/leads/partial-leads) capture visitors who started a multi-step flow but left before finishing.
* [AI Lead Insights](/features/leads/ai-lead-insights) summarizes trends, anomalies, and data quality issues in your leads.
* [Bypass saving leads](/features/leads/bypass-saving) sends regulated data straight to your CRM without storing it in LanderLab.
## How to automate lead handling with Workflows
Every form and quiz submission is stored as a lead. Open a landing page and click the **Leads** tab to view, filter, [export, or delete](/features/leads/managing) leads.
* [Partial leads](/features/leads/partial-leads) capture visitors who started a multi-step flow but left before finishing.
* [AI Lead Insights](/features/leads/ai-lead-insights) summarizes trends, anomalies, and data quality issues in your leads.
* [Bypass saving leads](/features/leads/bypass-saving) sends regulated data straight to your CRM without storing it in LanderLab.
## How to automate lead handling with Workflows
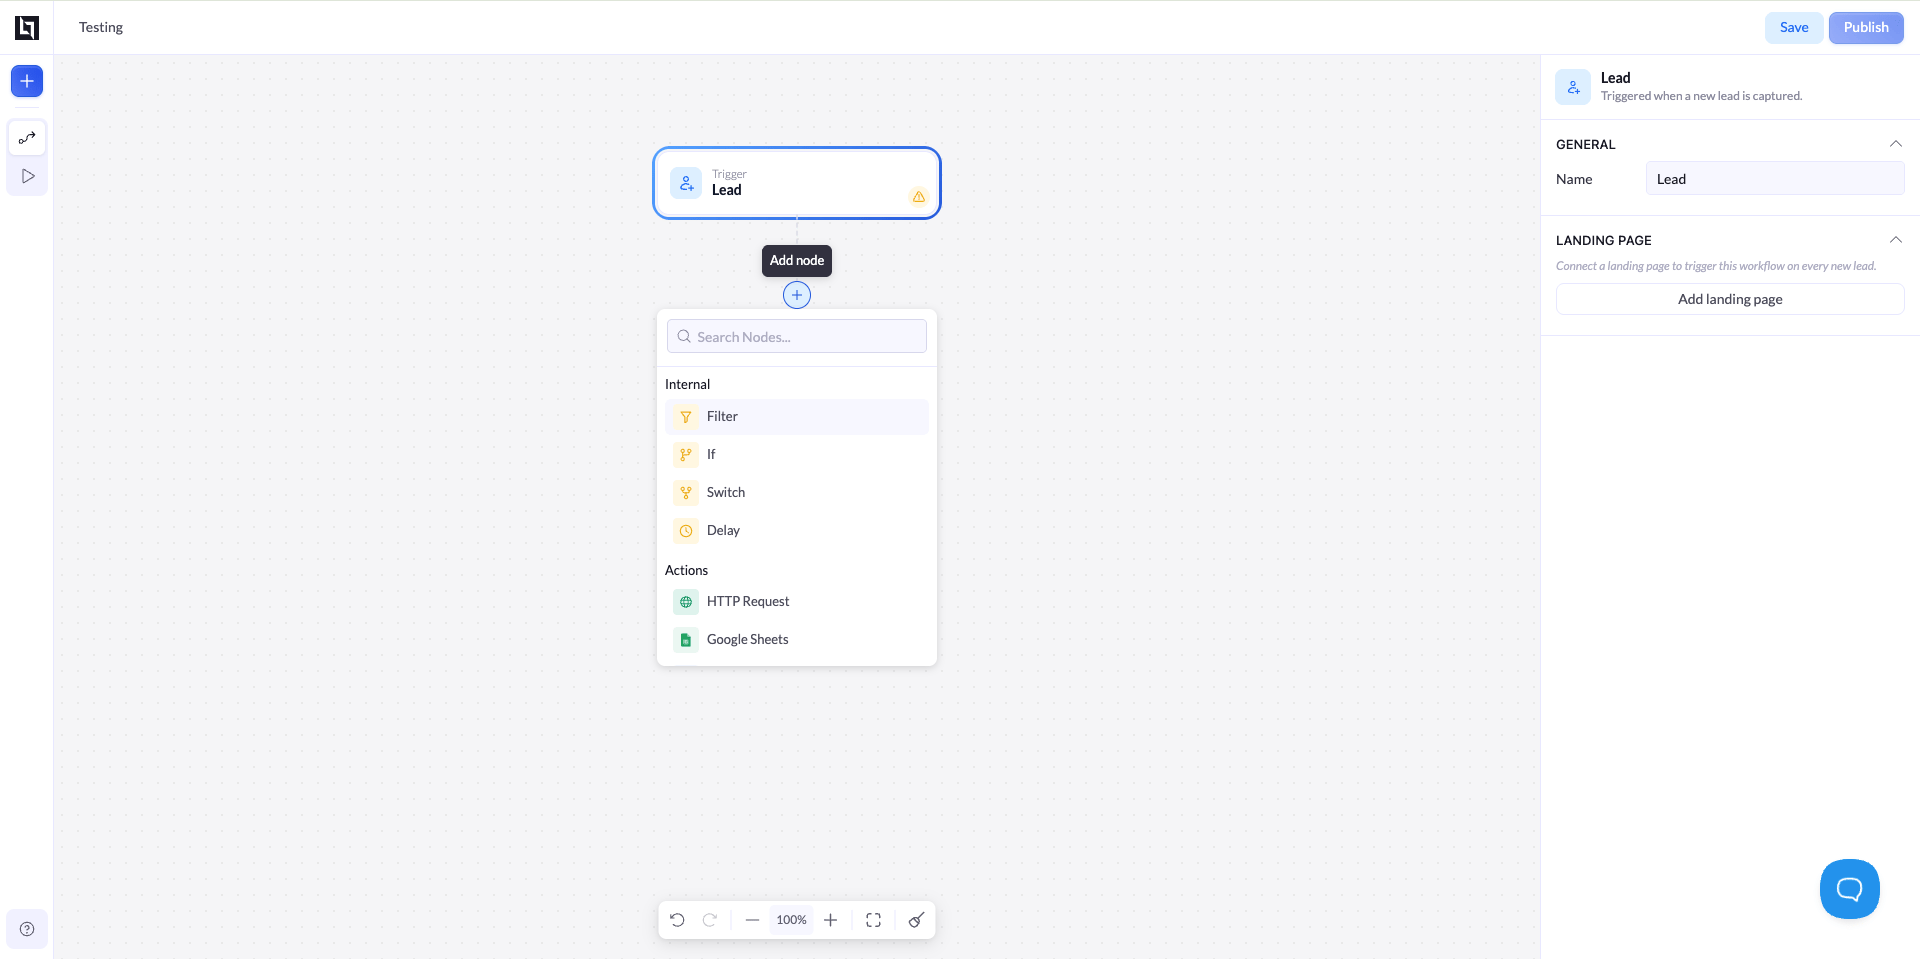 [Workflows](/features/workflows/getting-started) run automatically every time a connected landing page captures a lead. You build them on a visual canvas. A [Lead trigger](/features/workflows/trigger) starts the flow, conditions decide the path, and actions send the data.
* **Conditions:** [Filter](/features/workflows/conditions/filter), [If](/features/workflows/conditions/if), [Switch](/features/workflows/conditions/switch), and [Delay](/features/workflows/conditions/delay-node) nodes.
* **Actions:** HTTP requests, Google Sheets, CRMs, lead distribution platforms, Meta CAPI, and ClickFlare.
* **Runs:** see each lead's path through the workflow, including any failed step.
Workflows is in **BETA**. Available nodes may change.
## How to measure and improve results
[Workflows](/features/workflows/getting-started) run automatically every time a connected landing page captures a lead. You build them on a visual canvas. A [Lead trigger](/features/workflows/trigger) starts the flow, conditions decide the path, and actions send the data.
* **Conditions:** [Filter](/features/workflows/conditions/filter), [If](/features/workflows/conditions/if), [Switch](/features/workflows/conditions/switch), and [Delay](/features/workflows/conditions/delay-node) nodes.
* **Actions:** HTTP requests, Google Sheets, CRMs, lead distribution platforms, Meta CAPI, and ClickFlare.
* **Runs:** see each lead's path through the workflow, including any failed step.
Workflows is in **BETA**. Available nodes may change.
## How to measure and improve results
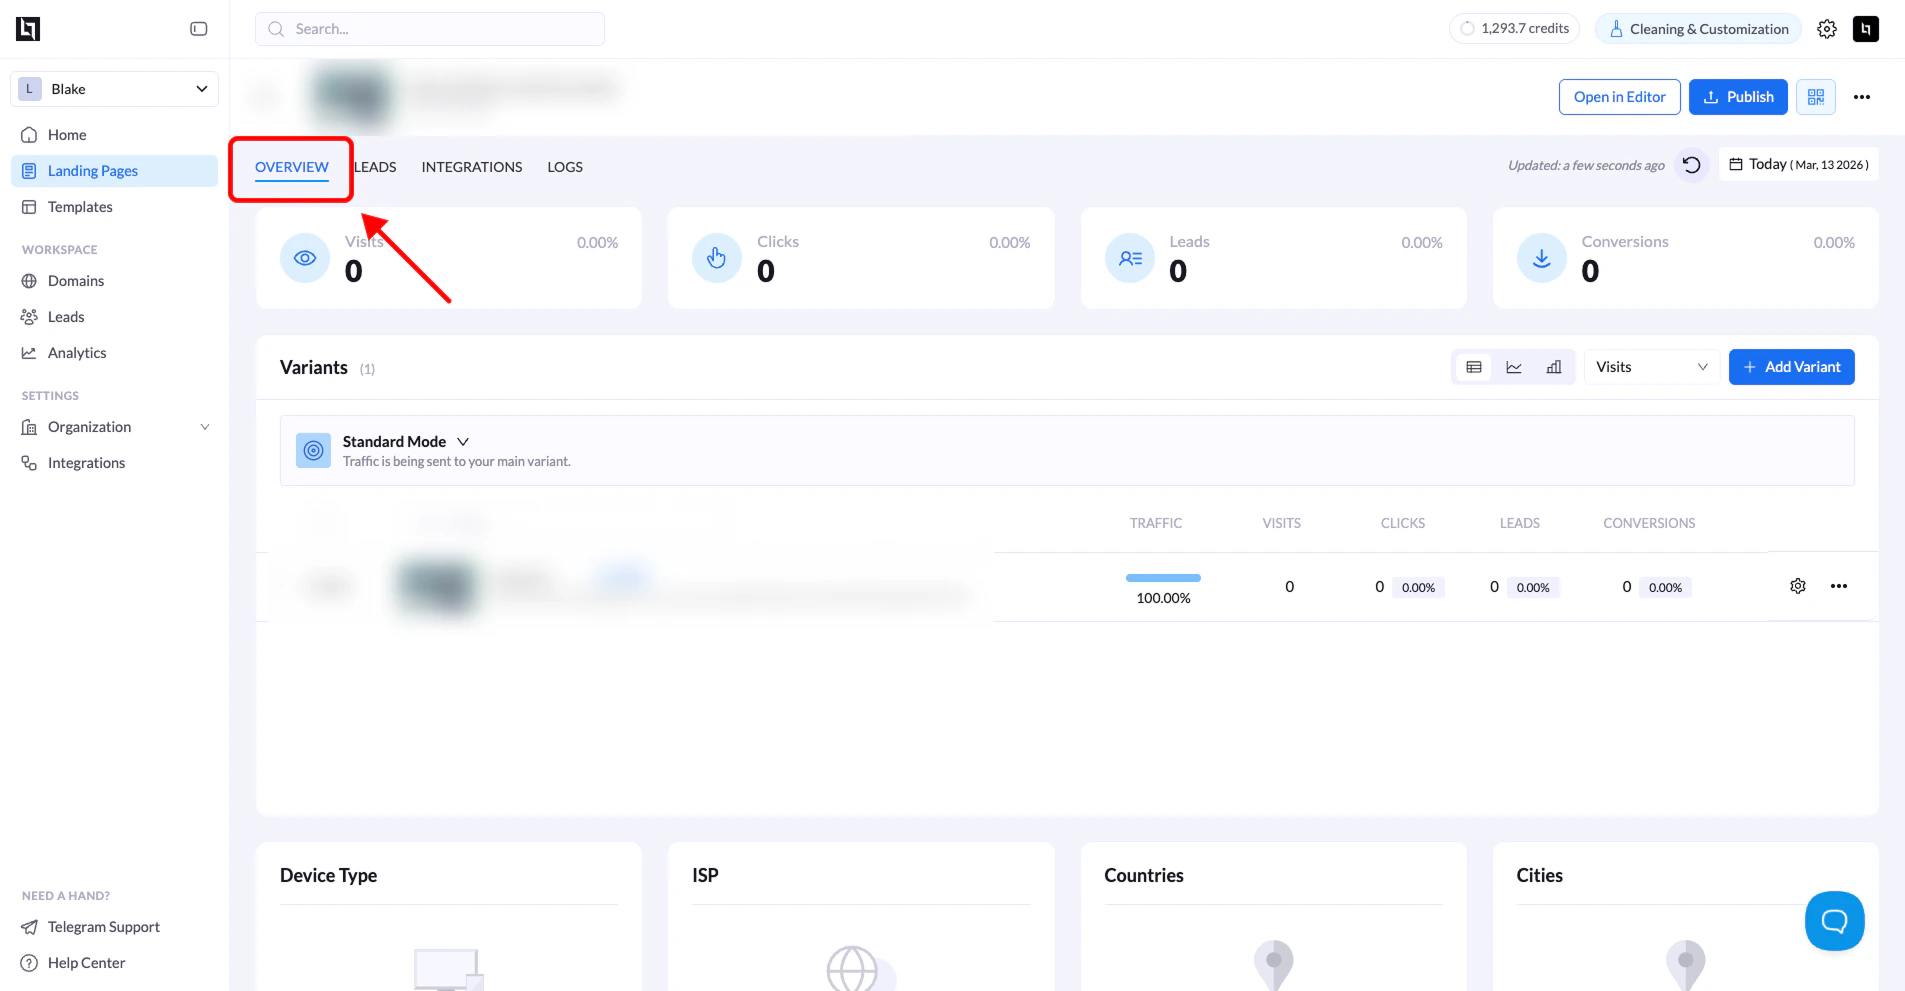 * **[Landing page analytics](/features/analytics/landing-page)** shows page views, clicks, leads, and conversions per page and per variant, with device and country breakdowns. You find it on the page's **Overview** tab.
* **[Reporting](/features/analytics/reporting)** compares every published page side by side. Sort by conversion rate to find your best pages.
* **[Conversion tracking](/features/analytics/conversions-tracking)** defines which clicks and submissions count as conversions.
* **[A/B testing](/features/analytics/ab-testing)** splits traffic between variants and lets you adjust the weights. When a test ends, set the winner as the main variant.
All variants share the same public URL and rotate server side, so testing stays compliant with Google and Meta ad policies.
## How to manage your team
| Feature | Where to find it | What it does |
| - | - | - |
| [Workspaces](/features/multi-user/workspaces) | Sidebar workspace selector or **Settings > Workspaces** | Separates pages and domains by client, brand, or vertical. |
| [Users and roles](/features/multi-user/users) | **Settings > Users** | Invites teammates as Admin, Worker, or Viewer, with access to specific workspaces. |
| [Credit limits](/features/multi-user/credit-limits) | **Settings > Users** | Sets monthly AI credit caps per team member. |
| [Logs](/features/multi-user/system-logs) | **Settings > Logs** | Records every change made across your organization. |
| [Two-factor authentication](/profile/two-factor-authentication) and [sessions](/profile/sessions) | **Settings > Security** | Protects your account and signs out devices you do not recognize. |
## How to connect AI assistants and the API
You can also manage LanderLab from outside the dashboard. MCP connections sign in with your LanderLab account. The REST API uses an [API key](/mcp/generate-api-key).
Connect Claude, ChatGPT, Cursor, and other AI assistants to manage pages, analytics, and leads in plain English.
Manage landing pages, leads, A/B tests, and analytics programmatically.
## Related
Build and publish your first landing page step by step.
Landers, variants, workspaces, global blocks, and the rest of the vocabulary.
Watch full builds end to end.
Answers to the questions new users ask most.
* **[Landing page analytics](/features/analytics/landing-page)** shows page views, clicks, leads, and conversions per page and per variant, with device and country breakdowns. You find it on the page's **Overview** tab.
* **[Reporting](/features/analytics/reporting)** compares every published page side by side. Sort by conversion rate to find your best pages.
* **[Conversion tracking](/features/analytics/conversions-tracking)** defines which clicks and submissions count as conversions.
* **[A/B testing](/features/analytics/ab-testing)** splits traffic between variants and lets you adjust the weights. When a test ends, set the winner as the main variant.
All variants share the same public URL and rotate server side, so testing stays compliant with Google and Meta ad policies.
## How to manage your team
| Feature | Where to find it | What it does |
| - | - | - |
| [Workspaces](/features/multi-user/workspaces) | Sidebar workspace selector or **Settings > Workspaces** | Separates pages and domains by client, brand, or vertical. |
| [Users and roles](/features/multi-user/users) | **Settings > Users** | Invites teammates as Admin, Worker, or Viewer, with access to specific workspaces. |
| [Credit limits](/features/multi-user/credit-limits) | **Settings > Users** | Sets monthly AI credit caps per team member. |
| [Logs](/features/multi-user/system-logs) | **Settings > Logs** | Records every change made across your organization. |
| [Two-factor authentication](/profile/two-factor-authentication) and [sessions](/profile/sessions) | **Settings > Security** | Protects your account and signs out devices you do not recognize. |
## How to connect AI assistants and the API
You can also manage LanderLab from outside the dashboard. MCP connections sign in with your LanderLab account. The REST API uses an [API key](/mcp/generate-api-key).
Connect Claude, ChatGPT, Cursor, and other AI assistants to manage pages, analytics, and leads in plain English.
Manage landing pages, leads, A/B tests, and analytics programmatically.
## Related
Build and publish your first landing page step by step.
Landers, variants, workspaces, global blocks, and the rest of the vocabulary.
Watch full builds end to end.
Answers to the questions new users ask most.