> ## Documentation Index
> Fetch the complete documentation index at: https://docs.landerlab.io/llms.txt
> Use this file to discover all available pages before exploring further.
# Set Up Meta Conversions API (CAPI) Integration
> Learn how to set up Meta Conversions API (CAPI) in LanderLab to send server-side events directly to Meta for better tracking accuracy and ad optimization.
 > Connect Meta Conversions API to your landing pages in LanderLab to send server-side conversion events directly to Meta and improve tracking accuracy for your ad campaigns.
## What is Meta CAPI?
[Meta Pixel](/integrations/pixels/meta-pixel) tracks conversions through the visitor's browser, but ad blockers, privacy settings, and cookie restrictions can prevent it from firing correctly. This means some conversions are never reported to Meta.
Meta Conversions API (CAPI) solves this problem by sending conversion events directly from the server to Meta, without relying on the visitor's browser. Since the data is sent server-side, it is not affected by ad blockers, cookie restrictions, or browser privacy settings.
Setting up Meta CAPI in LanderLab helps you get more accurate conversion data, better ad optimization, and improved campaign performance across Facebook and Instagram ads.
For the best results, use Meta CAPI **together with [Meta Pixel](/integrations/pixels/meta-pixel)**. Running both gives Meta two data sources to match events, which improves accuracy and reduces data loss.
Once you add a Meta CAPI integration, it is saved **globally** in your account. You can reuse it across multiple landing pages without entering the same credentials again.
***
## How to Add Meta CAPI Integration
Navigate to **Landing Pages** and click the **name of the landing page** where you want to add Meta CAPI tracking.
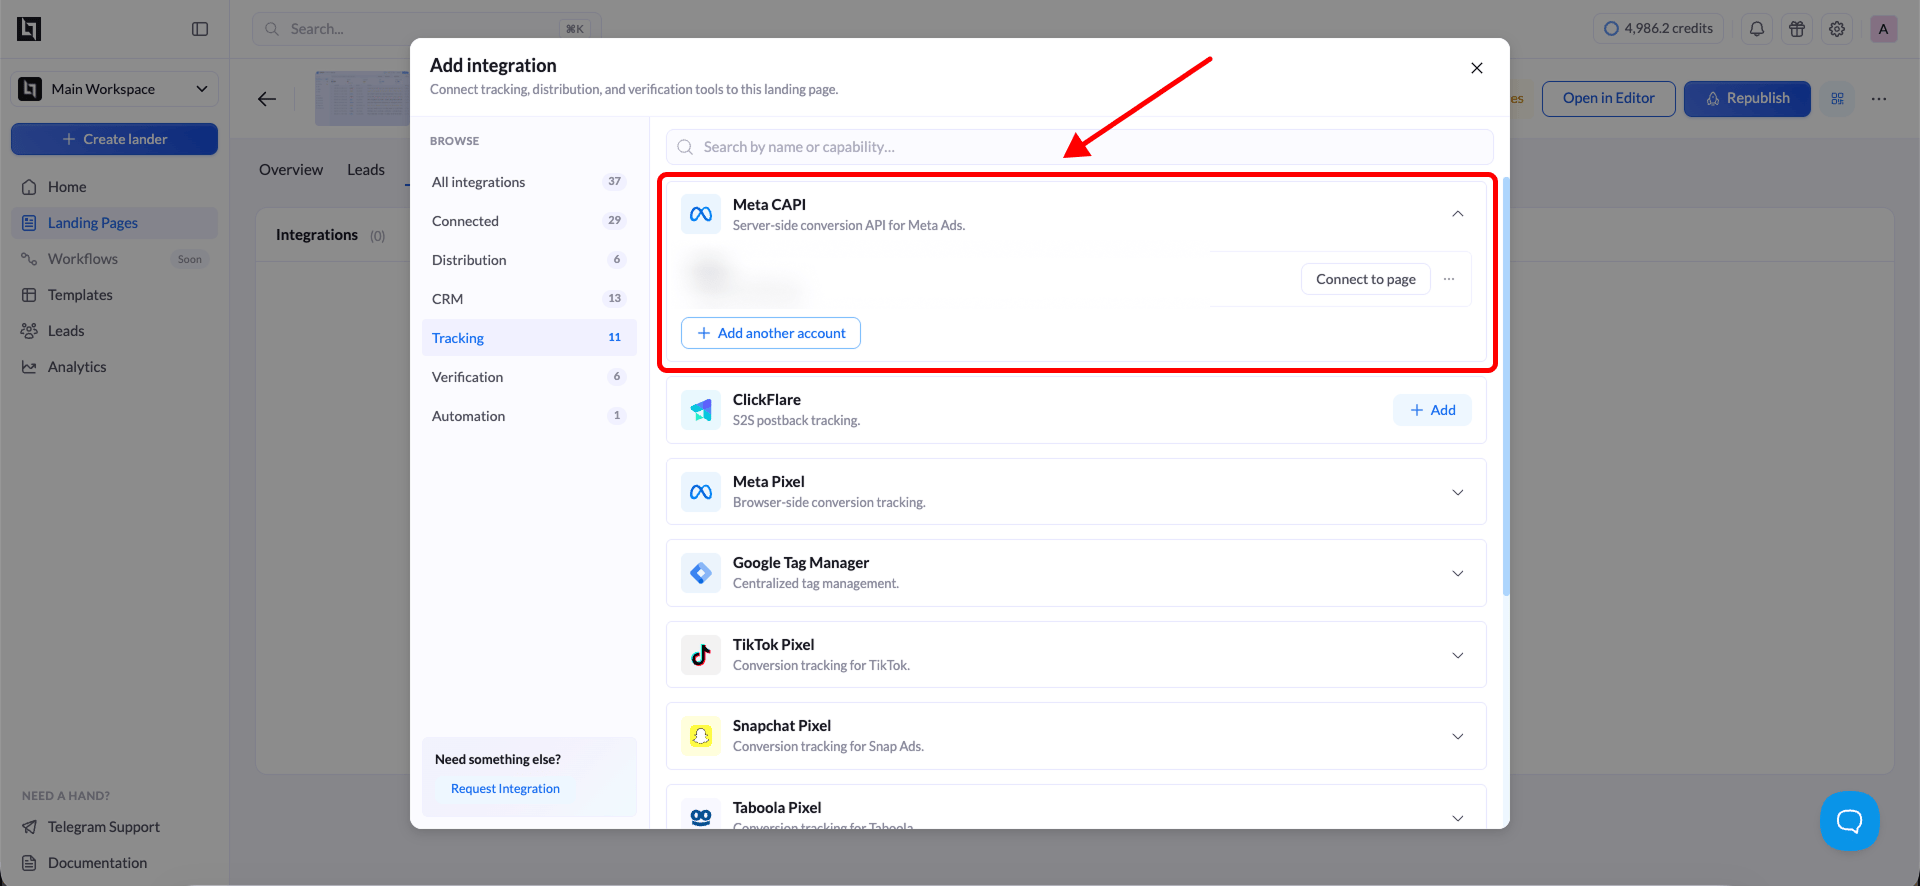
Click **Add Integration** to open the integrations panel. This is where you connect external tracking and marketing tools to your landing page.
From the list of available integrations, select **Meta CAPI**. This will open the tracking configuration form.
> Connect Meta Conversions API to your landing pages in LanderLab to send server-side conversion events directly to Meta and improve tracking accuracy for your ad campaigns.
## What is Meta CAPI?
[Meta Pixel](/integrations/pixels/meta-pixel) tracks conversions through the visitor's browser, but ad blockers, privacy settings, and cookie restrictions can prevent it from firing correctly. This means some conversions are never reported to Meta.
Meta Conversions API (CAPI) solves this problem by sending conversion events directly from the server to Meta, without relying on the visitor's browser. Since the data is sent server-side, it is not affected by ad blockers, cookie restrictions, or browser privacy settings.
Setting up Meta CAPI in LanderLab helps you get more accurate conversion data, better ad optimization, and improved campaign performance across Facebook and Instagram ads.
For the best results, use Meta CAPI **together with [Meta Pixel](/integrations/pixels/meta-pixel)**. Running both gives Meta two data sources to match events, which improves accuracy and reduces data loss.
Once you add a Meta CAPI integration, it is saved **globally** in your account. You can reuse it across multiple landing pages without entering the same credentials again.
***
## How to Add Meta CAPI Integration
Navigate to **Landing Pages** and click the **name of the landing page** where you want to add Meta CAPI tracking.
Click **Add Integration** to open the integrations panel. This is where you connect external tracking and marketing tools to your landing page.
From the list of available integrations, select **Meta CAPI**. This will open the tracking configuration form.
 Enter the following details from your Meta Business account:
| Field | Description |
| :--------------- | :---------------------------------------------------------------------------------------------------------------- |
| **Pixel ID** | Your Meta Pixel ID. You can find this in Meta Events Manager under your pixel settings. |
| **Access Token** | A server-side access token generated in Meta Events Manager. This allows LanderLab to send events on your behalf. |
You can find your **Pixel ID** and generate an **Access Token** inside [Meta Events Manager](https://business.facebook.com/events_manager). Go to your Pixel, then navigate to **Settings** to locate both values.
Click **Save** to store the integration. LanderLab saves this configuration globally, so you can connect it to other landing pages later without re-entering the details.
***
## Connect Meta CAPI to Another Landing Page
Since Meta CAPI integrations are saved globally, you do not need to create a new one for every landing page. You can reuse an existing integration across multiple pages.
Go to **Landing Pages** and click the name of the landing page where you want to use the same Meta CAPI integration.
Click **Add Integration** and select your previously saved **Meta CAPI** configuration from the list.
If your landing page has multiple **A/B test variants**, a modal will appear asking you to choose which variants should use this integration. Select the variants you want to track and confirm your selection.
The variant selection modal only appears when your landing page has more than one active variant. If there is only one variant, the integration is applied automatically.
Click **Save**, then **Publish** or **Republish** your landing page to activate Meta CAPI tracking on the selected variants.
***
## Why Use Meta CAPI
Server-side tracking through Meta CAPI offers several advantages over browser-only pixel tracking:
* **Better data accuracy** - Events are sent directly from the server, bypassing ad blockers and browser restrictions that can prevent pixel fires.
* **Improved ad optimization** - More complete conversion data helps Meta's algorithm optimize your campaigns and find better audiences.
* **Stronger event matching** - Server-side events support advanced matching parameters, which increases the match rate between conversions and ad interactions.
* **Privacy compliance** - Server-side tracking reduces reliance on browser cookies and provides a more privacy-friendly setup that aligns with current data regulations.
Enter the following details from your Meta Business account:
| Field | Description |
| :--------------- | :---------------------------------------------------------------------------------------------------------------- |
| **Pixel ID** | Your Meta Pixel ID. You can find this in Meta Events Manager under your pixel settings. |
| **Access Token** | A server-side access token generated in Meta Events Manager. This allows LanderLab to send events on your behalf. |
You can find your **Pixel ID** and generate an **Access Token** inside [Meta Events Manager](https://business.facebook.com/events_manager). Go to your Pixel, then navigate to **Settings** to locate both values.
Click **Save** to store the integration. LanderLab saves this configuration globally, so you can connect it to other landing pages later without re-entering the details.
***
## Connect Meta CAPI to Another Landing Page
Since Meta CAPI integrations are saved globally, you do not need to create a new one for every landing page. You can reuse an existing integration across multiple pages.
Go to **Landing Pages** and click the name of the landing page where you want to use the same Meta CAPI integration.
Click **Add Integration** and select your previously saved **Meta CAPI** configuration from the list.
If your landing page has multiple **A/B test variants**, a modal will appear asking you to choose which variants should use this integration. Select the variants you want to track and confirm your selection.
The variant selection modal only appears when your landing page has more than one active variant. If there is only one variant, the integration is applied automatically.
Click **Save**, then **Publish** or **Republish** your landing page to activate Meta CAPI tracking on the selected variants.
***
## Why Use Meta CAPI
Server-side tracking through Meta CAPI offers several advantages over browser-only pixel tracking:
* **Better data accuracy** - Events are sent directly from the server, bypassing ad blockers and browser restrictions that can prevent pixel fires.
* **Improved ad optimization** - More complete conversion data helps Meta's algorithm optimize your campaigns and find better audiences.
* **Stronger event matching** - Server-side events support advanced matching parameters, which increases the match rate between conversions and ad interactions.
* **Privacy compliance** - Server-side tracking reduces reliance on browser cookies and provides a more privacy-friendly setup that aligns with current data regulations.