> ## Documentation Index
> Fetch the complete documentation index at: https://docs.landerlab.io/llms.txt
> Use this file to discover all available pages before exploring further.
# Set Up Make.com Integration
> Learn how to connect Make.com to LanderLab with a webhook and send every landing page and quiz funnel lead into your Make scenarios in real time.
 Connect Make.com to your landing pages in LanderLab and send every lead into a Make scenario the moment it is submitted. From there you can route leads to any of the thousands of apps Make supports, such as Google Sheets, Slack, Airtable, Salesforce, or your own API.
There is no separate Make app to install. The connection is made with a **Custom webhook** in Make and the **Webhook integration** in LanderLab.
## How the Connection Works
The setup has three parts:
1. You create a Custom webhook in Make. Make gives you a unique URL.
2. You paste that URL into the LanderLab Webhook integration on your landing page.
3. You submit one test lead so Make learns the field structure and you can map the data to the next modules in your scenario.
Once both sides are connected and your scenario is switched on, every new lead is pushed to Make instantly. No exports, no polling, no third-party middleware.
Webhook integrations are **not** saved globally in LanderLab. Each webhook is configured per landing page, so repeat the LanderLab side of this guide for every page you want to send into Make.
## Before You Start
Make sure you have:
* A **Make.com account** on any plan. Free plans allow a limited number of active webhooks.
* A **LanderLab landing page or quiz funnel with a form** on it. The form fields are what get sent to Make.
## Step 1: Create a Webhook in Make.com
Log in to [Make.com](https://www.make.com) and click **Create a new scenario** in the top right corner of your dashboard.
Click the large **plus (+)** button in the scenario editor, search for **Webhooks**, and select the **Custom webhook** module.
Connect Make.com to your landing pages in LanderLab and send every lead into a Make scenario the moment it is submitted. From there you can route leads to any of the thousands of apps Make supports, such as Google Sheets, Slack, Airtable, Salesforce, or your own API.
There is no separate Make app to install. The connection is made with a **Custom webhook** in Make and the **Webhook integration** in LanderLab.
## How the Connection Works
The setup has three parts:
1. You create a Custom webhook in Make. Make gives you a unique URL.
2. You paste that URL into the LanderLab Webhook integration on your landing page.
3. You submit one test lead so Make learns the field structure and you can map the data to the next modules in your scenario.
Once both sides are connected and your scenario is switched on, every new lead is pushed to Make instantly. No exports, no polling, no third-party middleware.
Webhook integrations are **not** saved globally in LanderLab. Each webhook is configured per landing page, so repeat the LanderLab side of this guide for every page you want to send into Make.
## Before You Start
Make sure you have:
* A **Make.com account** on any plan. Free plans allow a limited number of active webhooks.
* A **LanderLab landing page or quiz funnel with a form** on it. The form fields are what get sent to Make.
## Step 1: Create a Webhook in Make.com
Log in to [Make.com](https://www.make.com) and click **Create a new scenario** in the top right corner of your dashboard.
Click the large **plus (+)** button in the scenario editor, search for **Webhooks**, and select the **Custom webhook** module.
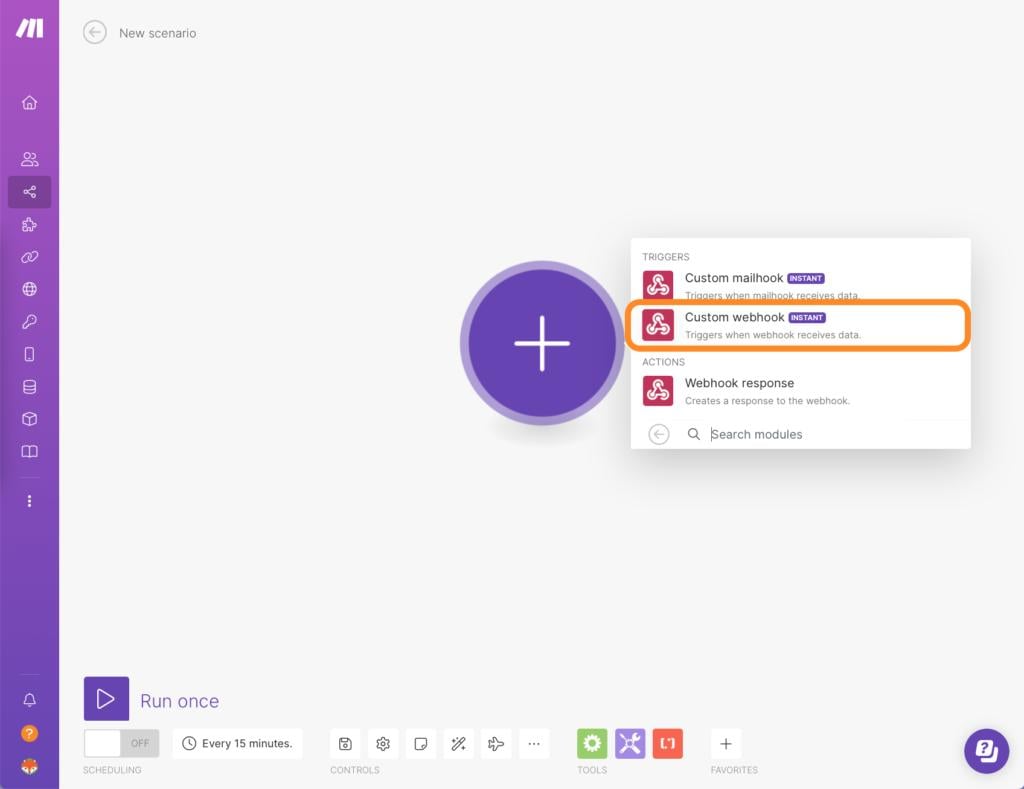 Make sure you pick **Custom webhook** and not Custom mailhook.
In the module settings, click **Add** next to the Webhook field. Give the webhook a clear name so you can find it later, for example `LanderLab - Insurance Quiz`, then click **Save**.
Make sure you pick **Custom webhook** and not Custom mailhook.
In the module settings, click **Add** next to the Webhook field. Give the webhook a clear name so you can find it later, for example `LanderLab - Insurance Quiz`, then click **Save**.
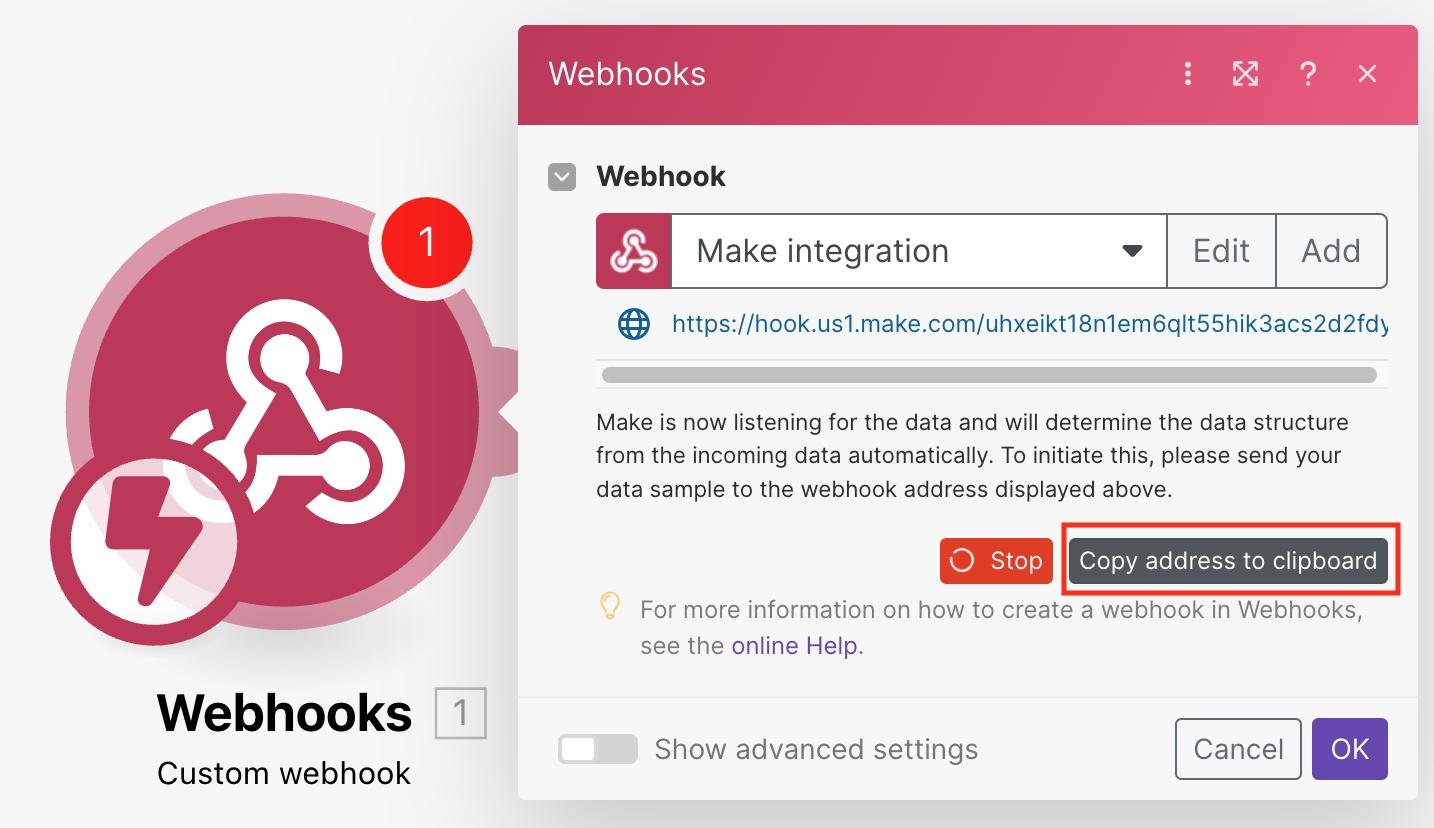 You can leave the advanced settings empty. Make detects the data structure automatically from the first request it receives.
Make generates a unique HTTPS URL that looks like `https://hook.eu2.make.com/xxxxxxxxxxxxxxxxxxxx`.
Click **Copy address to clipboard**. Keep this tab open, because the module now shows a listening state while it waits for the first request.
Treat the webhook URL like a password. Anyone who has it can send data into your scenario, so do not publish it publicly.
## Step 2: Add the Webhook Integration in LanderLab
Now switch to LanderLab and connect that URL to your landing page.
Go to **Landing Pages** and click the **name of the landing page** you want to connect.
Click **Add Integration** to open the integrations panel.
Find **Webhook integration**, labeled "Send lead data to any HTTPS endpoint in real time", and click it. The 3-step setup wizard opens.
You can leave the advanced settings empty. Make detects the data structure automatically from the first request it receives.
Make generates a unique HTTPS URL that looks like `https://hook.eu2.make.com/xxxxxxxxxxxxxxxxxxxx`.
Click **Copy address to clipboard**. Keep this tab open, because the module now shows a listening state while it waits for the first request.
Treat the webhook URL like a password. Anyone who has it can send data into your scenario, so do not publish it publicly.
## Step 2: Add the Webhook Integration in LanderLab
Now switch to LanderLab and connect that URL to your landing page.
Go to **Landing Pages** and click the **name of the landing page** you want to connect.
Click **Add Integration** to open the integrations panel.
Find **Webhook integration**, labeled "Send lead data to any HTTPS endpoint in real time", and click it. The 3-step setup wizard opens.
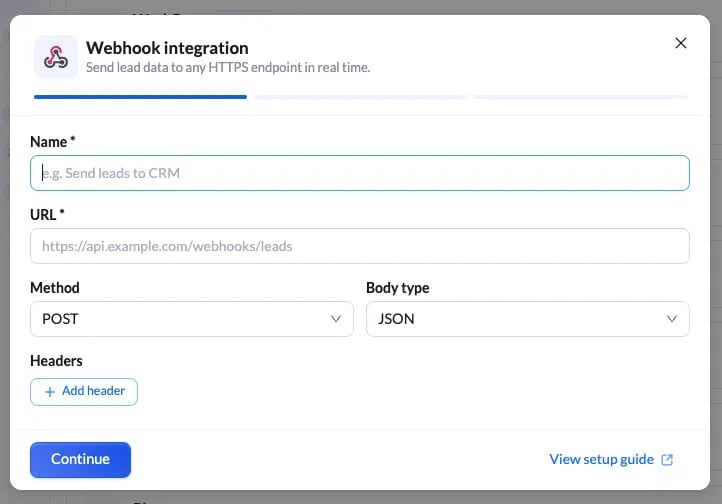 Enter the following:
| Field | Value |
| :------------ | :--------------------------------------------------------------------- |
| **Name** | A label to identify this connection, for example `Send leads to Make`. |
| **URL** | **Paste the webhook URL you copied from Make.** |
| **Method** | Select **POST**. |
| **Body type** | Select **JSON**. |
Leave the **Headers** section empty unless you added an API key check in the Make webhook settings.
Click **Continue**.
On the **Fields** tab you will see every field from your form or quiz funnel, plus the LanderLab system fields such as **LL Lander URL**, **LL Visitor IP**, **LL Visitor ID**, and **LL Submission Time UTC**.
Use the checkboxes to include or exclude fields, and edit the **Sent As** column to rename the keys that arrive in Make. The names you set here are exactly the field names you will map inside your Make scenario, so use clean, lowercase keys like `first_name` and `email`.
Enter the following:
| Field | Value |
| :------------ | :--------------------------------------------------------------------- |
| **Name** | A label to identify this connection, for example `Send leads to Make`. |
| **URL** | **Paste the webhook URL you copied from Make.** |
| **Method** | Select **POST**. |
| **Body type** | Select **JSON**. |
Leave the **Headers** section empty unless you added an API key check in the Make webhook settings.
Click **Continue**.
On the **Fields** tab you will see every field from your form or quiz funnel, plus the LanderLab system fields such as **LL Lander URL**, **LL Visitor IP**, **LL Visitor ID**, and **LL Submission Time UTC**.
Use the checkboxes to include or exclude fields, and edit the **Sent As** column to rename the keys that arrive in Make. The names you set here are exactly the field names you will map inside your Make scenario, so use clean, lowercase keys like `first_name` and `email`.
.webp?fit=max&auto=format&n=5Uu38EEDv07U0epd&q=85&s=6424f843f89579c12c3c1ec4913038b3) Keep the system fields enabled. Values like the lander URL, visitor IP, and submission time are useful later in Make for filtering, routing, and compliance records.
Click **Continue**.
The final step shows the exact request that will be sent to Make on every lead: the POST method, your webhook URL, and the JSON body with all mapped fields.
If everything looks right, click **Connect webhook**. The integration is now live on that landing page.
## Step 3: Send a Test Lead So Make Reads the Fields
Make does not know what your lead data looks like until it receives one real request. This step is what makes the fields mappable in the rest of your scenario.
Back in Make, open the Custom webhook module and click **Redetermine data structure**. The module now waits for an incoming request.
Open the **preview URL** or the **published URL** of your landing page, fill in the form or complete the quiz, and submit it.
Make confirms that the request was received and stores the structure. Every field you mapped in LanderLab is now available as a variable in the modules that follow.
## Step 4: Build the Rest of Your Scenario
With the data structure in place, add the modules that should run on every lead. Click the **plus (+)** next to the webhook module and choose your destination app, then map the LanderLab fields into it.
Common setups include:
* **Google Sheets** - Add a row for every new lead.
* **Slack or Telegram** - Post an instant notification to your sales channel.
* **Airtable, Notion, or HubSpot** - Create a record or contact automatically.
* **Router with filters** - Send leads to different destinations based on a quiz answer, country, or campaign.
* **HTTP module** - Forward the lead to any API that does not have a native Make app.
When your scenario is ready, click **Save**, then switch the toggle in the bottom left corner to **ON**.
A scenario that is switched **OFF** will not process incoming leads. Always turn the scenario on before you send traffic to your landing page.
## Troubleshooting
Check that the scenario toggle is set to **ON**, and that the webhook URL in LanderLab matches the one Make generated exactly, with no extra spaces. Then submit a new test lead and check the scenario **History** tab in Make for the incoming request.
Make only shows fields it has seen in an actual request. Open the Custom webhook module, click **Redetermine data structure**, and submit another test lead. Do this again any time you add a new field to your form or quiz.
New form fields are not added to the webhook payload automatically. Open the webhook integration on your landing page, go to the field mapping step, enable the new field, and save. Then redetermine the data structure in Make.
You can reuse the same Make webhook URL across multiple landing pages. Just add the Webhook integration on each page and paste the same URL. If the pages have different form fields, add a **Router** with filters in Make so each page is handled correctly.
Open the **History** tab of your scenario in Make and inspect the failed execution to see the exact response. You can also check the delivery logs on the LanderLab side to see the request that was sent and the response that came back.
## Related Articles
Full reference for the LanderLab webhook integration, including JSON mode and custom headers.
Send leads straight to a spreadsheet without building a scenario.
Automate lead routing inside LanderLab with triggers, conditions, and actions.
View, filter, and export every lead collected on your landing pages.
Keep the system fields enabled. Values like the lander URL, visitor IP, and submission time are useful later in Make for filtering, routing, and compliance records.
Click **Continue**.
The final step shows the exact request that will be sent to Make on every lead: the POST method, your webhook URL, and the JSON body with all mapped fields.
If everything looks right, click **Connect webhook**. The integration is now live on that landing page.
## Step 3: Send a Test Lead So Make Reads the Fields
Make does not know what your lead data looks like until it receives one real request. This step is what makes the fields mappable in the rest of your scenario.
Back in Make, open the Custom webhook module and click **Redetermine data structure**. The module now waits for an incoming request.
Open the **preview URL** or the **published URL** of your landing page, fill in the form or complete the quiz, and submit it.
Make confirms that the request was received and stores the structure. Every field you mapped in LanderLab is now available as a variable in the modules that follow.
## Step 4: Build the Rest of Your Scenario
With the data structure in place, add the modules that should run on every lead. Click the **plus (+)** next to the webhook module and choose your destination app, then map the LanderLab fields into it.
Common setups include:
* **Google Sheets** - Add a row for every new lead.
* **Slack or Telegram** - Post an instant notification to your sales channel.
* **Airtable, Notion, or HubSpot** - Create a record or contact automatically.
* **Router with filters** - Send leads to different destinations based on a quiz answer, country, or campaign.
* **HTTP module** - Forward the lead to any API that does not have a native Make app.
When your scenario is ready, click **Save**, then switch the toggle in the bottom left corner to **ON**.
A scenario that is switched **OFF** will not process incoming leads. Always turn the scenario on before you send traffic to your landing page.
## Troubleshooting
Check that the scenario toggle is set to **ON**, and that the webhook URL in LanderLab matches the one Make generated exactly, with no extra spaces. Then submit a new test lead and check the scenario **History** tab in Make for the incoming request.
Make only shows fields it has seen in an actual request. Open the Custom webhook module, click **Redetermine data structure**, and submit another test lead. Do this again any time you add a new field to your form or quiz.
New form fields are not added to the webhook payload automatically. Open the webhook integration on your landing page, go to the field mapping step, enable the new field, and save. Then redetermine the data structure in Make.
You can reuse the same Make webhook URL across multiple landing pages. Just add the Webhook integration on each page and paste the same URL. If the pages have different form fields, add a **Router** with filters in Make so each page is handled correctly.
Open the **History** tab of your scenario in Make and inspect the failed execution to see the exact response. You can also check the delivery logs on the LanderLab side to see the request that was sent and the response that came back.
## Related Articles
Full reference for the LanderLab webhook integration, including JSON mode and custom headers.
Send leads straight to a spreadsheet without building a scenario.
Automate lead routing inside LanderLab with triggers, conditions, and actions.
View, filter, and export every lead collected on your landing pages.