> ## Documentation Index
> Fetch the complete documentation index at: https://docs.landerlab.io/llms.txt
> Use this file to discover all available pages before exploring further.
# Use Google Address Autocomplete in Quiz Funnels
> Enable Google Address Autocomplete on your landing pages in LanderLab to speed up form filling, reduce errors, and collect accurate address data from visitors.
> Add Google Address Autocomplete to your landing pages in LanderLab to show real-time address suggestions as visitors type, making address fields faster to fill and more accurate.
## What is Google Address Autocomplete?
Google Address Autocomplete uses the Google Places API to show real-time address suggestions as a visitor starts typing in an address field. Instead of typing their full address manually, visitors can select from a list of matching suggestions, which speeds up form completion and reduces typing errors.
To use this feature in LanderLab, you need to do two things:
1. Add the **Google Address Autocomplete Input block** to your quiz or form in the editor
2. Connect your **Google Places API Key** through the integrations panel
Both steps are required for the autocomplete suggestions to appear.
Once you add a Google Address Autocomplete integration, it is saved **globally** in your account. You can reuse it across multiple landing pages without entering the details again.
***
## Part 1: Add the Autocomplete Input Block
First, add the specialized address input field to the quiz or form step where you want to collect address data.
Open the landing page that contains your quiz funnel and click into the **Quiz Editor**.
Go to the step where you want to collect the visitor's address.
Click **Add Block**, search for **Google Address Autocomplete Input**, and drag it onto your quiz step.
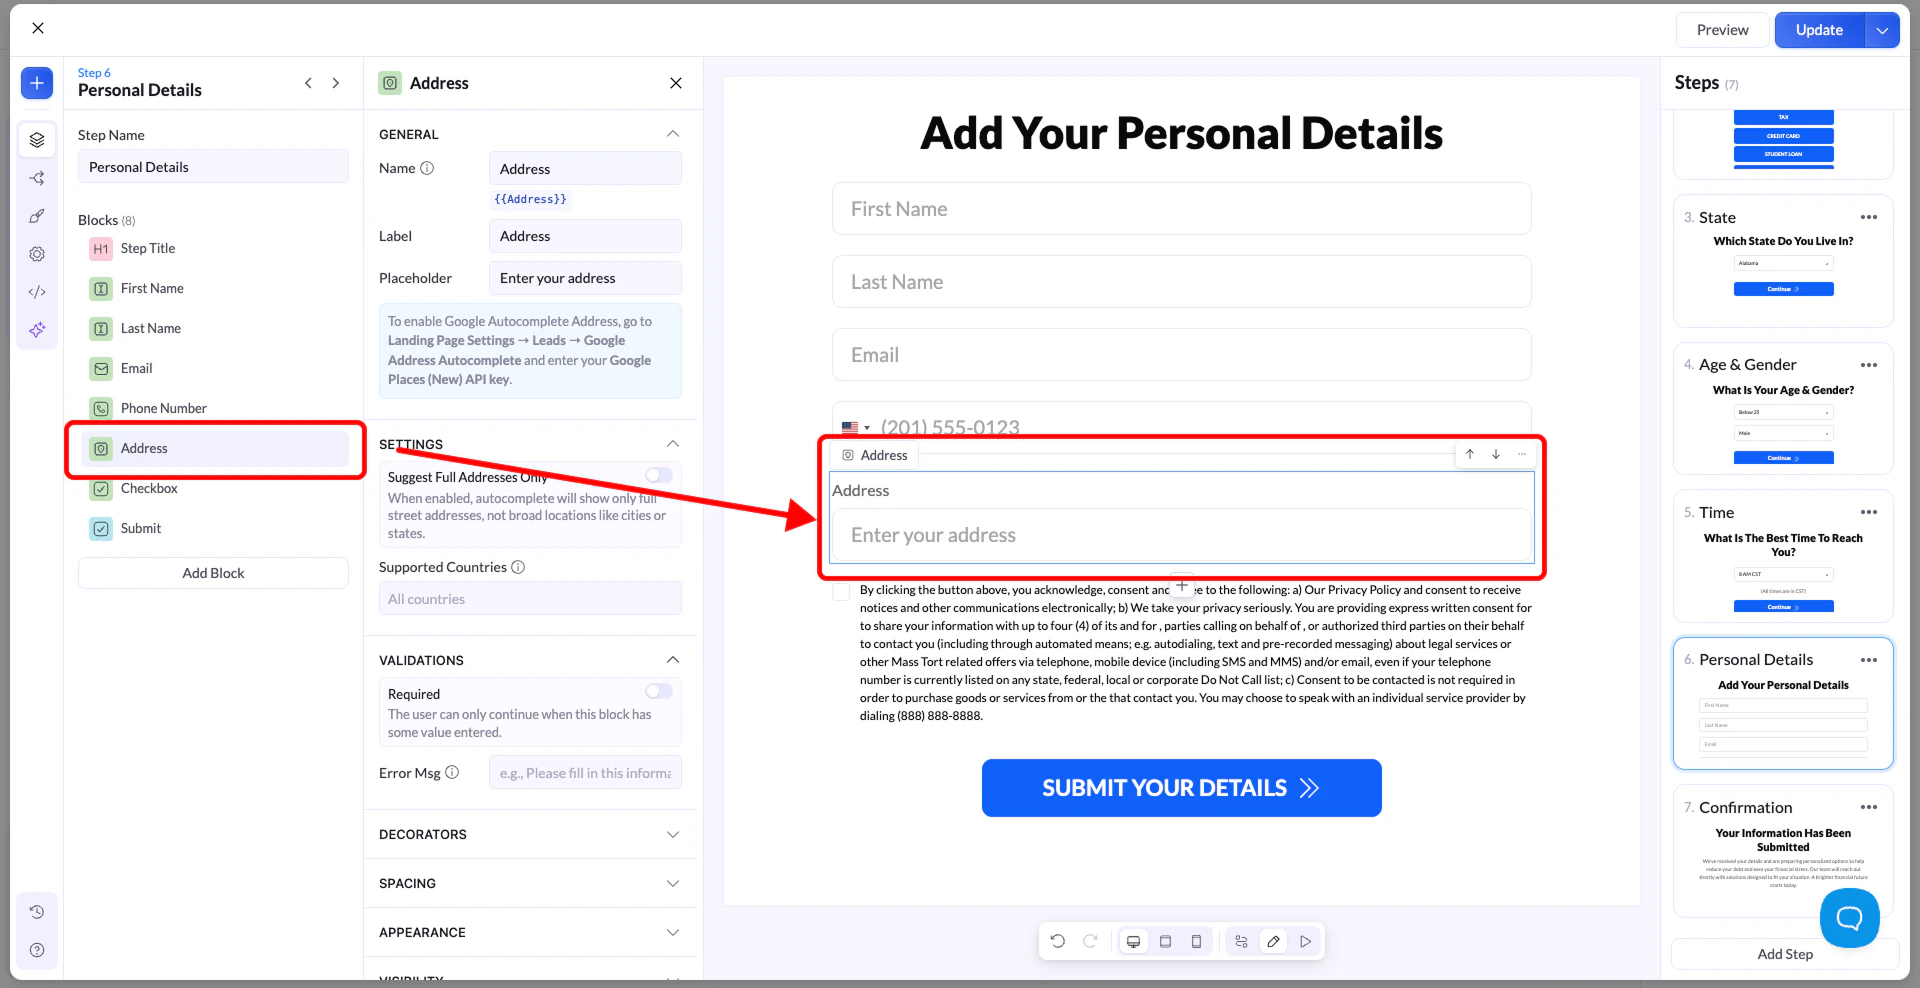 This prepares the field to receive address suggestions. The suggestions will not appear yet until you connect your Google Places API Key in Part 2.
***
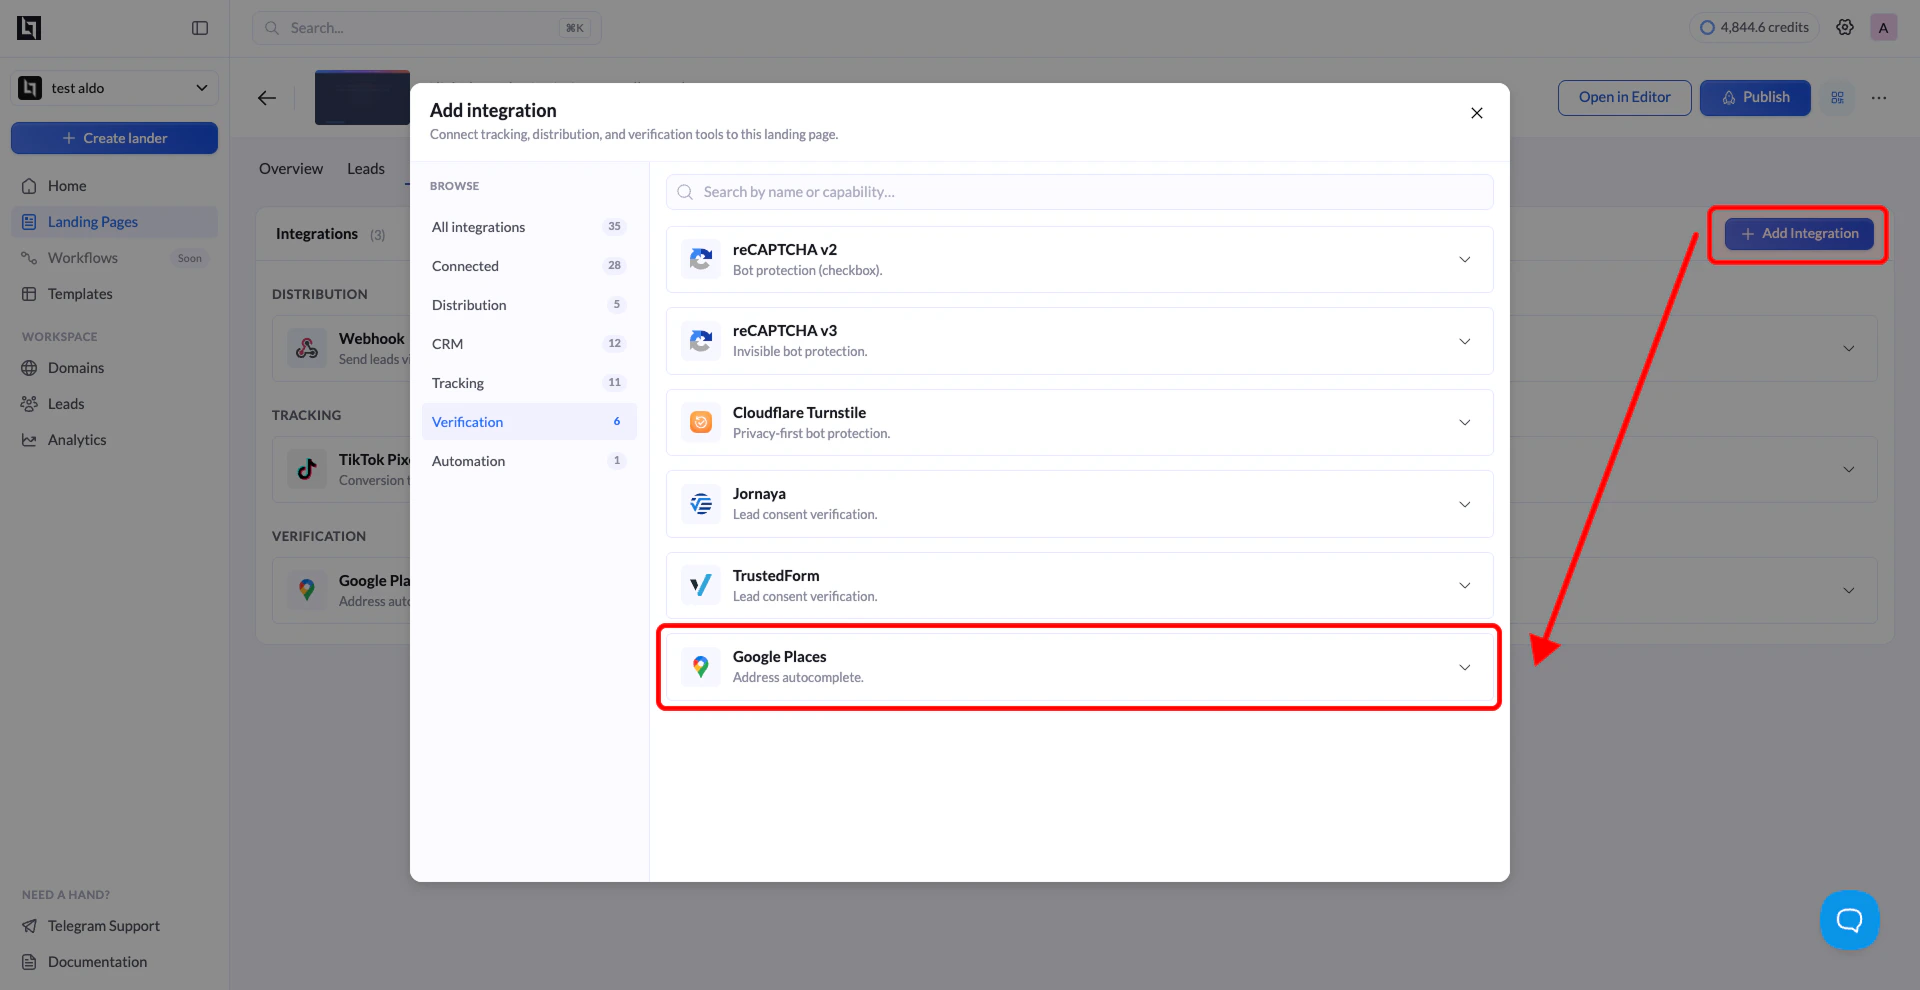
## Part 2: Connect Your Google Places API Key
Once the block is added, connect your Google Places API Key through the integrations panel.
Navigate to **Landing Pages** and click the **name of the landing page** where you want to enable address autocomplete.
Click **Add Integration** to open the integrations panel.
From the list of available integrations, find **Google Address Autocomplete** and click on it. A configuration form will appear.
Enter the following details:
| Field | Description |
| :---------- | :--------------------------------------------------------------------------------------------------------------------------- |
| **Name** | A label to identify this integration (e.g. "Google Address Autocomplete"). Helps you recognize it when reusing across pages. |
| **API Key** | Your Google Places API Key from the Google Cloud Console. |
See the **How to Get a Google Places API Key** section below if you have not created one yet.
Click **Add Google Address Autocomplete** to save the integration, then **Publish** or **Republish** your landing page. Address suggestions will now appear in real time as visitors type in the address field.
This prepares the field to receive address suggestions. The suggestions will not appear yet until you connect your Google Places API Key in Part 2.
***
## Part 2: Connect Your Google Places API Key
Once the block is added, connect your Google Places API Key through the integrations panel.
Navigate to **Landing Pages** and click the **name of the landing page** where you want to enable address autocomplete.
Click **Add Integration** to open the integrations panel.
From the list of available integrations, find **Google Address Autocomplete** and click on it. A configuration form will appear.
Enter the following details:
| Field | Description |
| :---------- | :--------------------------------------------------------------------------------------------------------------------------- |
| **Name** | A label to identify this integration (e.g. "Google Address Autocomplete"). Helps you recognize it when reusing across pages. |
| **API Key** | Your Google Places API Key from the Google Cloud Console. |
See the **How to Get a Google Places API Key** section below if you have not created one yet.
Click **Add Google Address Autocomplete** to save the integration, then **Publish** or **Republish** your landing page. Address suggestions will now appear in real time as visitors type in the address field.
 ***
## Connect to Another Landing Page
Since Google Address Autocomplete integrations are saved globally, you do not need to create a new one for every landing page.
Go to **Landing Pages** and click the name of the landing page where you want to use the same integration.
Click **Add Integration**. You will see your previously saved Google Address Autocomplete configurations listed. Select the one you want to connect.
If your landing page has multiple **A/B test variants**, a modal will appear asking you to choose which variants should use this integration. Select the variants you want and confirm.
Click **Save**, then **Publish** or **Republish** your landing page to activate address autocomplete on the selected variants.
***
## How to Get a Google Places API Key
If you do not have a Google Places API Key yet, follow these steps to create one in the Google Cloud Console.
Go to [console.cloud.google.com](https://console.cloud.google.com) and sign in with your Google account.
Click **Select a Project** at the top of the page and either choose an existing project or click **New Project** to create one.
1. Go to **APIs and Services** in the left sidebar.
2. Click **Library**.
3. Search for **Places API**.
4. Click on it and then click **Enable**.
1. Go to **APIs and Services > Credentials**.
2. Click **+ Create Credentials** and select **API Key**.
3. Copy the generated API key and paste it into the **API Key** field in LanderLab.
To prevent unauthorized use of your key, apply restrictions in the API key settings:
* Under **API restrictions**, select **Places API** so the key can only be used for address autocomplete.
* Under **Application restrictions**, select **HTTP referrers (websites)** and add your landing page domain.
This ensures your API key cannot be used by other sites or services.
Google requires **billing to be enabled** on your Google Cloud project to use the Places API. However, Google provides **\$200 in free monthly credit**, which is more than enough for most landing page address autocomplete use cases.
***
## Tips for Google Address Autocomplete
* **Both steps are required** - Adding the input block without connecting the API Key (or vice versa) will result in a plain text field with no suggestions. Make sure you complete both Part 1 and Part 2.
* **Publish after connecting** - The autocomplete suggestions will not appear on your live page until you republish after adding the integration.
* **Restrict your API key** - An unrestricted API key can be used by anyone who finds it. Always apply API and domain restrictions in the Google Cloud Console to protect your usage and billing.
* **Billing is required but usually free** - You must enable billing on your Google Cloud project, but the \$200 monthly free credit Google provides is sufficient for almost all landing page use cases unless you are running very high traffic volumes.
***
## Connect to Another Landing Page
Since Google Address Autocomplete integrations are saved globally, you do not need to create a new one for every landing page.
Go to **Landing Pages** and click the name of the landing page where you want to use the same integration.
Click **Add Integration**. You will see your previously saved Google Address Autocomplete configurations listed. Select the one you want to connect.
If your landing page has multiple **A/B test variants**, a modal will appear asking you to choose which variants should use this integration. Select the variants you want and confirm.
Click **Save**, then **Publish** or **Republish** your landing page to activate address autocomplete on the selected variants.
***
## How to Get a Google Places API Key
If you do not have a Google Places API Key yet, follow these steps to create one in the Google Cloud Console.
Go to [console.cloud.google.com](https://console.cloud.google.com) and sign in with your Google account.
Click **Select a Project** at the top of the page and either choose an existing project or click **New Project** to create one.
1. Go to **APIs and Services** in the left sidebar.
2. Click **Library**.
3. Search for **Places API**.
4. Click on it and then click **Enable**.
1. Go to **APIs and Services > Credentials**.
2. Click **+ Create Credentials** and select **API Key**.
3. Copy the generated API key and paste it into the **API Key** field in LanderLab.
To prevent unauthorized use of your key, apply restrictions in the API key settings:
* Under **API restrictions**, select **Places API** so the key can only be used for address autocomplete.
* Under **Application restrictions**, select **HTTP referrers (websites)** and add your landing page domain.
This ensures your API key cannot be used by other sites or services.
Google requires **billing to be enabled** on your Google Cloud project to use the Places API. However, Google provides **\$200 in free monthly credit**, which is more than enough for most landing page address autocomplete use cases.
***
## Tips for Google Address Autocomplete
* **Both steps are required** - Adding the input block without connecting the API Key (or vice versa) will result in a plain text field with no suggestions. Make sure you complete both Part 1 and Part 2.
* **Publish after connecting** - The autocomplete suggestions will not appear on your live page until you republish after adding the integration.
* **Restrict your API key** - An unrestricted API key can be used by anyone who finds it. Always apply API and domain restrictions in the Google Cloud Console to protect your usage and billing.
* **Billing is required but usually free** - You must enable billing on your Google Cloud project, but the \$200 monthly free credit Google provides is sufficient for almost all landing page use cases unless you are running very high traffic volumes.