> ## Documentation Index
> Fetch the complete documentation index at: https://docs.landerlab.io/llms.txt
> Use this file to discover all available pages before exploring further.

# Connecting Gmail (SMTP) in LanderLab

> Send lead notification emails from your landing pages using Gmail SMTP and an app password.

When a visitor submits a form or lead on a landing page, LanderLab can email you a notification through your own SMTP server. This guide connects a Gmail or Google Workspace account using an app password.

<Info>
  Estimated time: about 10 minutes. You complete this once per sending account, then connect it to each landing page.
</Info>

## Before you start

<CardGroup cols={2}>
  <Card title="Google account ready" icon="google">
    A Gmail or Google Workspace address to send notifications from.
  </Card>

  <Card title="2-Step Verification on" icon="shield-check">
    Required before you can create an app password.
  </Card>

  <Card title="LanderLab access" icon="key">
    Edit access to the landing page project.
  </Card>

  <Card title="Recipient address" icon="inbox">
    The inbox that should receive the lead notifications.
  </Card>
</CardGroup>

<Warning>
  Use an app-specific password from your email provider, not your normal Gmail login password. Gmail blocks third-party SMTP sign-ins that use your normal password, so authentication will fail.
</Warning>

## Part 1: Generate a Gmail app password

<Steps>
  <Step title="Enable 2-Step Verification">
    Open your [Google Account](https://myaccount.google.com), go to the **Security** tab, and turn on **2-Step Verification** if it is not already active.

    <Note>
      Google requires 2-Step Verification to be on before the app password option becomes available.
    </Note>
  </Step>

  <Step title="Open the app passwords page">
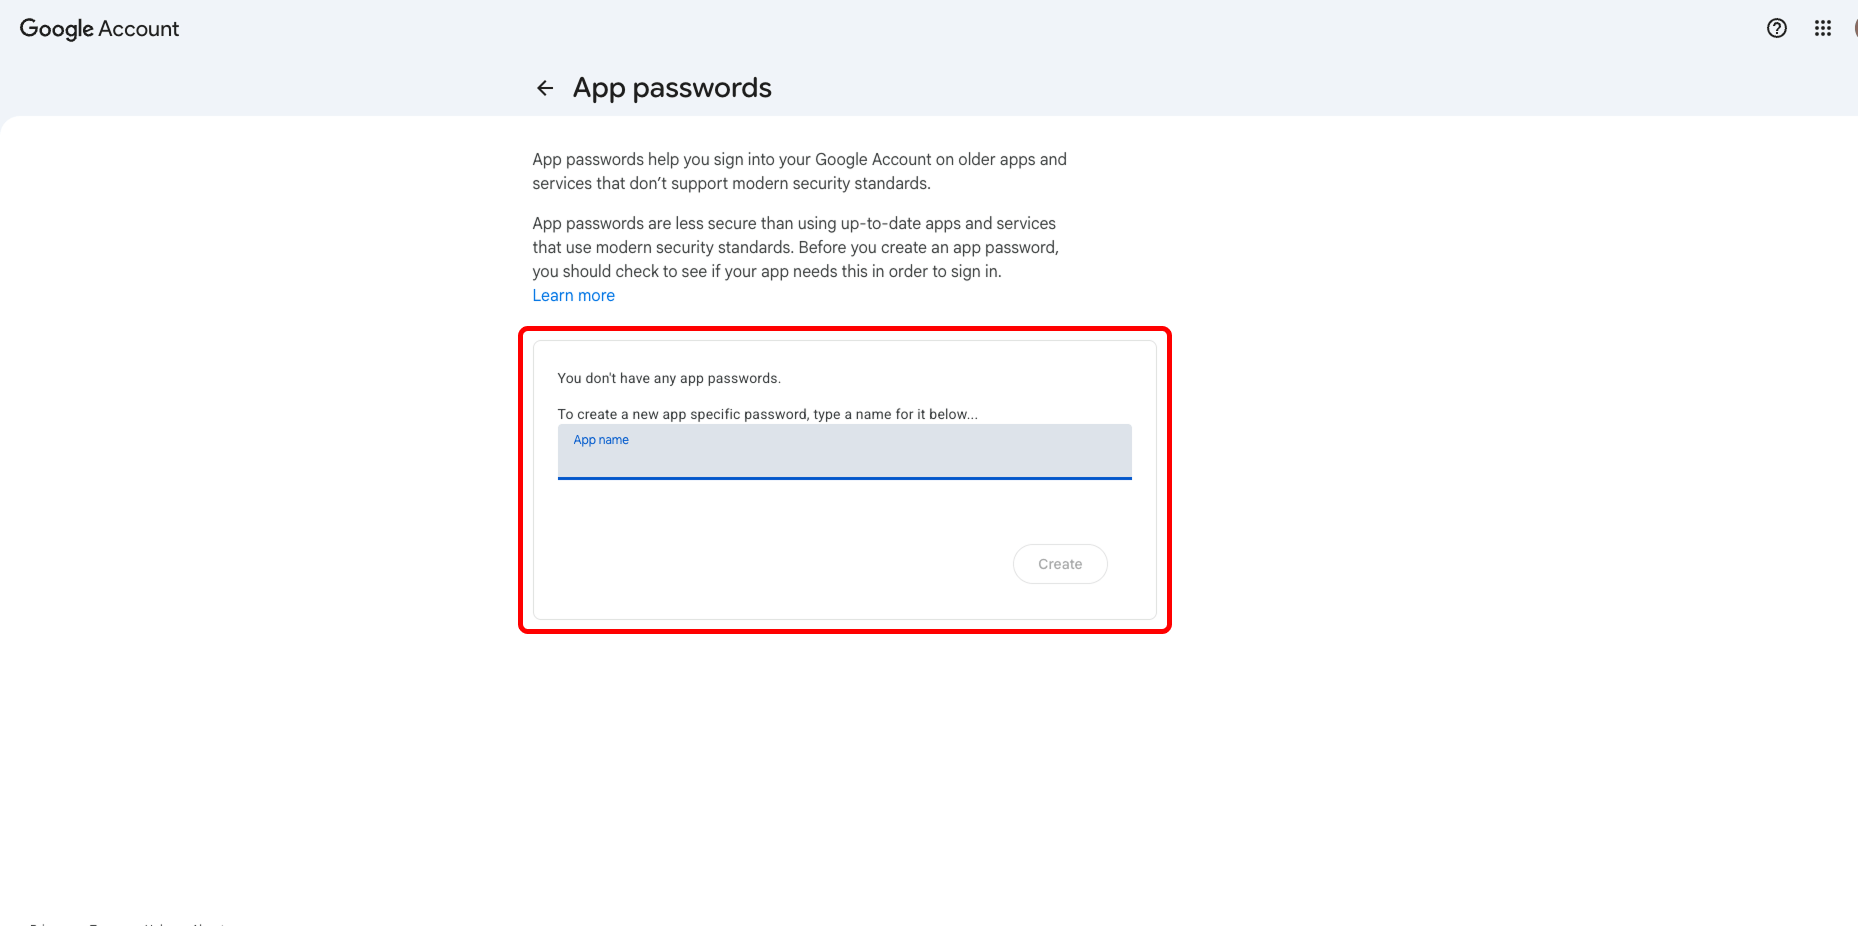
    Go to [myaccount.google.com/apppasswords](https://myaccount.google.com/apppasswords).
  </Step>

  <Step title="Create the password">
    In the **App name** field, type a clear label so you can find it later, for example `Landerlab`. Click **Create**.

    <Frame>
      <img src="https://mintcdn.com/landerlab-babdc23f/KufV1vuXu4qVF_bK/images/create-app-paswords.png?fit=max&auto=format&n=KufV1vuXu4qVF_bK&q=85&s=8d9554619a0daba9d9b047b00665dbb0" alt="Create App Paswords" width="1858" height="926" data-path="images/create-app-paswords.png" />
    </Frame>
  </Step>

  <Step title="Copy the 16-character password">
    Google shows a 16-character password once. Copy it now and remove any spaces so it pastes as one unbroken string.

    <Warning>
      Google only displays this password a single time. If you lose it, delete the entry from the same page and create a new one.
    </Warning>
  </Step>
</Steps>

## Part 2: Add the email integration in LanderLab

<Steps>
  <Step title="Open the integration browser">
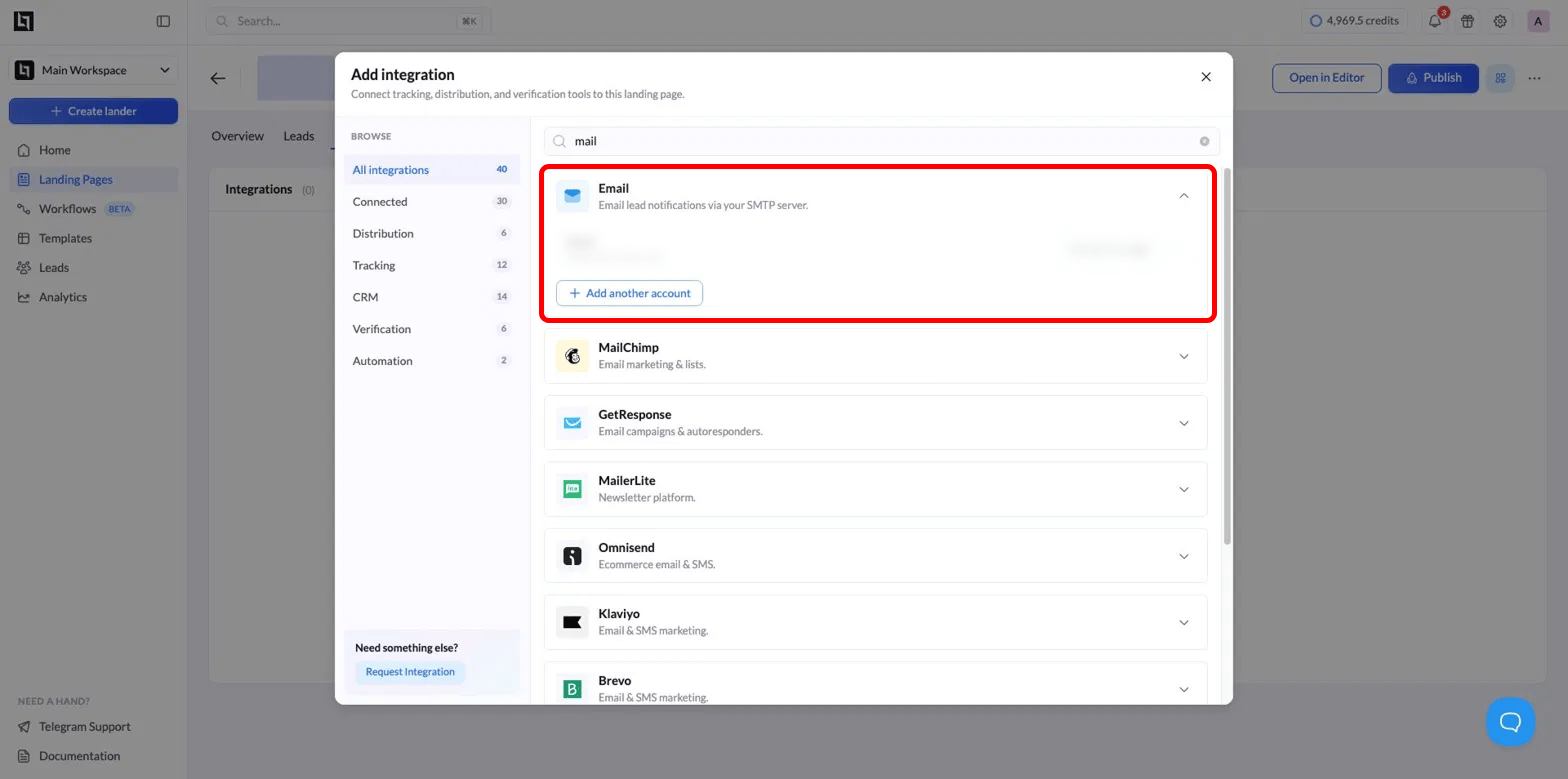
    Open the LP project, go to the **Integrations** area, then click **Add integration**. In the search box, type `mail`.

    <Frame>
      <img src="https://mintcdn.com/landerlab-babdc23f/Bq2uGS7A2TgJq5bV/images/Add-email-accouint.png?fit=max&auto=format&n=Bq2uGS7A2TgJq5bV&q=85&s=83bb01e6c3b33a63e534f582cb81164c" alt="Add Email Accouint" width="1568" height="779" data-path="images/Add-email-accouint.png" />
    </Frame>
  </Step>

  <Step title="Expand the Email option">
    Find the **Email** result labeled "Email lead notifications via your SMTP server" and expand it.
  </Step>

  <Step title="Fill the SMTP connection form">
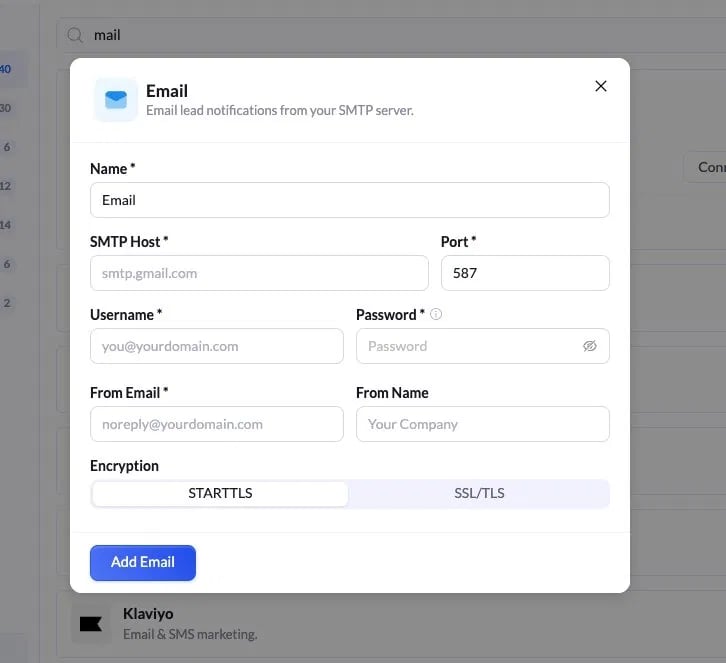
    Enter these values for Gmail:

    <Frame>
      <img src="https://mintcdn.com/landerlab-babdc23f/KufV1vuXu4qVF_bK/images/image-22.png?fit=max&auto=format&n=KufV1vuXu4qVF_bK&q=85&s=a216979141f27c6b418d7f2ee8d07a47" alt="Image" width="726" height="663" data-path="images/image-22.png" />
    </Frame>

    | Field      | Value                                                |
    | ---------- | ---------------------------------------------------- |
    | Name       | `Email`, or any label such as `TLS Leads`            |
    | SMTP Host  | `smtp.gmail.com`                                     |
    | Port       | `587`                                                |
    | Username   | Your full Gmail address, for example `you@gmail.com` |
    | Password   | The 16-character app password from Part 1            |
    | From Email | The address the notification is sent from            |
    | From Name  | Your company or sender name                          |
    | Encryption | `STARTTLS`                                           |
    <Tip>
      Match the port to the encryption: port `587` pairs with `STARTTLS`, and port `465` pairs with `SSL/TLS`. Mixing them, such as 587 with SSL/TLS, fails the connection.
    </Tip>
  </Step>

  <Step title="Save the connection">
    Click **Add Email**. The account now appears in your integrations list as connected, with the time it was added.

    <Note>
      To use more than one sending account, click **Add another account** rather than overwriting the existing one.
    </Note>
  </Step>
</Steps>

## Part 3: Connect the email to the page

Adding the SMTP account only stores the credentials. You still have to connect it to the landing page and choose who receives leads.

<Steps>
  <Step title="Start the connection">
    On the Email integration row, click **Connect to page**.
  </Step>

  <Step title="Set recipients">
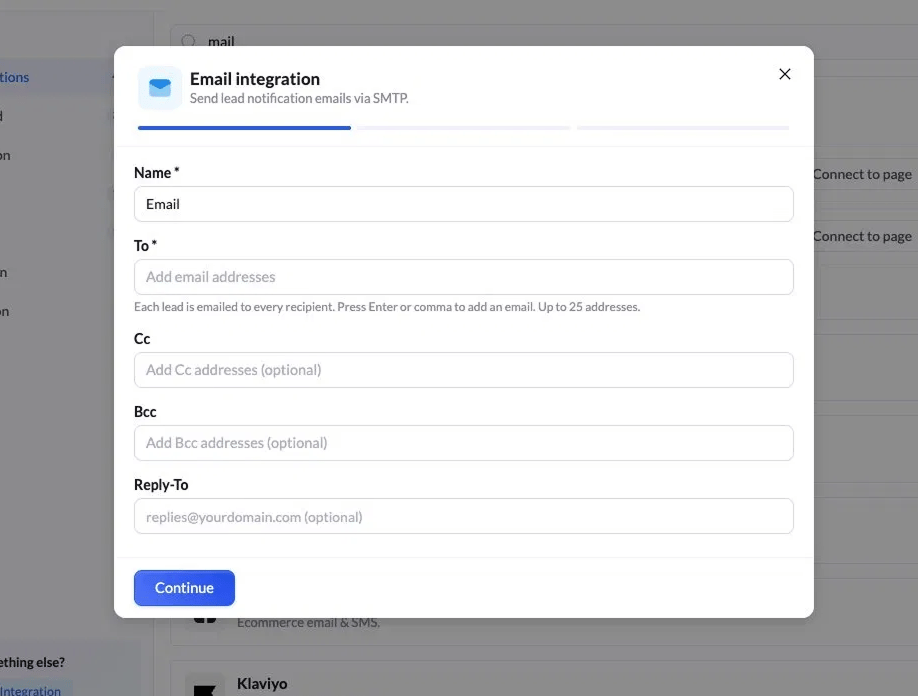
    Fill the recipient fields:

    <Frame>
      <img src="https://mintcdn.com/landerlab-babdc23f/UpoHfTfpG2tBjVav/images/step2.png?fit=max&auto=format&n=UpoHfTfpG2tBjVav&q=85&s=156e515e57d099bfb0eeb43f78203aae" alt="Step2" width="918" height="696" data-path="images/step2.png" />
    </Frame>

    | Field         | Notes                                                                                                                    |
    | ------------- | ------------------------------------------------------------------------------------------------------------------------ |
    | Name          | Internal label for this connection                                                                                       |
    | To (required) | Where leads are emailed. Press Enter or comma to add each address. Up to 25 addresses. Every lead goes to all recipients |
    | Cc            | Optional carbon copy addresses                                                                                           |
    | Bcc           | Optional blind copy addresses                                                                                            |
    | Reply-To      | Optional. The address replies go to, for example `replies@yourdomain.com`                                                |

    Click **Continue**.
  </Step>

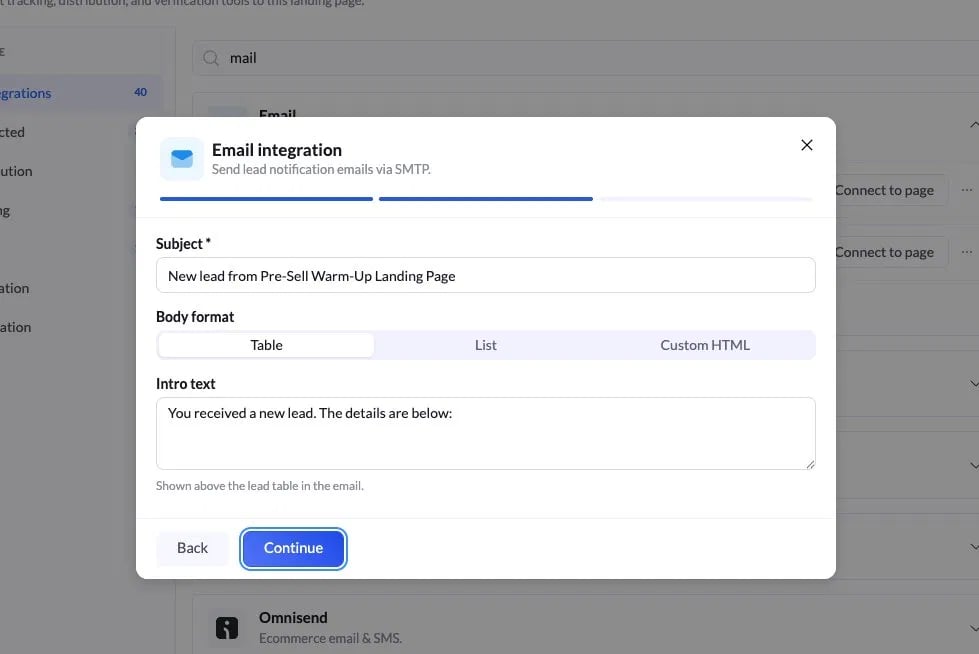
  <Step title="Set the email content">
    Choose what the notification looks like:

    <Frame>
      <img src="https://mintcdn.com/landerlab-babdc23f/KufV1vuXu4qVF_bK/images/image-24.png?fit=max&auto=format&n=KufV1vuXu4qVF_bK&q=85&s=1619289065bd57fb3fe5a523f805419d" alt="Image" width="979" height="654" data-path="images/image-24.png" />
    </Frame>

    | Field              | Notes                                                         |
    | ------------------ | ------------------------------------------------------------- |
    | Subject (required) | The email subject line, for example `New lead from [LP name]` |
    | Body format        | `Table`, `List`, or `Custom HTML`                             |
    | Intro text         | A short line shown above the lead data                        |

    Click **Continue**.
  </Step>

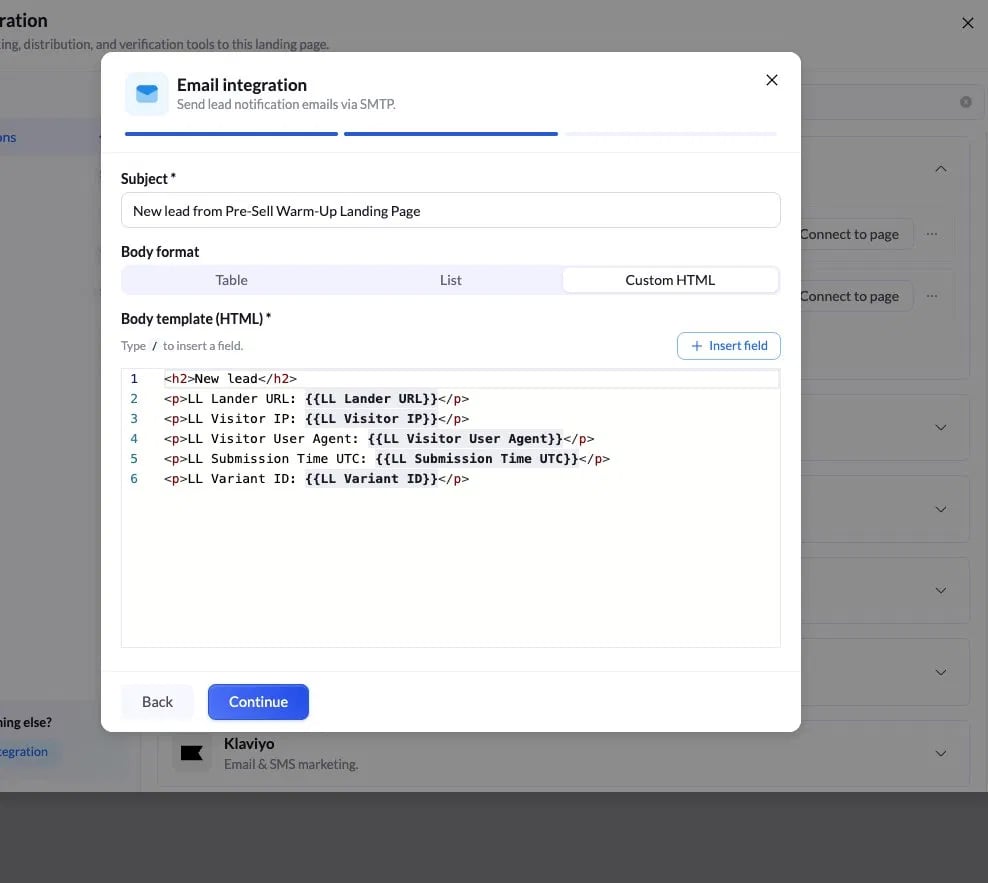
  <Step title="(Optional) Build a custom HTML body">
    If you select **Custom HTML**, you can lay out the email yourself and insert LanderLab merge fields. Type `/` in the editor or use **Insert field**.

    <Frame>
      <img src="https://mintcdn.com/landerlab-babdc23f/KufV1vuXu4qVF_bK/images/image-25.png?fit=max&auto=format&n=KufV1vuXu4qVF_bK&q=85&s=3c962ed9bfc5176db98e9abda49978c7" alt="Image" width="988" height="883" data-path="images/image-25.png" />
    </Frame>

    Common fields:

    * `{{LL Lander URL}}` — landing page the lead came from
    * `{{LL Visitor IP}}` — visitor IP address
    * `{{LL Visitor User Agent}}` — visitor browser and device
    * `{{LL Submission Time UTC}}` — when the lead was submitted
    * `{{LL Variant ID}}` — which LP variant the lead came from

    ```html Custom HTML body theme={null}
    <h2>New lead</h2>
    <p>LL Lander URL: {{LL Lander URL}}</p>
    <p>LL Visitor IP: {{LL Visitor IP}}</p>
    <p>LL Visitor User Agent: {{LL Visitor User Agent}}</p>
    <p>LL Submission Time UTC: {{LL Submission Time UTC}}</p>
    <p>LL Variant ID: {{LL Variant ID}}</p>
    ```

    Click **Continue** to finish.
  </Step>
</Steps>

## Part 4: Verify it works

<Steps>
  <Step title="Submit a test lead">
    Open the LP preview and submit a test lead through the form.
  </Step>

  <Step title="Confirm delivery">
    Check that the notification email arrives at the **To** address. If it does not arrive within a minute or two, check the spam folder.
  </Step>

  <Step title="Check the content">
    Confirm the subject line and body fields render as expected.
  </Step>
</Steps>

<Check>
  When a test lead lands in your inbox with the correct subject and fields, the integration is live.
</Check>

## Troubleshooting

<AccordionGroup>
  <Accordion title="Authentication failed when saving">
    The normal Gmail password was used. Replace it with the 16-character app password from Part 1.
  </Accordion>

  <Accordion title="Cannot create an app password">
    2-Step Verification is not enabled on the Google account. Turn it on in the Security tab, then retry.
  </Accordion>

  <Accordion title="Connection times out or is refused">
    The port and encryption do not match. Use `587` with `STARTTLS`, or `465` with `SSL/TLS`.
  </Accordion>

  <Accordion title="App password rejected">
    Spaces were left in the pasted value. Remove all spaces so it is exactly 16 characters.
  </Accordion>

  <Accordion title="Emails stop sending at high volume">
    Standard Gmail caps at 2,000 messages per day. For higher volume, use the Google Workspace SMTP relay (`smtp-relay.gmail.com`).
  </Accordion>

  <Accordion title="No email after a real lead">
    The account was added but never connected to the page. Run Part 3. Adding the account and connecting it to the LP are two separate steps.
  </Accordion>
</AccordionGroup>

## Quick reference

```text Gmail SMTP settings theme={null}
SMTP Host:   smtp.gmail.com
Port:        587
Encryption:  STARTTLS
Username:    full Gmail address
Password:    16-character Gmail app password (no spaces)
App pwd URL: https://myaccount.google.com/apppasswords
```
