> ## Documentation Index
> Fetch the complete documentation index at: https://docs.landerlab.io/llms.txt
> Use this file to discover all available pages before exploring further.
# Set Up Pipedrive Integration
> Learn how to connect Pipedrive to LanderLab and send every landing page lead to Pipedrive as a person with a lead opened automatically, in real time. No code needed.
 Connect Pipedrive to LanderLab to automatically send every new lead to your Pipedrive account the moment someone submits a form. No manual exports, no delays.
## What is Pipedrive and Why Use This Integration?
Pipedrive is a CRM and sales pipeline tool used to manage people, deals, and follow-ups in one place. When you connect Pipedrive to a LanderLab landing page, every lead that submits your form is saved as a **person** in Pipedrive, and a **lead** is opened for that person automatically.
Pipedrive connects with an **API Token**. You copy the token from your Pipedrive account and paste it into LanderLab once. After that, you map your form fields and go live.
Pipedrive integrations **are saved globally in your account**. Once you connect a Pipedrive account, you can reuse it across multiple landing pages without entering the API token again. You can also add more than one Pipedrive account from the same screen.
## Prerequisites
Before you start, make sure you have:
* A LanderLab account with at least one landing page that has an email field
* A Pipedrive account
* Your Pipedrive **personal API Token**
## Step 1: Get Your Pipedrive API Token
Log in to Pipedrive, click your **profile icon** in the top right, then go to **Company settings**.
In the left sidebar, click **Personal preferences**, then open the **API** tab.
Copy your **personal API token**. Keep it somewhere safe for the next step.
If you do not see the API tab, your user role does not have API access enabled. Ask your Pipedrive administrator to turn it on for your permission set.
## Step 2: Connect Your Pipedrive Account
In LanderLab, go to **Landing Pages** and open the landing page where you want to add Pipedrive.
Click **Add Integration** to open the integrations panel.
Search for **Pipedrive** or open the **CRM** category, then click **Pipedrive**.
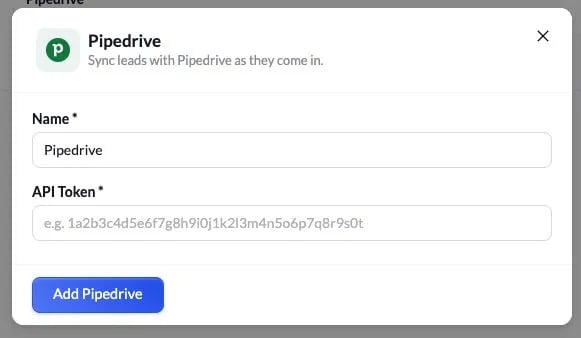
Fill in the following fields:
* **Name** - A label for this account (e.g. "Pipedrive"). This is only used to identify the account inside LanderLab.
* **API Token** - Paste the personal API token you copied from Pipedrive.
Click **Add Pipedrive** to save the account.
Connect Pipedrive to LanderLab to automatically send every new lead to your Pipedrive account the moment someone submits a form. No manual exports, no delays.
## What is Pipedrive and Why Use This Integration?
Pipedrive is a CRM and sales pipeline tool used to manage people, deals, and follow-ups in one place. When you connect Pipedrive to a LanderLab landing page, every lead that submits your form is saved as a **person** in Pipedrive, and a **lead** is opened for that person automatically.
Pipedrive connects with an **API Token**. You copy the token from your Pipedrive account and paste it into LanderLab once. After that, you map your form fields and go live.
Pipedrive integrations **are saved globally in your account**. Once you connect a Pipedrive account, you can reuse it across multiple landing pages without entering the API token again. You can also add more than one Pipedrive account from the same screen.
## Prerequisites
Before you start, make sure you have:
* A LanderLab account with at least one landing page that has an email field
* A Pipedrive account
* Your Pipedrive **personal API Token**
## Step 1: Get Your Pipedrive API Token
Log in to Pipedrive, click your **profile icon** in the top right, then go to **Company settings**.
In the left sidebar, click **Personal preferences**, then open the **API** tab.
Copy your **personal API token**. Keep it somewhere safe for the next step.
If you do not see the API tab, your user role does not have API access enabled. Ask your Pipedrive administrator to turn it on for your permission set.
## Step 2: Connect Your Pipedrive Account
In LanderLab, go to **Landing Pages** and open the landing page where you want to add Pipedrive.
Click **Add Integration** to open the integrations panel.
Search for **Pipedrive** or open the **CRM** category, then click **Pipedrive**.
Fill in the following fields:
* **Name** - A label for this account (e.g. "Pipedrive"). This is only used to identify the account inside LanderLab.
* **API Token** - Paste the personal API token you copied from Pipedrive.
Click **Add Pipedrive** to save the account.
 ## Step 3: Configure the Integration
After saving your account, a setup wizard opens. It has three steps: name the integration, map your fields, then review and connect.
### Name the integration
Give this integration a recognizable name (e.g. "Pipedrive - Auto Leads"). This helps you find it in the integrations list on your landing page.
Click **Continue** to move to field mapping.
### Map your fields
LanderLab shows your form fields on the left and a dropdown to pick the matching **Pipedrive field** on the right.
Pipedrive needs **Name** to create a person. You must map a field to **Name**, otherwise the integration cannot create the record and you will see a "Map a field to Name so Pipedrive can create the person" message.
Map your form's **email** field to the Pipedrive **Email** field.
Map a field to **Name**. This is required. Use your form's name field if you collect one, or map another value so Pipedrive has a name to create the person with.
## Step 3: Configure the Integration
After saving your account, a setup wizard opens. It has three steps: name the integration, map your fields, then review and connect.
### Name the integration
Give this integration a recognizable name (e.g. "Pipedrive - Auto Leads"). This helps you find it in the integrations list on your landing page.
Click **Continue** to move to field mapping.
### Map your fields
LanderLab shows your form fields on the left and a dropdown to pick the matching **Pipedrive field** on the right.
Pipedrive needs **Name** to create a person. You must map a field to **Name**, otherwise the integration cannot create the record and you will see a "Map a field to Name so Pipedrive can create the person" message.
Map your form's **email** field to the Pipedrive **Email** field.
Map a field to **Name**. This is required. Use your form's name field if you collect one, or map another value so Pipedrive has a name to create the person with.
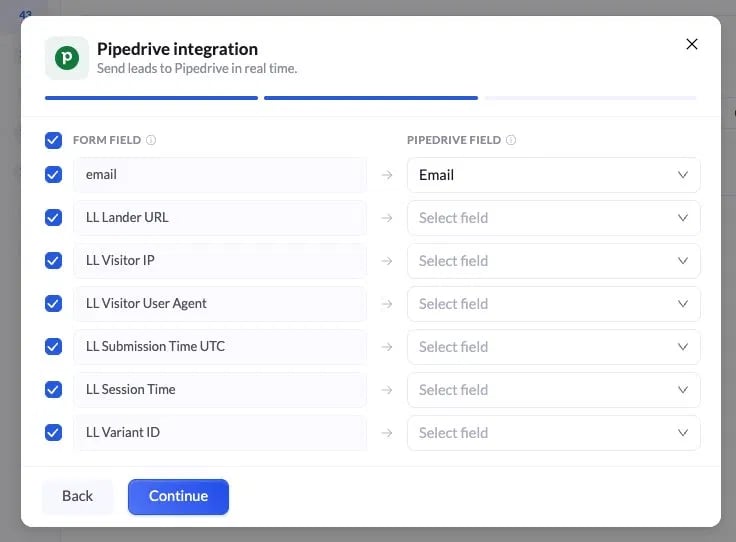 Map any other fields you want to send. LanderLab also includes tracking fields you can pass along:
* LL Lander URL
* LL Visitor IP
* LL Visitor User Agent
* LL Submission Time UTC
* LL Session Time
* LL Variant ID
Fields you leave unmapped are not sent to Pipedrive.
Click **Continue** to move to the review step.
### Review and connect
The final step shows everything that will be sent to Pipedrive for every lead, including each mapped field. Review it carefully. If anything looks off, click **Back** to make changes.
Click **Connect Pipedrive** to save and activate the integration. From now on, every lead submitted on this landing page is sent to Pipedrive in real time as a person, with a lead opened for them.
## Tips for Pipedrive Integration
* **Name is required** - Pipedrive cannot create a person without a Name. Always map a field to Name before connecting.
* **Reuse your account** - Because Pipedrive is saved globally, you only enter the API token once. Connect the same account to other landing pages in a few clicks.
* **Pass tracking data** - Map fields like LL Lander URL and LL Variant ID to see which page and variant each lead came from.
* **Test with a real submission** - After connecting, submit a test lead and confirm the person and lead appear in Pipedrive within a few seconds.
## Troubleshooting
Pipedrive requires a Name to create a record. Go back to the field mapping step and map one of your form fields to the **Name** field, then continue.
Confirm the integration is active on your landing page and that **Name** is mapped. Also check that your API token is still valid in Pipedrive, since generating a new token invalidates the old one.
Make sure you copied the full **personal API token** from **Company settings > Personal preferences > API**. If you recently regenerated it in Pipedrive, update the token in LanderLab to match.
Your user role does not have API access. Ask your Pipedrive administrator to enable API access for your permission set, then copy the token again.
Map any other fields you want to send. LanderLab also includes tracking fields you can pass along:
* LL Lander URL
* LL Visitor IP
* LL Visitor User Agent
* LL Submission Time UTC
* LL Session Time
* LL Variant ID
Fields you leave unmapped are not sent to Pipedrive.
Click **Continue** to move to the review step.
### Review and connect
The final step shows everything that will be sent to Pipedrive for every lead, including each mapped field. Review it carefully. If anything looks off, click **Back** to make changes.
Click **Connect Pipedrive** to save and activate the integration. From now on, every lead submitted on this landing page is sent to Pipedrive in real time as a person, with a lead opened for them.
## Tips for Pipedrive Integration
* **Name is required** - Pipedrive cannot create a person without a Name. Always map a field to Name before connecting.
* **Reuse your account** - Because Pipedrive is saved globally, you only enter the API token once. Connect the same account to other landing pages in a few clicks.
* **Pass tracking data** - Map fields like LL Lander URL and LL Variant ID to see which page and variant each lead came from.
* **Test with a real submission** - After connecting, submit a test lead and confirm the person and lead appear in Pipedrive within a few seconds.
## Troubleshooting
Pipedrive requires a Name to create a record. Go back to the field mapping step and map one of your form fields to the **Name** field, then continue.
Confirm the integration is active on your landing page and that **Name** is mapped. Also check that your API token is still valid in Pipedrive, since generating a new token invalidates the old one.
Make sure you copied the full **personal API token** from **Company settings > Personal preferences > API**. If you recently regenerated it in Pipedrive, update the token in LanderLab to match.
Your user role does not have API access. Ask your Pipedrive administrator to enable API access for your permission set, then copy the token again.