> ## Documentation Index
> Fetch the complete documentation index at: https://docs.landerlab.io/llms.txt
> Use this file to discover all available pages before exploring further.
# Set Up Microsoft Clarity Integration
> Learn how to add Microsoft Clarity to your landing pages in LanderLab to record sessions, view heatmaps, and see exactly how visitors interact with your pages.
 Add Microsoft Clarity to your landing pages in LanderLab to record real visitor sessions, see heatmaps of clicks and scrolls, and find out where people get stuck before they convert.
## What is Microsoft Clarity?
Microsoft Clarity is a free behavior analytics tool. It records visitor sessions and turns them into heatmaps and session replays, so you can watch how real people scroll, click, and move through your landing page.
Where Google Analytics tells you **what** happened, Clarity shows you **why** it happened. You can spot dead clicks, rage clicks, and drop-off points on a specific step of your funnel.
LanderLab handles the Clarity script installation for you. Instead of pasting the tracking code into your page, you enter your Project ID and LanderLab adds the script on publish.
Once you add a Microsoft Clarity integration, it is saved **globally** in your account. You can connect the same account to as many landing pages as you want without entering the details again.
## How to Add Microsoft Clarity
Go to **Landing Pages** and click the **name of the landing page** where you want to track visitor behavior.
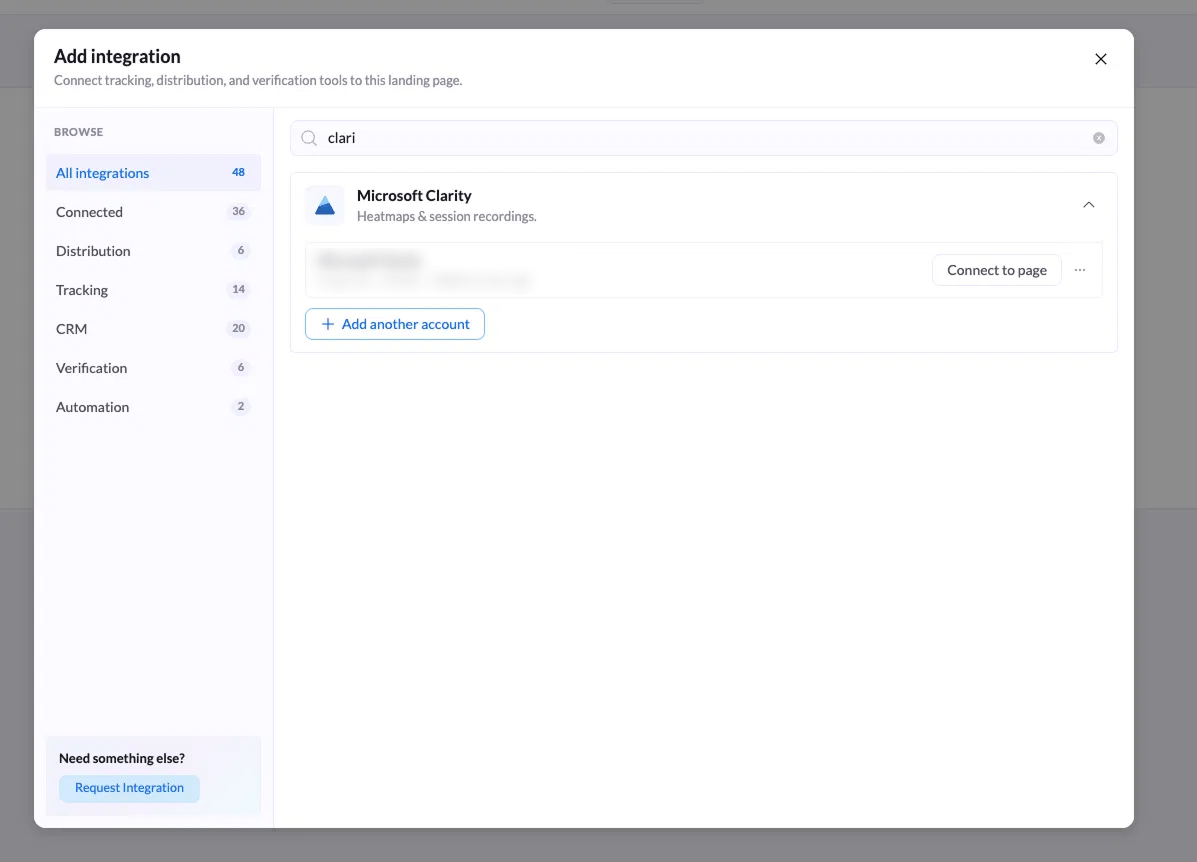
Click **Add Integration**, then search for **Clarity** in the search bar or open the **Tracking** category on the left.
Click **Microsoft Clarity**, then click **Add another account** if you already have one saved. A short configuration form appears.
Add Microsoft Clarity to your landing pages in LanderLab to record real visitor sessions, see heatmaps of clicks and scrolls, and find out where people get stuck before they convert.
## What is Microsoft Clarity?
Microsoft Clarity is a free behavior analytics tool. It records visitor sessions and turns them into heatmaps and session replays, so you can watch how real people scroll, click, and move through your landing page.
Where Google Analytics tells you **what** happened, Clarity shows you **why** it happened. You can spot dead clicks, rage clicks, and drop-off points on a specific step of your funnel.
LanderLab handles the Clarity script installation for you. Instead of pasting the tracking code into your page, you enter your Project ID and LanderLab adds the script on publish.
Once you add a Microsoft Clarity integration, it is saved **globally** in your account. You can connect the same account to as many landing pages as you want without entering the details again.
## How to Add Microsoft Clarity
Go to **Landing Pages** and click the **name of the landing page** where you want to track visitor behavior.
Click **Add Integration**, then search for **Clarity** in the search bar or open the **Tracking** category on the left.
Click **Microsoft Clarity**, then click **Add another account** if you already have one saved. A short configuration form appears.
 | Field | Description |
| :------------- | :--------------------------------------------------------------------------------------------------------------------------- |
| **Name** | A label to identify this account (e.g. "Microsoft Clarity" or "Clarity - Solar Funnel"). Useful when you save more than one. |
| **Project ID** | Your Clarity project ID, a short alphanumeric string such as `abcdef1234`. Found in your Clarity project settings. |
Click **Add Microsoft Clarity** to save the account. It is stored globally, so it will be ready to use on any other landing page.
Click **Connect to page**, choose which variants should run the script under **Apply to variants**, then confirm with **Connect to page**.
| Field | Description |
| :------------- | :--------------------------------------------------------------------------------------------------------------------------- |
| **Name** | A label to identify this account (e.g. "Microsoft Clarity" or "Clarity - Solar Funnel"). Useful when you save more than one. |
| **Project ID** | Your Clarity project ID, a short alphanumeric string such as `abcdef1234`. Found in your Clarity project settings. |
Click **Add Microsoft Clarity** to save the account. It is stored globally, so it will be ready to use on any other landing page.
Click **Connect to page**, choose which variants should run the script under **Apply to variants**, then confirm with **Connect to page**.
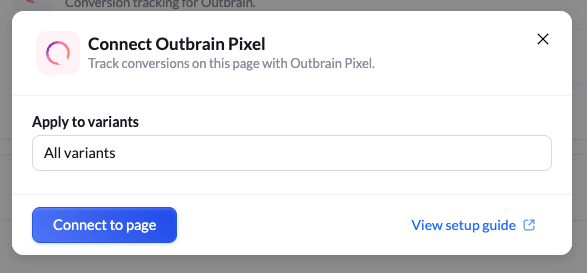 **All variants** is selected by default. Keep it if you want the same Clarity data across your A/B test, or pick a single variant to isolate one design.
Click **Publish** or **Republish**. The Clarity script only runs on the live page, so recordings start after publishing.
## Connect Microsoft Clarity to Another Landing Page
Because Clarity accounts are saved globally, you never need to enter the Project ID twice.
Go to **Landing Pages** and open the page you want to track.
Click **Add Integration**, search for **Clarity**, and you will see your saved account listed with its Project ID. Click **Connect to page** next to it.
Select the variants under **Apply to variants**, confirm, then **Publish** or **Republish** the page.
## Where to Find Your Clarity Project ID
1. Log in to [clarity.microsoft.com](https://clarity.microsoft.com).
2. Open the project you want to use, or click **New project** to create one.
3. Go to **Settings**, then **Overview** or **Setup**.
4. Copy the **Project ID**, a short alphanumeric code such as `abcdef1234`.
**All variants** is selected by default. Keep it if you want the same Clarity data across your A/B test, or pick a single variant to isolate one design.
Click **Publish** or **Republish**. The Clarity script only runs on the live page, so recordings start after publishing.
## Connect Microsoft Clarity to Another Landing Page
Because Clarity accounts are saved globally, you never need to enter the Project ID twice.
Go to **Landing Pages** and open the page you want to track.
Click **Add Integration**, search for **Clarity**, and you will see your saved account listed with its Project ID. Click **Connect to page** next to it.
Select the variants under **Apply to variants**, confirm, then **Publish** or **Republish** the page.
## Where to Find Your Clarity Project ID
1. Log in to [clarity.microsoft.com](https://clarity.microsoft.com).
2. Open the project you want to use, or click **New project** to create one.
3. Go to **Settings**, then **Overview** or **Setup**.
4. Copy the **Project ID**, a short alphanumeric code such as `abcdef1234`.
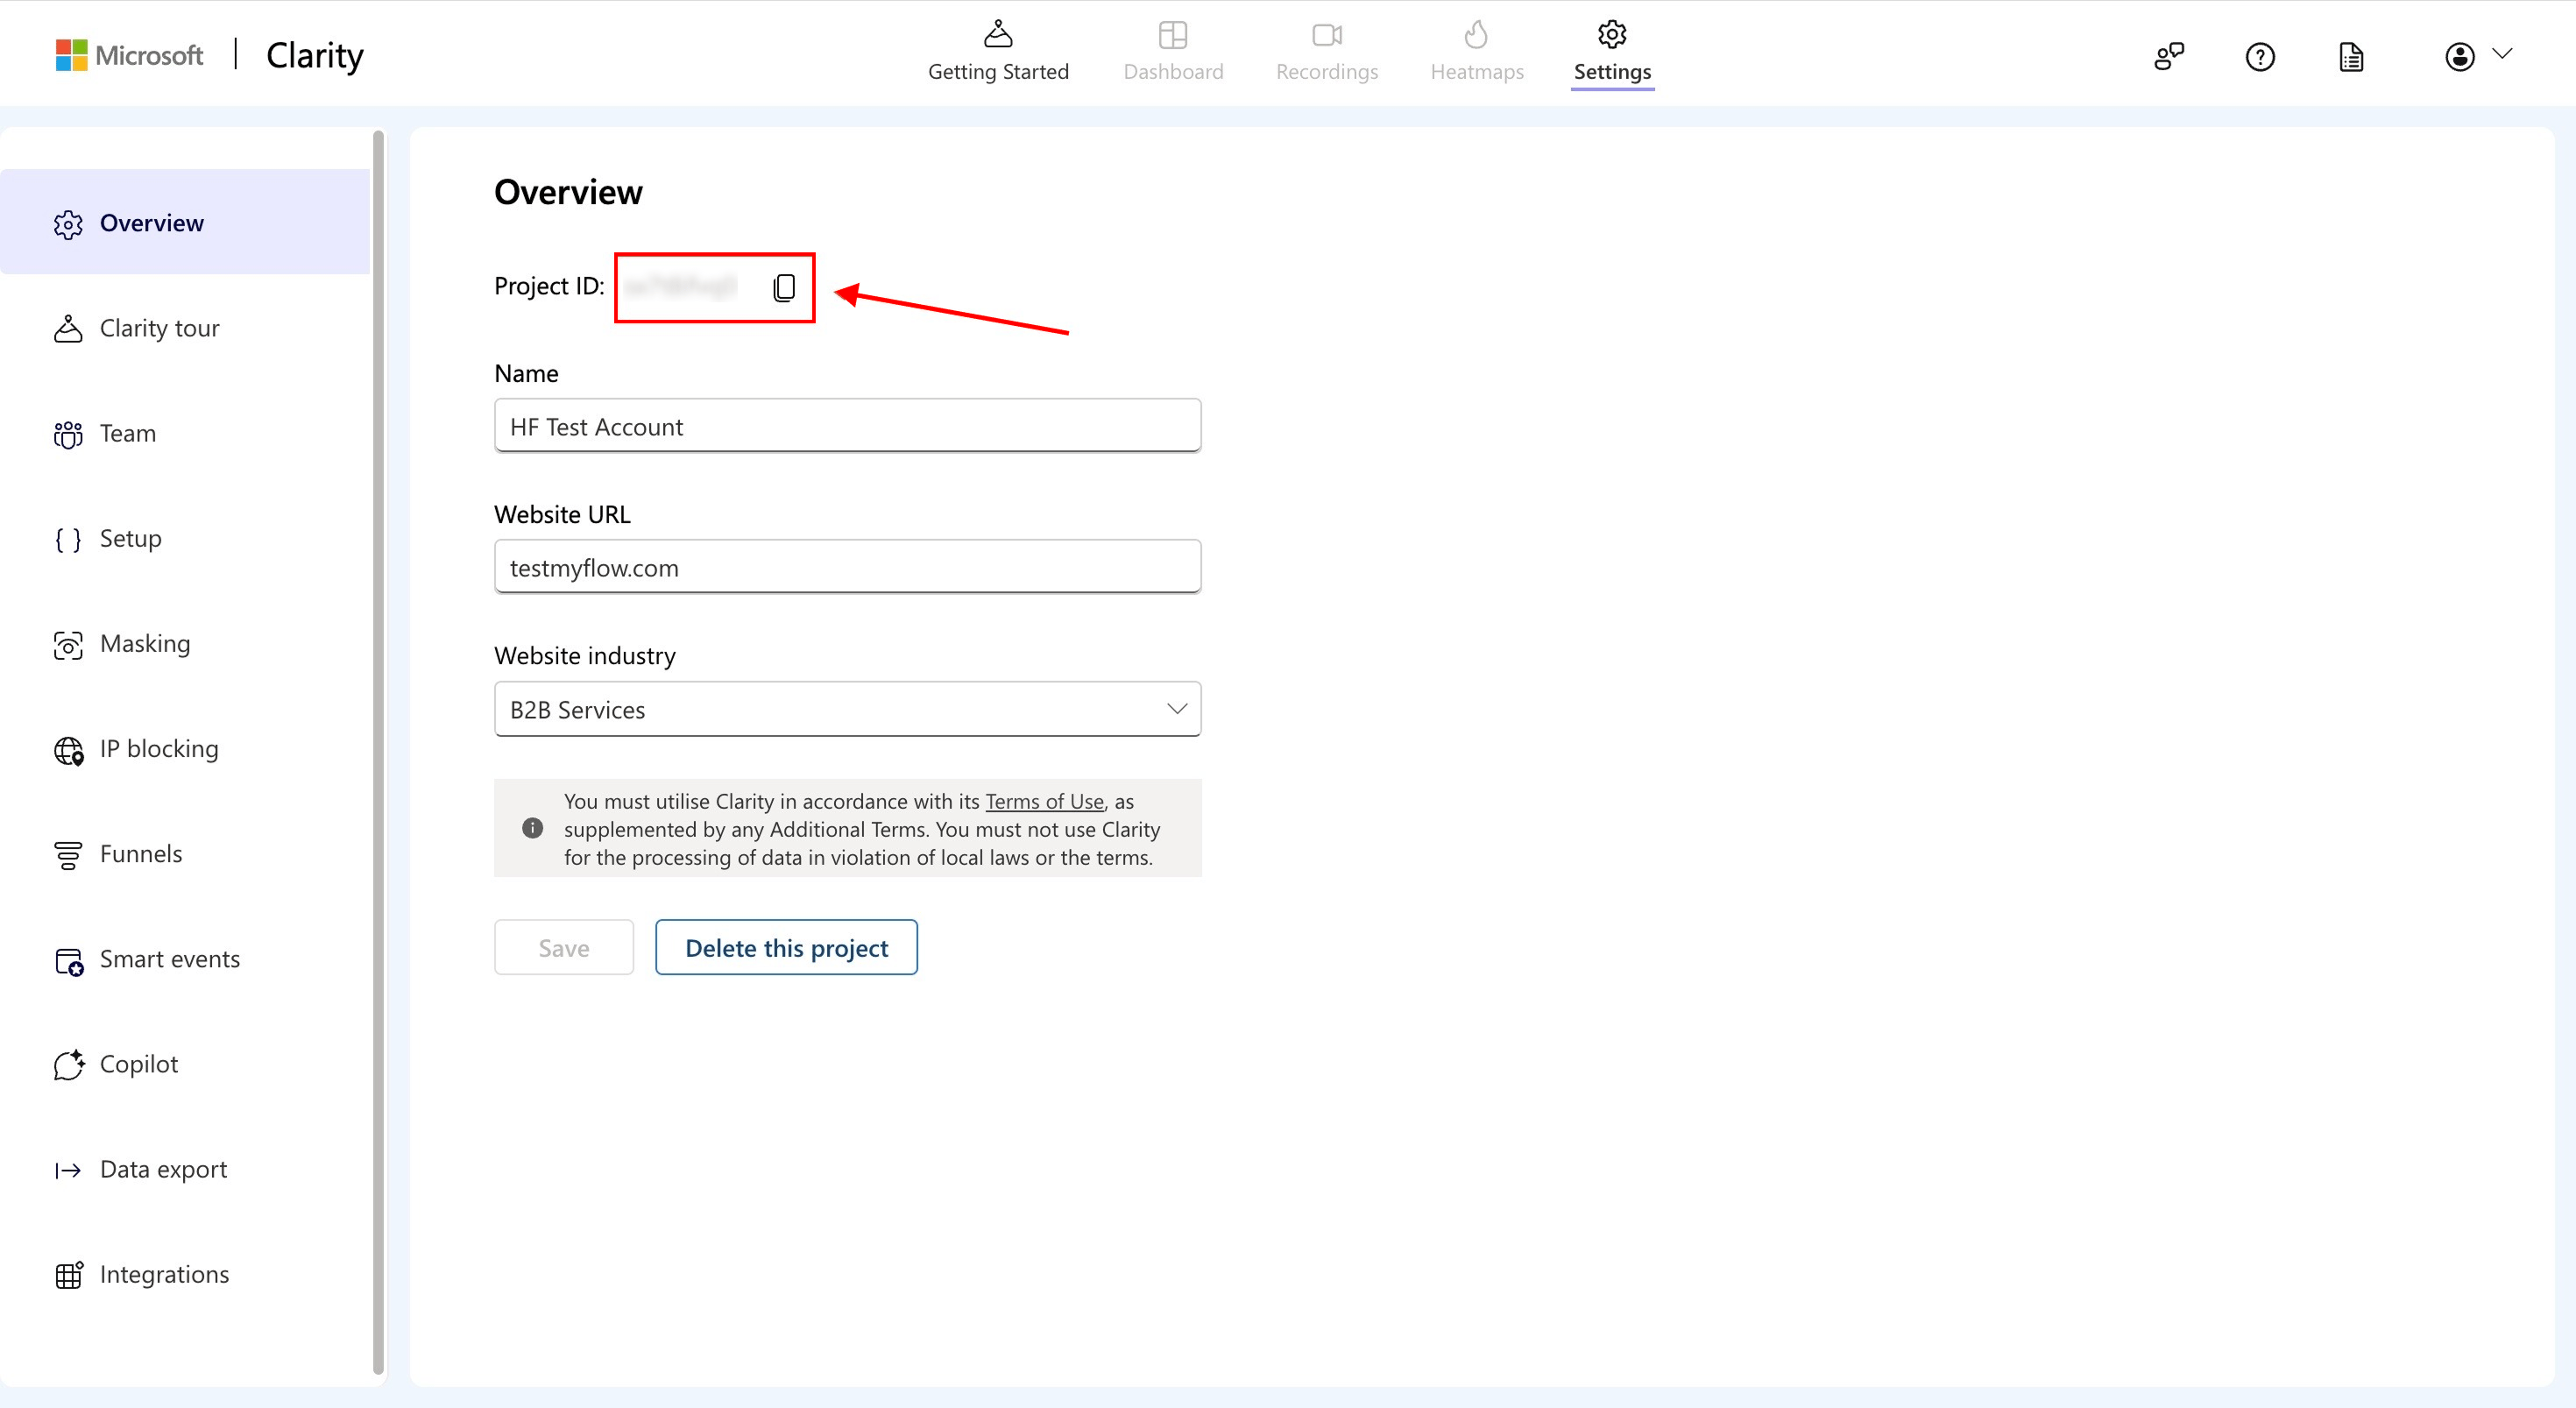 You can also read it straight from the browser address bar. When a project is open, the URL contains the ID right after `/projects/view/`.
Skip the installation instructions Clarity shows you. LanderLab injects the script automatically, so the Project ID is the only thing you need.
## How to Confirm Clarity Is Working
Open the live URL of your landing page in a normal browser tab and interact with it for a few seconds.
Go back to Clarity and open **Recordings**. Your session should appear within a few minutes.
If no data appears, republish the landing page and make sure the correct variant was selected under **Apply to variants**. Ad blockers and privacy browsers can also block Clarity, so test in a clean browser window.
## Why Use Microsoft Clarity
* **Watch real sessions** - See exactly how visitors scroll through your page, fill in your form, or abandon it halfway.
* **Read heatmaps** - Find out which headlines, buttons, and sections actually get attention, and which ones get ignored.
* **Catch friction fast** - Rage clicks and dead clicks point straight at broken buttons, confusing CTAs, or elements people expect to be clickable.
* **Improve A/B tests** - Pair Clarity replays with LanderLab A/B testing to understand why one variant outperforms another, not just by how much.
* **Free with no traffic limits** - Clarity is free to use and does not sample your data, so it works well even on high-volume paid traffic campaigns.
You can also read it straight from the browser address bar. When a project is open, the URL contains the ID right after `/projects/view/`.
Skip the installation instructions Clarity shows you. LanderLab injects the script automatically, so the Project ID is the only thing you need.
## How to Confirm Clarity Is Working
Open the live URL of your landing page in a normal browser tab and interact with it for a few seconds.
Go back to Clarity and open **Recordings**. Your session should appear within a few minutes.
If no data appears, republish the landing page and make sure the correct variant was selected under **Apply to variants**. Ad blockers and privacy browsers can also block Clarity, so test in a clean browser window.
## Why Use Microsoft Clarity
* **Watch real sessions** - See exactly how visitors scroll through your page, fill in your form, or abandon it halfway.
* **Read heatmaps** - Find out which headlines, buttons, and sections actually get attention, and which ones get ignored.
* **Catch friction fast** - Rage clicks and dead clicks point straight at broken buttons, confusing CTAs, or elements people expect to be clickable.
* **Improve A/B tests** - Pair Clarity replays with LanderLab A/B testing to understand why one variant outperforms another, not just by how much.
* **Free with no traffic limits** - Clarity is free to use and does not sample your data, so it works well even on high-volume paid traffic campaigns.