> ## Documentation Index
> Fetch the complete documentation index at: https://docs.landerlab.io/llms.txt
> Use this file to discover all available pages before exploring further.
# Get Started with Workflows
> Learn how to build automated workflows in LanderLab. Trigger on new leads, branch with conditions, send data to Google Sheets or any API, and track every run.
Workflows let you automate what happens after a visitor becomes a lead. Start with a trigger, add conditions and actions, then publish. Every lead that comes in runs through your workflow so the right data reaches the right place, automatically.
## What is a Workflow?
A workflow is an automated sequence that runs each time you capture a new lead. Instead of manually exporting data or wiring up separate integrations, you build a simple flow on a visual canvas: a **trigger** starts it, **conditions** decide which path a lead takes, and **actions** do the work, such as sending lead data to Google Sheets or posting it to an external API.
Each workflow is made of **nodes** connected together. You drag, drop, and connect them on the canvas, configure each one, then publish. Once live, you can watch every lead move through the workflow in real time and see exactly where each one landed, including any that failed.
Workflows is currently in **BETA**. Features and available nodes may change as the product evolves.
## How to Build Your First Workflow
The setup walks you through creating a workflow, adding a trigger, branching with conditions, configuring an action, and publishing, all in a single flow.
From the left sidebar, click **Workflows**. Click **Add Workflow** in the top right, enter a **Name** in the popup, then click **Create Workflow**.
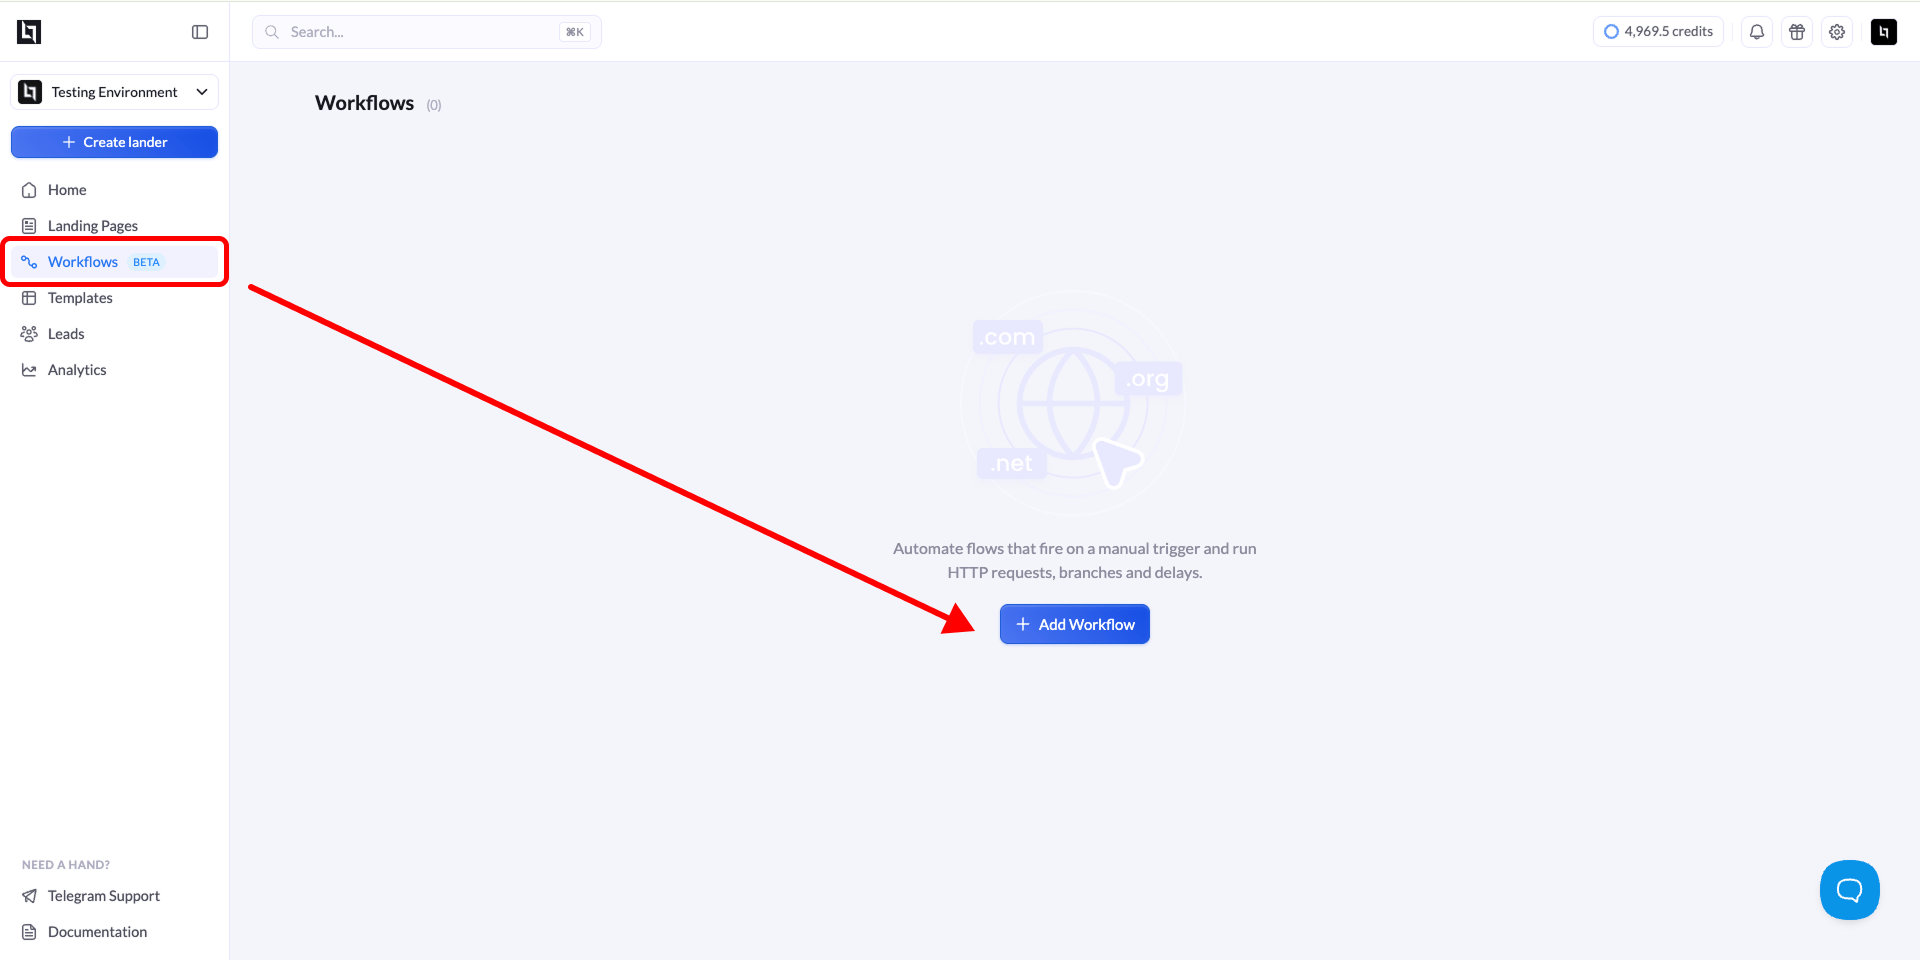 Use a name that describes the goal, such as "Qualified Leads to Sheets" or "US Traffic Routing." It makes workflows easier to find later.
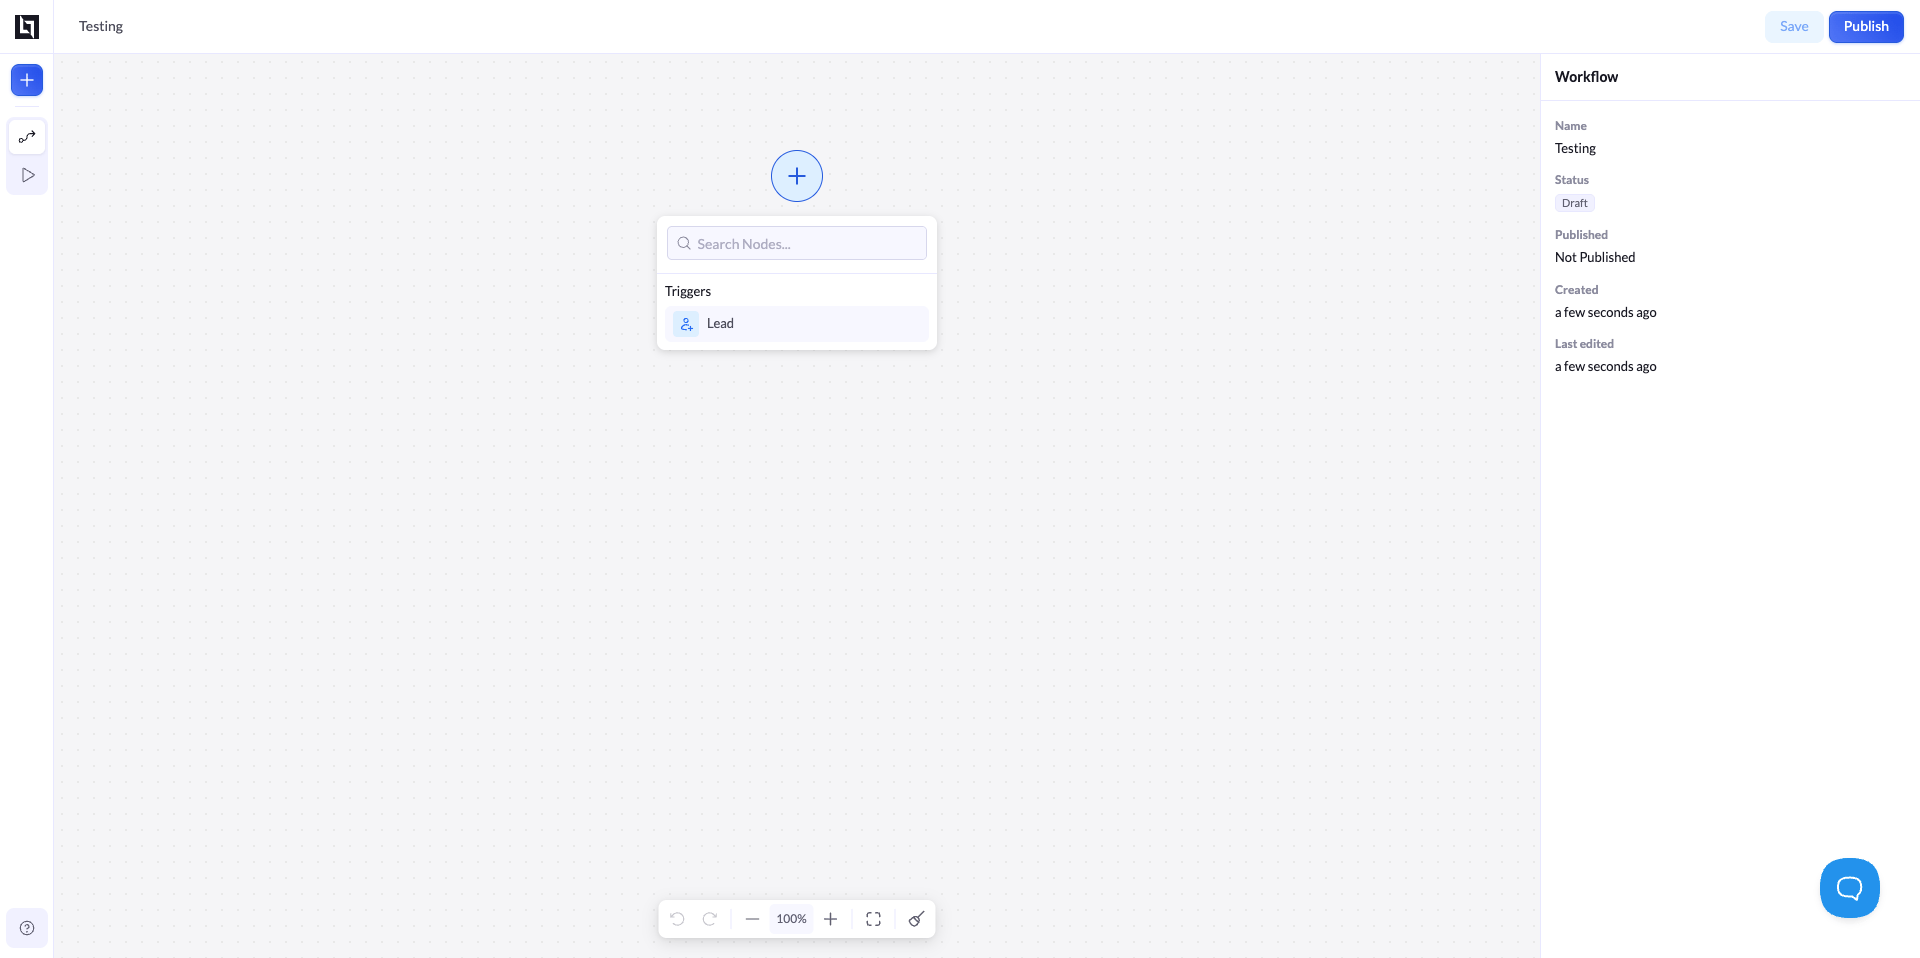
A new workflow opens on a blank canvas. Click the **+** button in the center of the canvas to open the node search, then under **Triggers**, select **Lead**.
The Lead trigger starts the workflow every time a visitor submits a form on a connected landing page.
Next, click the **Lead** node to open its settings. In the **Landing Page** section, click **Add landing page** and choose the landing page whose leads should start this workflow. Only leads from a connected landing page will trigger it.
Until a landing page is connected, the Lead trigger shows a warning icon and the workflow will not run. Connect at least one landing page before publishing.
Use a name that describes the goal, such as "Qualified Leads to Sheets" or "US Traffic Routing." It makes workflows easier to find later.
A new workflow opens on a blank canvas. Click the **+** button in the center of the canvas to open the node search, then under **Triggers**, select **Lead**.
The Lead trigger starts the workflow every time a visitor submits a form on a connected landing page.
Next, click the **Lead** node to open its settings. In the **Landing Page** section, click **Add landing page** and choose the landing page whose leads should start this workflow. Only leads from a connected landing page will trigger it.
Until a landing page is connected, the Lead trigger shows a warning icon and the workflow will not run. Connect at least one landing page before publishing.
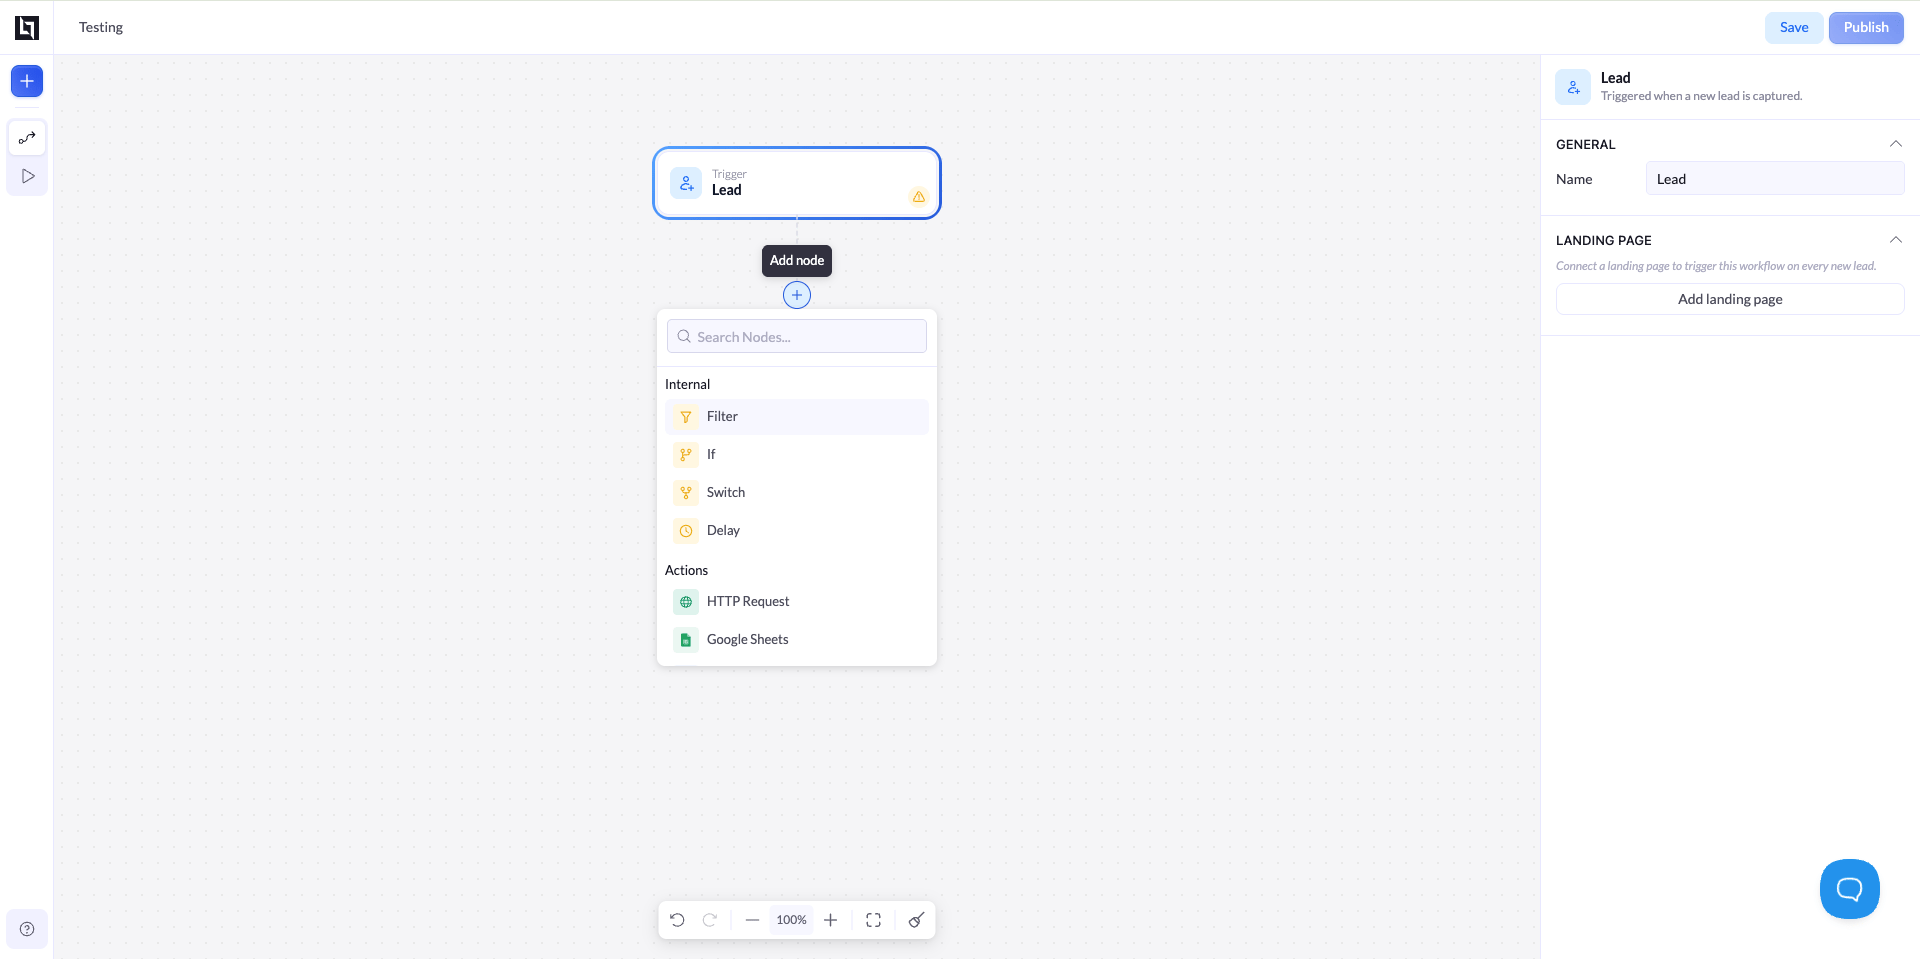
 To continue the flow, add the next node. You have two options:
| Option | How |
| ------------- | --------------------------------------------------------------- |
| **Canvas +** | Click the **+** that appears below a node on the canvas. |
| **Sidebar +** | Click the **+** in the top left toolbar to open the node panel. |
Both open the node search, where nodes are grouped into **Internal** (logic) and **Actions** (integrations).
| Group | Nodes |
| ------------ | ------------------------------------------------------------------------------------------------------------------------------------------------------------------------------------------------------------------------------------------------------------------------------------------------------------------------- |
| **Internal** | **Filter**, **If**, **Switch**, **Delay** |
| **Actions** | **HTTP Request**, **Google Sheets**, **LeadByte**, **LeadsPedia**, **LeadProsper**, **Phonexa**, **MailChimp**, **HubSpot**, **GetResponse**, **ActiveCampaign**, **MailerLite**, **Omnisend**, **Klaviyo**, **GoHighLevel**, **Brevo**, **Beehiiv**, **ConvertKit**, **Drip**, **AWeber**, **Meta CAPI**, **ClickFlare** |
To continue the flow, add the next node. You have two options:
| Option | How |
| ------------- | --------------------------------------------------------------- |
| **Canvas +** | Click the **+** that appears below a node on the canvas. |
| **Sidebar +** | Click the **+** in the top left toolbar to open the node panel. |
Both open the node search, where nodes are grouped into **Internal** (logic) and **Actions** (integrations).
| Group | Nodes |
| ------------ | ------------------------------------------------------------------------------------------------------------------------------------------------------------------------------------------------------------------------------------------------------------------------------------------------------------------------- |
| **Internal** | **Filter**, **If**, **Switch**, **Delay** |
| **Actions** | **HTTP Request**, **Google Sheets**, **LeadByte**, **LeadsPedia**, **LeadProsper**, **Phonexa**, **MailChimp**, **HubSpot**, **GetResponse**, **ActiveCampaign**, **MailerLite**, **Omnisend**, **Klaviyo**, **GoHighLevel**, **Brevo**, **Beehiiv**, **ConvertKit**, **Drip**, **AWeber**, **Meta CAPI**, **ClickFlare** |
 Click any node to open its settings panel on the right. Each node has its own fields.
For a **Google Sheets** action, the panel shows a **General** section to rename the node and an **Account** section where you click **Add account** to connect a Google account and choose where leads are written.
Click any node to open its settings panel on the right. Each node has its own fields.
For a **Google Sheets** action, the panel shows a **General** section to rename the node and an **Account** section where you click **Add account** to connect a Google account and choose where leads are written.
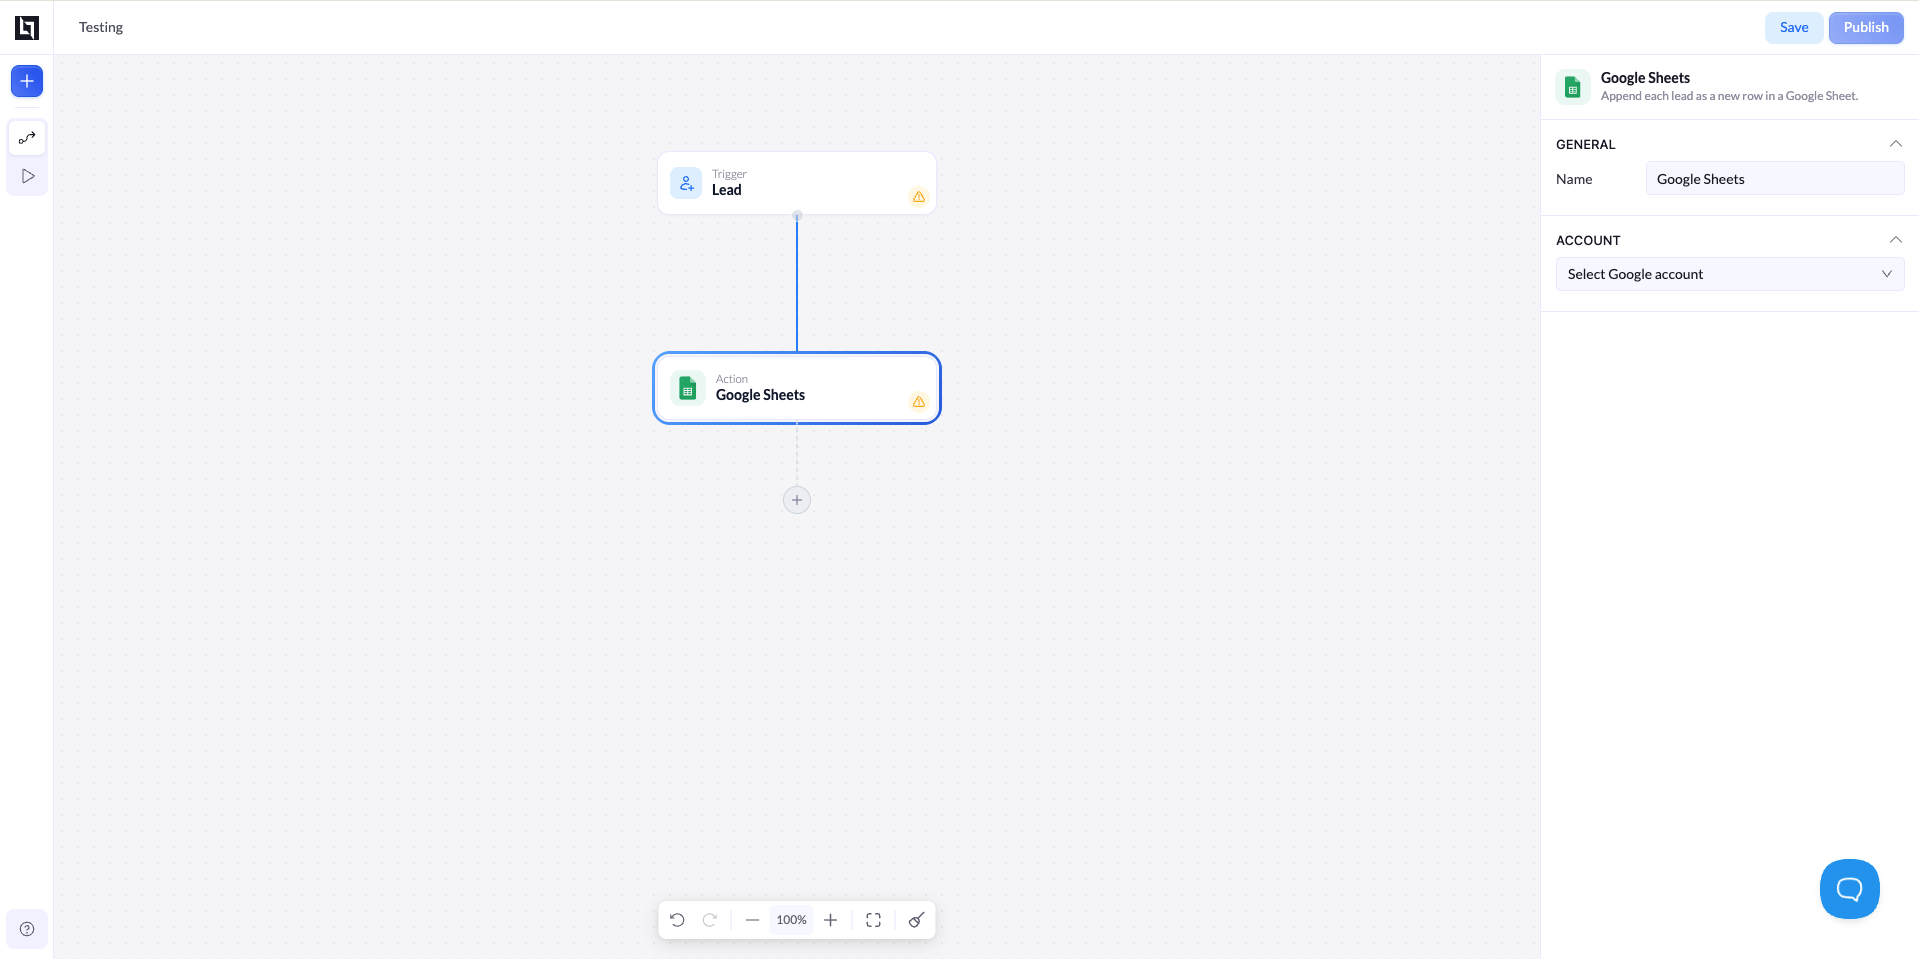 A yellow warning icon on a node means it still needs to be configured. Finish the setup on every node before publishing, or those steps will not run.
Click **Save** to keep your progress as a draft, or click **Publish** to make the workflow live. A published workflow starts running for every new lead right away.
Save often while building. Publishing is only needed when the workflow is ready to run on real leads.
Your workflow is now live. Every new lead captured on your connected landing pages will run through it automatically.
## Tracking Workflow Runs
Once your workflow is live, open the **Runs** view by clicking the **play icon** in the left toolbar. This is where you monitor activity.
Each run shows a single lead's journey through the workflow: where it entered, which path it took, and where it ended up. If a step fails, the run is marked so you can spot the problem quickly and fix the node.
Use the time filters (**1D**, **7D**, **1M**, **3M**, **All**, or **Custom**) to focus on a specific period. Before any leads come in, the view shows "No runs yet."
The Runs view is your audit trail. Check it regularly to confirm leads are flowing as expected and to catch failed steps early.
## Tips for Getting the Best Results
**Start simple, then expand.** Build a basic trigger-to-action flow first, confirm it runs, then add conditions and extra branches.
**Configure every node before publishing.** Any node with a warning icon is incomplete and will not run. Clear all warnings first.
**Use clear node names.** Renaming nodes in the General section makes complex workflows far easier to read and debug.
**Check Runs after going live.** Review the Runs view soon after publishing to confirm real leads are taking the paths you expect.
A yellow warning icon on a node means it still needs to be configured. Finish the setup on every node before publishing, or those steps will not run.
Click **Save** to keep your progress as a draft, or click **Publish** to make the workflow live. A published workflow starts running for every new lead right away.
Save often while building. Publishing is only needed when the workflow is ready to run on real leads.
Your workflow is now live. Every new lead captured on your connected landing pages will run through it automatically.
## Tracking Workflow Runs
Once your workflow is live, open the **Runs** view by clicking the **play icon** in the left toolbar. This is where you monitor activity.
Each run shows a single lead's journey through the workflow: where it entered, which path it took, and where it ended up. If a step fails, the run is marked so you can spot the problem quickly and fix the node.
Use the time filters (**1D**, **7D**, **1M**, **3M**, **All**, or **Custom**) to focus on a specific period. Before any leads come in, the view shows "No runs yet."
The Runs view is your audit trail. Check it regularly to confirm leads are flowing as expected and to catch failed steps early.
## Tips for Getting the Best Results
**Start simple, then expand.** Build a basic trigger-to-action flow first, confirm it runs, then add conditions and extra branches.
**Configure every node before publishing.** Any node with a warning icon is incomplete and will not run. Clear all warnings first.
**Use clear node names.** Renaming nodes in the General section makes complex workflows far easier to read and debug.
**Check Runs after going live.** Review the Runs view soon after publishing to confirm real leads are taking the paths you expect.