> ## Documentation Index
> Fetch the complete documentation index at: https://docs.landerlab.io/llms.txt
> Use this file to discover all available pages before exploring further.
# Switch Node (Multi-Case Routing)
> Use the Switch node in LanderLab workflows to route leads across many branches with cases and a Default path. Cases evaluate top to bottom by conditions.
The **Switch** node routes a lead across many branches based on conditions. You define a set of **cases**, each with its own conditions and its own path on the canvas. A lead follows the first case it matches. If it matches none, it follows the **Default** branch.
Switch is the multi-way version of the **If** node. Where If gives you two paths (Yes / No), Switch gives you as many as you need, plus a built-in Default catch-all.
Cases are evaluated **top to bottom**, and a lead takes the **first** case it matches. Order your cases from most specific to most general so a broad case doesn't catch leads meant for a narrower one.
## Add the Switch node
Switch lives under the **Internal** group in the node menu.
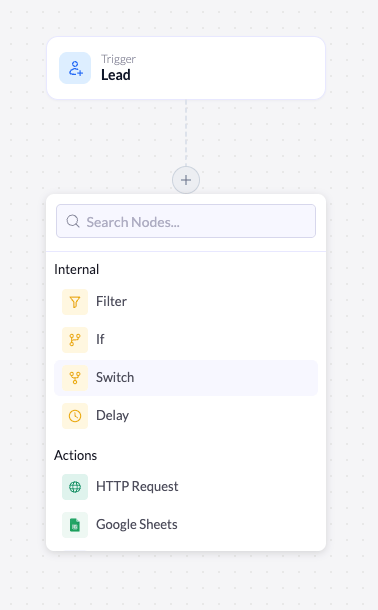 Click the **+** below the node where you want the branch to happen (usually right after the trigger).
Under **Internal**, click **Switch**. The node is added to the canvas and its settings open on the right.
A new Switch node has no cases yet, so it shows a warning icon. Add at least one case before publishing the workflow.
## How cases and the Default branch work
Each case you add becomes its own branch under the Switch node on the canvas. Alongside your cases, the node always has a **Default** branch.
Click the **+** below the node where you want the branch to happen (usually right after the trigger).
Under **Internal**, click **Switch**. The node is added to the canvas and its settings open on the right.
A new Switch node has no cases yet, so it shows a warning icon. Add at least one case before publishing the workflow.
## How cases and the Default branch work
Each case you add becomes its own branch under the Switch node on the canvas. Alongside your cases, the node always has a **Default** branch.
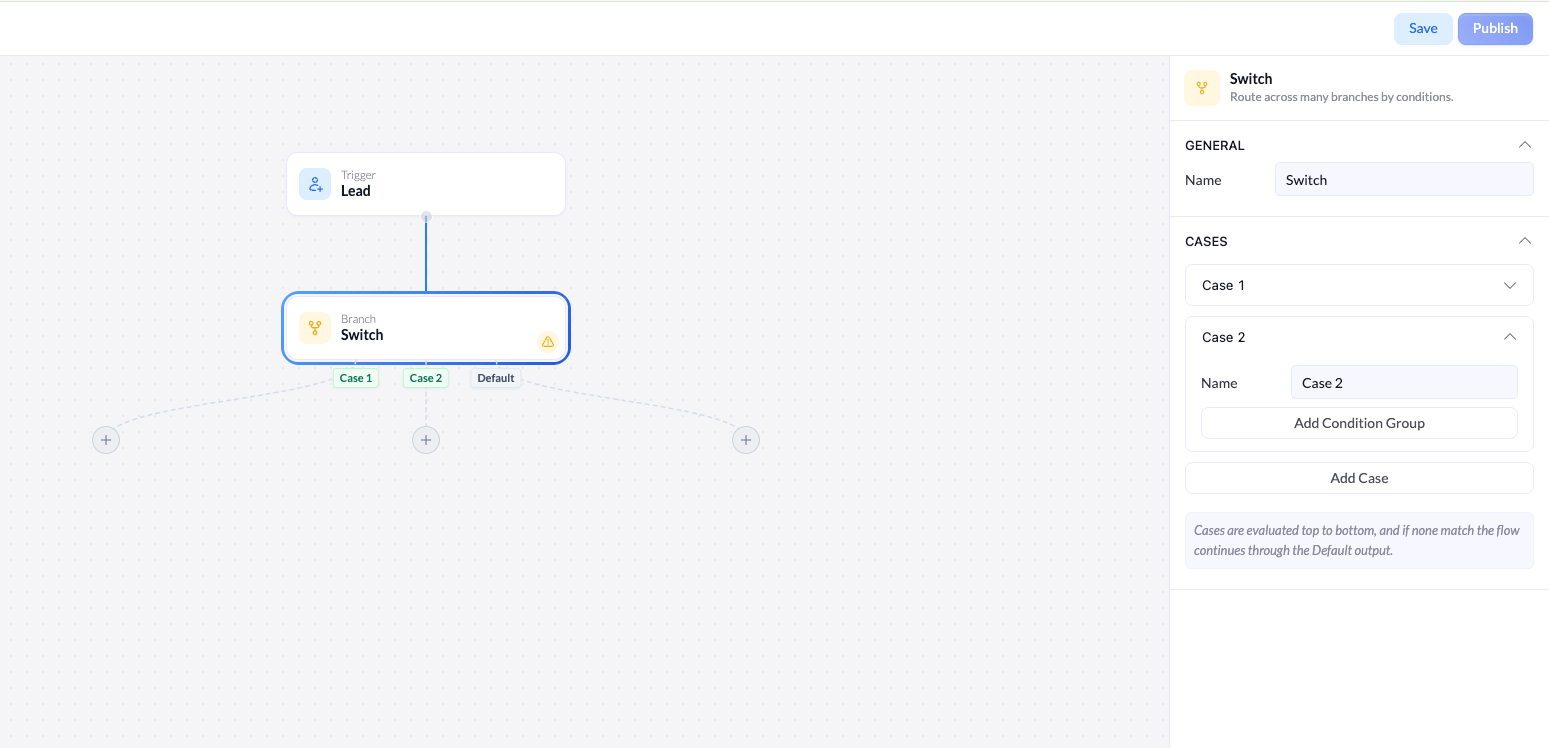 * **Cases** - evaluated top to bottom. A lead takes the first case whose conditions it matches.
* **Default** - the fallback path. A lead that matches no case flows through Default.
Each branch has its own **+** button, so you can build a different sequence of nodes for every case and for Default.
## Configure the Switch
Selecting the node opens its settings. The header confirms what it does: *Route across many branches by conditions.*
### General
| Setting | Description |
| -------- | --------------------------------------------------------------------------------------------------------------- |
| **Name** | The label for the Switch node on the canvas. Rename it to describe the decision (for example, `Route by plan`). |
### Add and manage cases
In the **Cases** section, click **Add Case** to create a case. Each case has:
* **Name** - the label shown on the case's branch (for example, `Pro plan`). Rename it so the canvas stays readable.
* **Conditions** - the rules a lead must match to take this case's branch.
* **Duplicate / delete** - use the icons on the case header to copy a case or remove it.
Click **Add Case** again to add as many cases as you need. Each new case adds another branch to the left of Default.
## Build a case's conditions
Inside a case, click **Add Condition Group** to add your first condition. Conditions work exactly like they do in the Filter and If nodes. Each one has three parts, read left to right:
* **Cases** - evaluated top to bottom. A lead takes the first case whose conditions it matches.
* **Default** - the fallback path. A lead that matches no case flows through Default.
Each branch has its own **+** button, so you can build a different sequence of nodes for every case and for Default.
## Configure the Switch
Selecting the node opens its settings. The header confirms what it does: *Route across many branches by conditions.*
### General
| Setting | Description |
| -------- | --------------------------------------------------------------------------------------------------------------- |
| **Name** | The label for the Switch node on the canvas. Rename it to describe the decision (for example, `Route by plan`). |
### Add and manage cases
In the **Cases** section, click **Add Case** to create a case. Each case has:
* **Name** - the label shown on the case's branch (for example, `Pro plan`). Rename it so the canvas stays readable.
* **Conditions** - the rules a lead must match to take this case's branch.
* **Duplicate / delete** - use the icons on the case header to copy a case or remove it.
Click **Add Case** again to add as many cases as you need. Each new case adds another branch to the left of Default.
## Build a case's conditions
Inside a case, click **Add Condition Group** to add your first condition. Conditions work exactly like they do in the Filter and If nodes. Each one has three parts, read left to right:
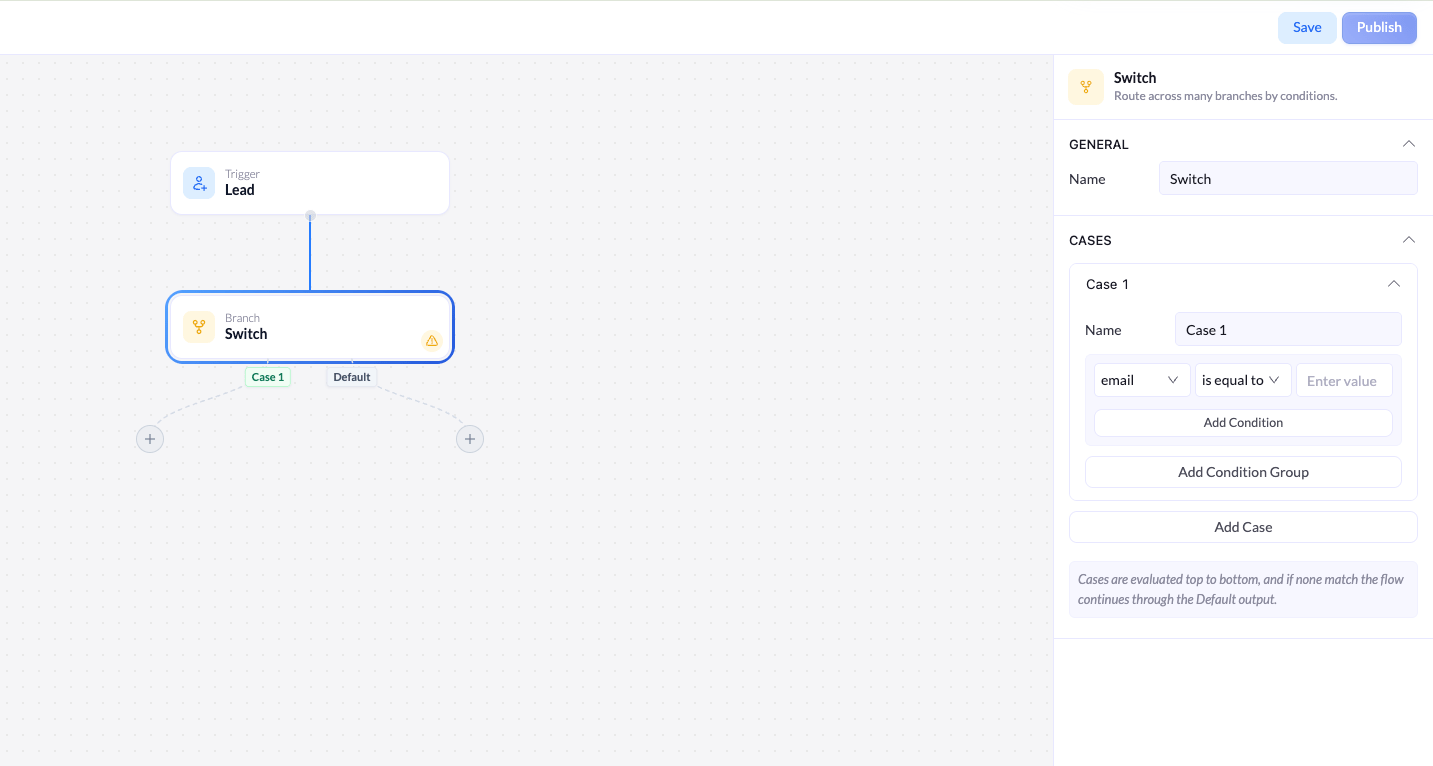 The first dropdown lists the fields captured on your connected landing page - for example, **email**. Pick the field to check.
The second dropdown sets how the field is compared - for example, **is equal to**, **contains**, **greater than**, or **less than**.
The third field is what you compare against. Type the value to check for.
You can add more conditions to a case with **Add Condition** (joined by an **AND / OR** toggle), and add more groups with **Add Condition Group** for two-level logic - same as the other condition-based nodes.
The available fields come from the landing page connected to your trigger. If a field you expect is missing, check that the page is capturing it and is connected to the trigger.
## Switch vs. If vs. Filter
| Node | Branches | Use when |
| ---------- | ----------------------------- | ------------------------------------------------------- |
| **Filter** | None (pass or stop) | You only want to keep matching leads and drop the rest. |
| **If** | Two (Yes / No) | You have exactly two outcomes. |
| **Switch** | Many (one per case + Default) | You need to sort leads into several paths at once. |
The first dropdown lists the fields captured on your connected landing page - for example, **email**. Pick the field to check.
The second dropdown sets how the field is compared - for example, **is equal to**, **contains**, **greater than**, or **less than**.
The third field is what you compare against. Type the value to check for.
You can add more conditions to a case with **Add Condition** (joined by an **AND / OR** toggle), and add more groups with **Add Condition Group** for two-level logic - same as the other condition-based nodes.
The available fields come from the landing page connected to your trigger. If a field you expect is missing, check that the page is capturing it and is connected to the trigger.
## Switch vs. If vs. Filter
| Node | Branches | Use when |
| ---------- | ----------------------------- | ------------------------------------------------------- |
| **Filter** | None (pass or stop) | You only want to keep matching leads and drop the rest. |
| **If** | Two (Yes / No) | You have exactly two outcomes. |
| **Switch** | Many (one per case + Default) | You need to sort leads into several paths at once. |