> ## Documentation Index
> Fetch the complete documentation index at: https://docs.landerlab.io/llms.txt
> Use this file to discover all available pages before exploring further.
# If Node (Yes/No Branching) Guide
> Set up the If node in LanderLab workflows to route leads down a Yes or No path by conditions. Learn fields, operators, AND/OR logic, and condition groups.
The **If** node splits your workflow into two paths based on conditions. Leads that match the conditions follow the **Yes** branch; everyone else follows the **No** branch. Use it when failing leads shouldn't stop - they should just go somewhere different.
If and Filter build conditions the exact same way. The difference is what happens to a lead that doesn't match: a filter stops it, while an If node sends it down the **No** path so you can still act on it.
Reach for **If** when you have two outcomes ("do this, otherwise do that"). Reach for **Filter** when you only want to keep matching leads and drop the rest. For more than two outcomes, use **Switch**.
## Add the If node
If lives under the **Internal** group in the node menu.
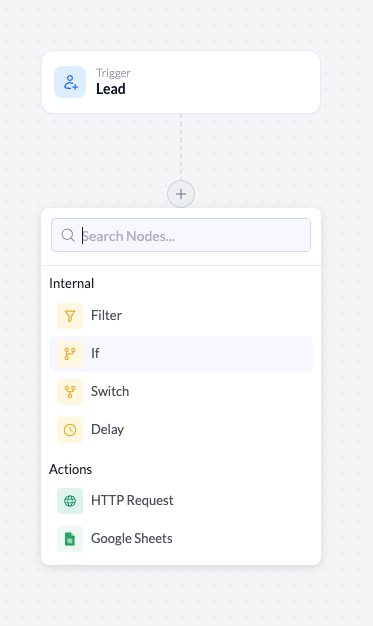 Click the **+** below the node where you want the branch to happen (usually right after the trigger).
Under **Internal**, click **If**. The node is added to the canvas and its settings open on the right.
## The Yes and No branches
Once added, the If node appears on the canvas with two paths below it: a green **Yes** branch and a red **No** branch. Each branch has its own **+** button so you can build a different sequence of nodes on each side.
Click the **+** below the node where you want the branch to happen (usually right after the trigger).
Under **Internal**, click **If**. The node is added to the canvas and its settings open on the right.
## The Yes and No branches
Once added, the If node appears on the canvas with two paths below it: a green **Yes** branch and a red **No** branch. Each branch has its own **+** button so you can build a different sequence of nodes on each side.
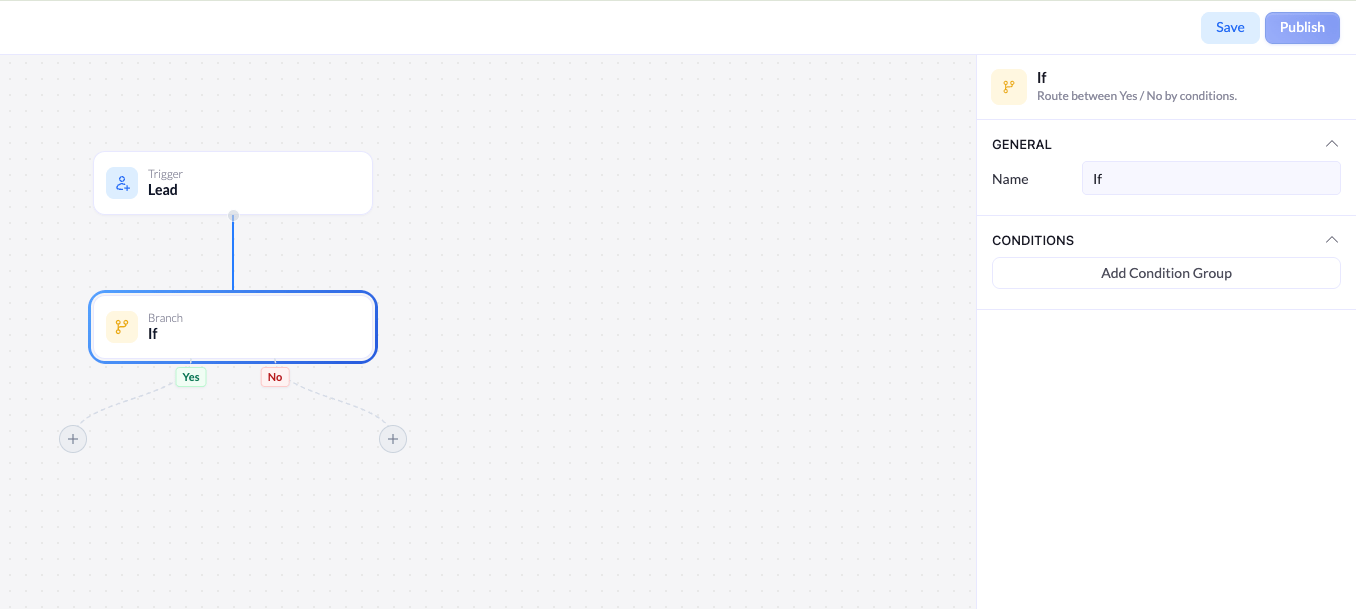 * **Yes** - runs for leads that match your conditions.
* **No** - runs for leads that don't.
You can leave a branch empty if a lead simply ends there, or add actions to one or both sides.
## Configure the conditions
Selecting the node opens its settings. The header confirms what it does: *Route between Yes / No by conditions.*
### General
| Setting | Description |
| -------- | ------------------------------------------------------------------------------------------------------------------------------------------- |
| **Name** | The label for this node on the canvas. Rename it to describe the decision (for example, `Is a paid plan?`) so the branch is easy to follow. |
### Conditions
The **Conditions** section defines what counts as a **Yes**. If a lead matches, it takes the Yes branch; if not, it takes the No branch.
Click **Add Condition Group** to add your first condition. Each condition has three parts, read left to right:
* **Yes** - runs for leads that match your conditions.
* **No** - runs for leads that don't.
You can leave a branch empty if a lead simply ends there, or add actions to one or both sides.
## Configure the conditions
Selecting the node opens its settings. The header confirms what it does: *Route between Yes / No by conditions.*
### General
| Setting | Description |
| -------- | ------------------------------------------------------------------------------------------------------------------------------------------- |
| **Name** | The label for this node on the canvas. Rename it to describe the decision (for example, `Is a paid plan?`) so the branch is easy to follow. |
### Conditions
The **Conditions** section defines what counts as a **Yes**. If a lead matches, it takes the Yes branch; if not, it takes the No branch.
Click **Add Condition Group** to add your first condition. Each condition has three parts, read left to right:
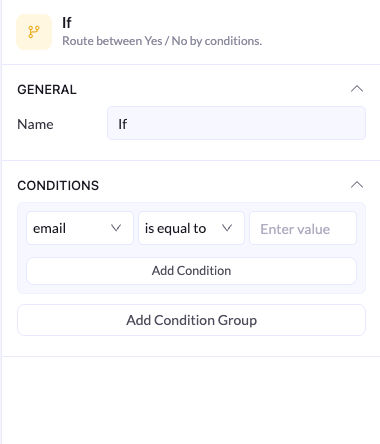 The first dropdown lists the fields captured on your connected landing page - for example, **email**. Pick the field to check.
The second dropdown sets how the field is compared to your value - for example, **is equal to**, **is not equal to**, **contains**, **does not contain**, **greater than**, or **less than**.
The third field is what you compare against. Type the value to check for.
The available fields come straight from the landing page connected to your trigger. If a field you expect is missing, check that the page is capturing it and is connected to the trigger.
## Combine conditions with AND / OR
You can add more than one condition. Click **Add Condition** inside a group, and an **AND / OR** toggle appears between conditions.
The first dropdown lists the fields captured on your connected landing page - for example, **email**. Pick the field to check.
The second dropdown sets how the field is compared to your value - for example, **is equal to**, **is not equal to**, **contains**, **does not contain**, **greater than**, or **less than**.
The third field is what you compare against. Type the value to check for.
The available fields come straight from the landing page connected to your trigger. If a field you expect is missing, check that the page is capturing it and is connected to the trigger.
## Combine conditions with AND / OR
You can add more than one condition. Click **Add Condition** inside a group, and an **AND / OR** toggle appears between conditions.
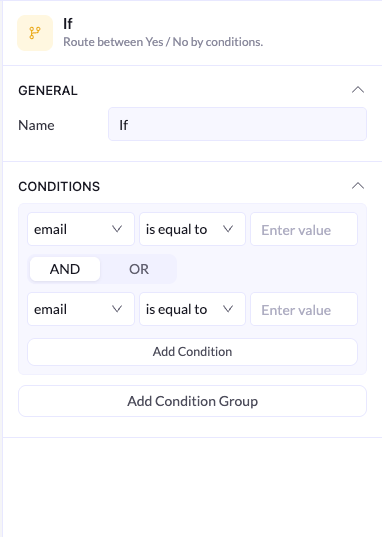 * **AND** - a lead takes the Yes branch only if it matches **every** condition in the group.
* **OR** - a lead takes the Yes branch if it matches **at least one** condition in the group.
For more complex logic, click **Add Condition Group** to add another group. An **AND / OR** toggle then appears *between* the groups too:
1. **Within a group** - conditions combine with the group's AND / OR toggle.
2. **Between groups** - each group is evaluated as a whole, then groups combine with the AND / OR toggle between them.
Think of groups like parentheses in math: conditions inside a group are evaluated first, then the groups are combined. Reach for a new group whenever your logic mixes AND and OR.
* **AND** - a lead takes the Yes branch only if it matches **every** condition in the group.
* **OR** - a lead takes the Yes branch if it matches **at least one** condition in the group.
For more complex logic, click **Add Condition Group** to add another group. An **AND / OR** toggle then appears *between* the groups too:
1. **Within a group** - conditions combine with the group's AND / OR toggle.
2. **Between groups** - each group is evaluated as a whole, then groups combine with the AND / OR toggle between them.
Think of groups like parentheses in math: conditions inside a group are evaluated first, then the groups are combined. Reach for a new group whenever your logic mixes AND and OR.