> ## Documentation Index
> Fetch the complete documentation index at: https://docs.landerlab.io/llms.txt
> Use this file to discover all available pages before exploring further.
# Delay node
> Pause a workflow for a set duration before the next node runs.
The **Delay** node pauses the workflow for a set amount of time before the lead continues to the next node. Use it to wait before acting - for example, to hold a new lead for a day before sending a follow-up email instead of sending it the moment they sign up.
A delay doesn't change or filter the lead. It only controls *when* the rest of the workflow runs.
A Delay node affects everything after it. Place it in the flow at the point where you want the pause to start — the nodes below it won't run until the wait is over.
## Add the Delay node
Delay lives under the **Internal** group in the node menu.
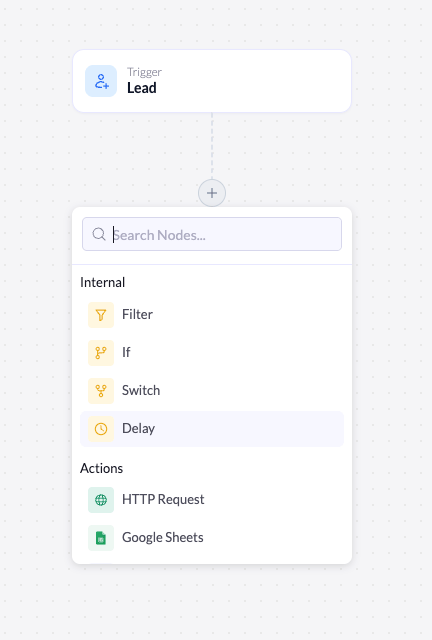 Click the **+** at the point in the flow where you want the pause to begin.
Under **Internal**, click **Delay**. The node is added to the canvas and its settings open on the right.
## Configure the delay
Selecting the node opens its settings. The header confirms what it does: *Pause execution for a set duration.*
### General
| Setting | Description |
| -------- | -------------------------------------------------------------------------------------------------------------------------------- |
| **Name** | The label for the node on the canvas. Rename it to describe the wait (for example, `Wait 1 day`) so the workflow stays readable. |
### Duration
The **Duration** section sets how long the workflow waits.
Click the **+** at the point in the flow where you want the pause to begin.
Under **Internal**, click **Delay**. The node is added to the canvas and its settings open on the right.
## Configure the delay
Selecting the node opens its settings. The header confirms what it does: *Pause execution for a set duration.*
### General
| Setting | Description |
| -------- | -------------------------------------------------------------------------------------------------------------------------------- |
| **Name** | The label for the node on the canvas. Rename it to describe the wait (for example, `Wait 1 day`) so the workflow stays readable. |
### Duration
The **Duration** section sets how long the workflow waits.
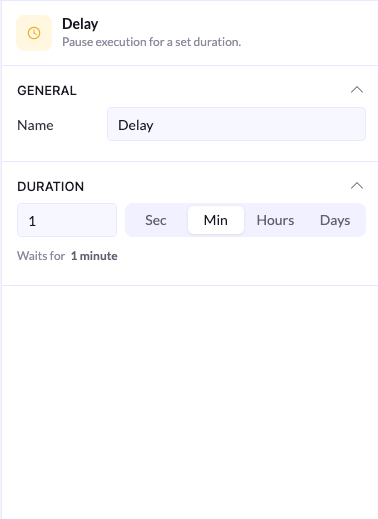 1. Enter a **number** in the field on the left.
2. Choose a **unit** from the toggle: **Sec**, **Min**, **Hours**, or **Days**.
A live preview below the field confirms the total wait - for example, *Waits for 1 minute*. Check this line to make sure the number and unit read the way you intended.
## Example: wait before sending an email
A common pattern is to delay a follow-up so it doesn't arrive the instant a lead signs up:
The **Lead** trigger fires when someone signs up on your landing page.
Add a **Delay** node set to **1 Day**.
Add the action that sends the email after the delay. It runs a day later instead of immediately.
You can chain delays through a workflow — for example, a short delay, an action, another delay, then a second action — to space out a multi-step sequence.
1. Enter a **number** in the field on the left.
2. Choose a **unit** from the toggle: **Sec**, **Min**, **Hours**, or **Days**.
A live preview below the field confirms the total wait - for example, *Waits for 1 minute*. Check this line to make sure the number and unit read the way you intended.
## Example: wait before sending an email
A common pattern is to delay a follow-up so it doesn't arrive the instant a lead signs up:
The **Lead** trigger fires when someone signs up on your landing page.
Add a **Delay** node set to **1 Day**.
Add the action that sends the email after the delay. It runs a day later instead of immediately.
You can chain delays through a workflow — for example, a short delay, an action, another delay, then a second action — to space out a multi-step sequence.