> ## Documentation Index
> Fetch the complete documentation index at: https://docs.landerlab.io/llms.txt
> Use this file to discover all available pages before exploring further.
# Design Settings for Global Styles and Branding
> Customize global design settings like colors, fonts, and styles to create consistent and professional funnel designs.
The Design tab is where you define the **look and feel of your entire flow**. From colors to typography and component styles, everything can be customized to match your brand.
Instead of styling each element individually, LanderLab uses a **global design system**, so your changes apply across your entire flow automatically.
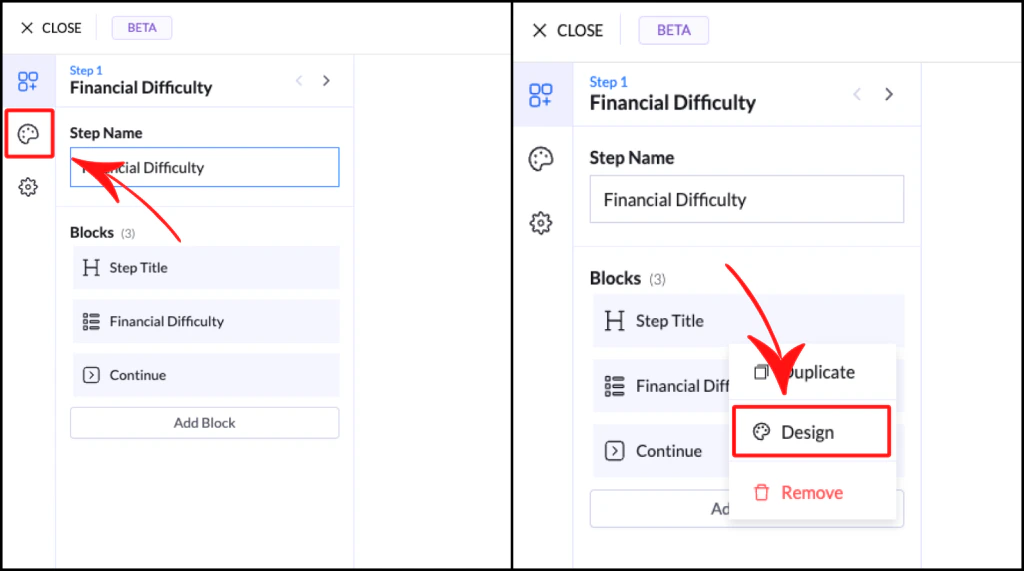
## How to Access Design Settings
You can open Design in two ways:
* Click the **color palette icon** in the left panel → for global styles
* Click the **three dots (•••)** on any block and select **Design** → for direct access
By default, all design changes are applied globally.
 ***
## How Design Works
Design settings are shared across your flow using an inheritance system:
* Changing styles updates all similar blocks automatically
* Ensures consistency across your entire flow
* Saves time by avoiding repetitive edits
You can still override styles on individual blocks if needed.
***
## Colors
The Colors panel defines your flow’s visual identity.
### Main Colors
* **Primary Color** → Used for buttons, selections, and key actions
* **Secondary Color** → Used for accents and highlights
### Neutral Colors
* Black, white, and gray tones
* Used for text, backgrounds, and structure
### Error Color
* Automatically applied to validation errors and invalid inputs
💡 Tip: Set your primary and secondary colors first to create a consistent brand foundation.
***
## Fonts
Your flow automatically inherits fonts from the **landing page** it’s placed on.
* No need to configure fonts inside the flow
* Keeps everything visually consistent
💡 Tip: Define your fonts at the landing page level so all flows match your brand style.
***
## Presets
Presets are pre-designed styles you can apply instantly to blocks.
Instead of building styles from scratch, you can:
* Apply a preset
* Adjust it if needed
### Example
Applying a preset to a Multiple Choice block will automatically set:
* Colors
* Spacing
* Button styles
Because of global inheritance:
* Updating one block style updates all similar blocks
***
## Why Use Presets
* Faster setup
* Consistent design
* No design experience needed
💡 Tip: Start with default presets and adjust later if needed. This keeps your flow clean and professional from the start.
***
## Best Practices
* Set colors before building your flow
* Keep styles consistent across all steps
* Avoid over-customizing every block
* Use presets to save time
***
## How Design Works
Design settings are shared across your flow using an inheritance system:
* Changing styles updates all similar blocks automatically
* Ensures consistency across your entire flow
* Saves time by avoiding repetitive edits
You can still override styles on individual blocks if needed.
***
## Colors
The Colors panel defines your flow’s visual identity.
### Main Colors
* **Primary Color** → Used for buttons, selections, and key actions
* **Secondary Color** → Used for accents and highlights
### Neutral Colors
* Black, white, and gray tones
* Used for text, backgrounds, and structure
### Error Color
* Automatically applied to validation errors and invalid inputs
💡 Tip: Set your primary and secondary colors first to create a consistent brand foundation.
***
## Fonts
Your flow automatically inherits fonts from the **landing page** it’s placed on.
* No need to configure fonts inside the flow
* Keeps everything visually consistent
💡 Tip: Define your fonts at the landing page level so all flows match your brand style.
***
## Presets
Presets are pre-designed styles you can apply instantly to blocks.
Instead of building styles from scratch, you can:
* Apply a preset
* Adjust it if needed
### Example
Applying a preset to a Multiple Choice block will automatically set:
* Colors
* Spacing
* Button styles
Because of global inheritance:
* Updating one block style updates all similar blocks
***
## Why Use Presets
* Faster setup
* Consistent design
* No design experience needed
💡 Tip: Start with default presets and adjust later if needed. This keeps your flow clean and professional from the start.
***
## Best Practices
* Set colors before building your flow
* Keep styles consistent across all steps
* Avoid over-customizing every block
* Use presets to save time