> ## Documentation Index
> Fetch the complete documentation index at: https://docs.landerlab.io/llms.txt
> Use this file to discover all available pages before exploring further.
# Connect Domain with Manual DNS
> Connect your domain using manual DNS by adding CNAME and TXT records to publish landing pages on your own domain.
Use **Manual DNS** if your domain is managed outside Cloudflare or if you prefer to configure DNS records yourself.
This method connects your domain by **adding DNS records in your domain provider**, then verifying them inside LanderLab.
## Before You Start
Make sure the following requirements are met:
* You have access to your **domain DNS settings** (GoDaddy, Namecheap, etc.)
* Only **admins can add domains** in LanderLab
* Manual DNS usually requires a **subdomain** (example: `lp.yourdomain.com`), not the root domain (`yourdomain.com`)
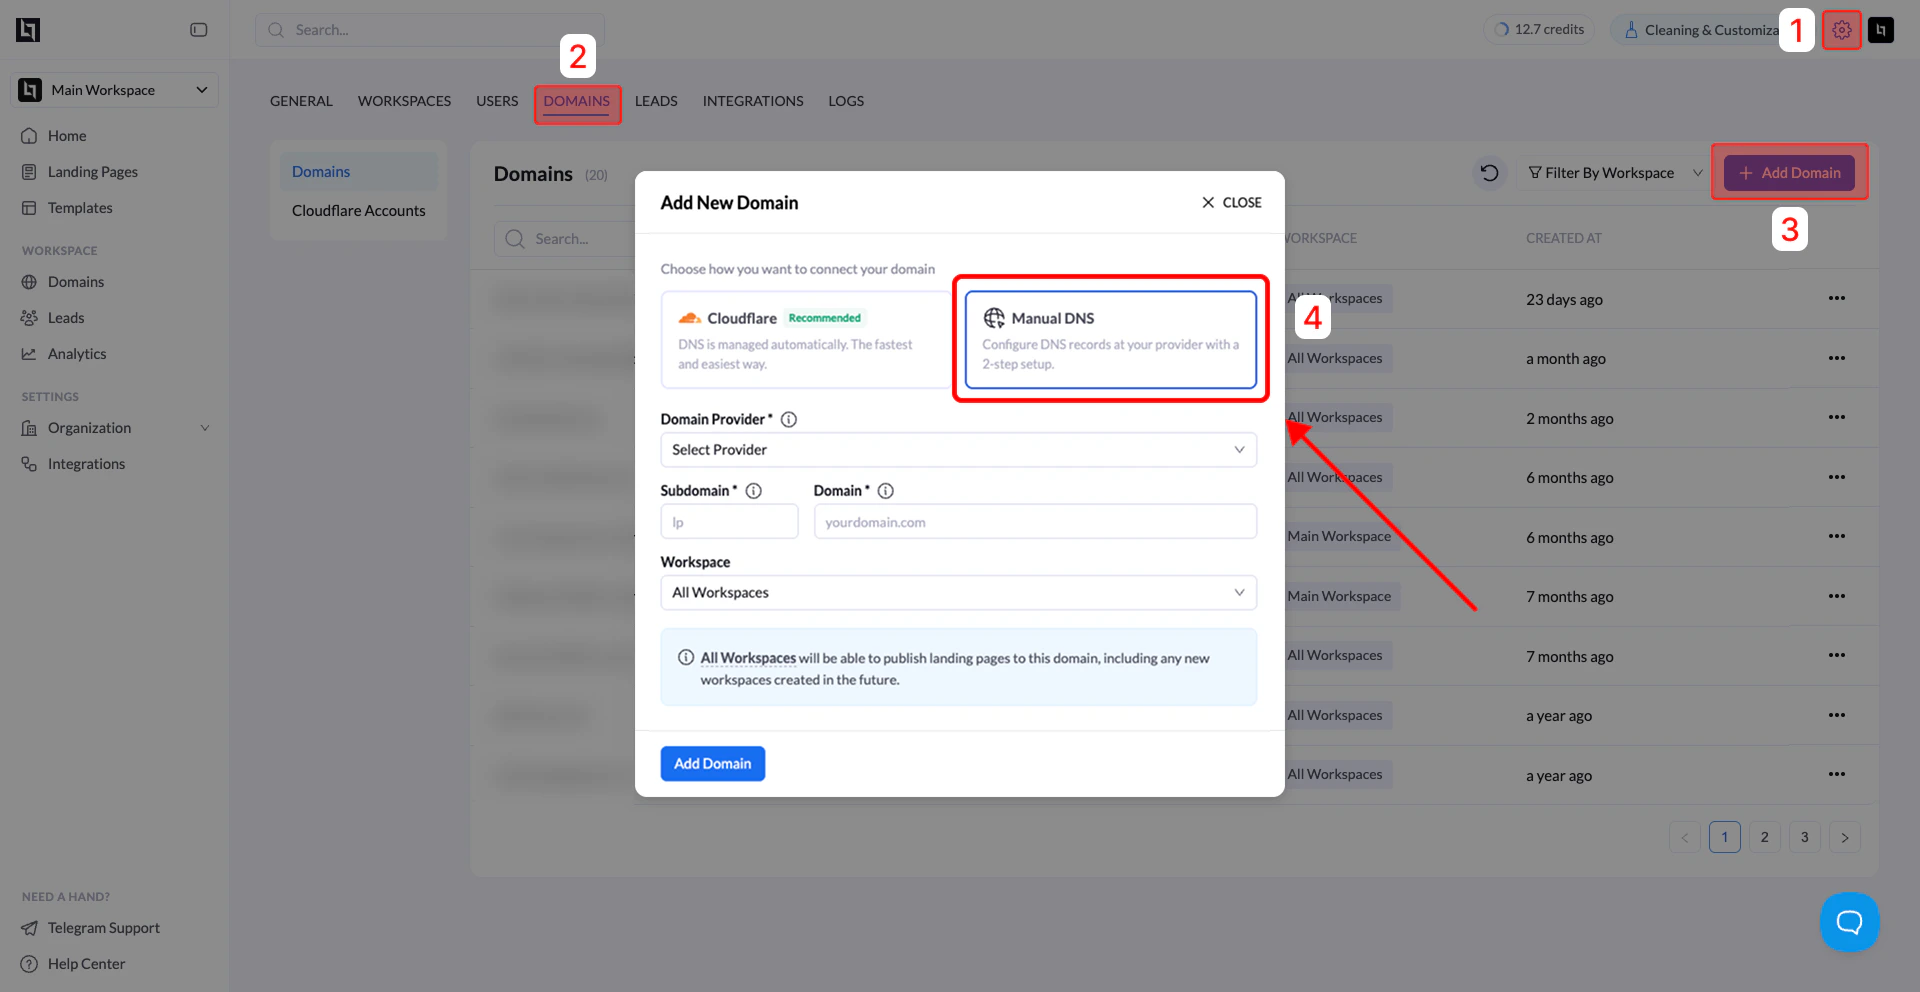 ## Step 1: Open Domains in Settings
1. In your **LanderLab dashboard**, go to **Settings**.
2. Click the **Domains** tab.
3. You will see the **Domains list** and the option to add a new domain.
## Step 2: Click Add Domain
Click **Add Domain** in the top-right corner.
If you do not see this button, you likely **do not have admin permissions**.
## Step 3: Choose Manual DNS
In the **Add New Domain** window, you will see two connection options:
* **Cloudflare (Recommended)** – automatic DNS configuration
* **Manual DNS** – configure DNS records manually
Select **Manual DNS**.
## Step 4: Enter Domain Details
Fill in the required fields:
| Field | Description |
| :------------------ | :---------------------------------------------- |
| **Domain Provider** | Select your provider (GoDaddy, Namecheap, etc.) |
| **Subdomain** | The subdomain you want to use (example: `lp`) |
| **Domain** | Your main domain (example: `yourdomain.com`) |
| **Workspace** | Choose where the domain will be available |
Workspace options:
* **All Workspaces** – any workspace can publish to this domain
* **Specific Workspace** – only selected workspace can use it
Click **Add Domain**.
### Root Domain Notes
Some domain providers **do not allow CNAME records on root domains**.
Because of this, Manual DNS usually requires a subdomain such as:
```text theme={null}
lp.yourdomain.com
www.yourdomain.com
```
If you want to use the root domain (`yourdomain.com`), you can:
* Connect the domain using **Cloudflare** (recommended), or
* Use a **subdomain like www** and redirect the root domain to it.
## Step 5: Add the DNS Records
After clicking **Add Domain**, LanderLab will open the **Domain Verification window**.
You will be asked to add DNS records.
Typically you will see two records:
| Record Type | Purpose |
| :---------- | :-------------------------------- |
| **CNAME** | Routes the subdomain to LanderLab |
| **TXT** | Verifies ownership of the domain |
### Add the records in your domain provider
1. Log in to your **domain provider dashboard**
2. Open **DNS Management** or **Zone Editor**
3. Create the records exactly as shown in LanderLab:
* Match the **Type** (CNAME / TXT)
* Match the **Host / Name**
* Match the **Value / Target**
Tips:
* Do **not include** `https://`
* If a record already exists with the same host, **edit or remove it to avoid conflicts**
## Step 6: Verify the Records
1. Return to the **Domain Verification window** in LanderLab
2. Click **Refresh**
If the records are correct and DNS propagation has started, the verification step will continue.
## Step 7: Add the SSL Record (HTTPS)
After the first records are verified, LanderLab will prompt the next step:
A **final SSL DNS record** will appear.
### What to do
1. Wait a few minutes
2. Click **Refresh**
3. Copy the **SSL record** shown
4. Add it to your DNS provider (same process as before)
5. Return to LanderLab
6. Click **Refresh**
Once verified, **HTTPS will be enabled for your domain**.
## Step 8: Confirm the Domain is Active
After all records are added:
1. Go to **Settings → Domains**
2. Click the **Refresh icon**
3. Locate your domain in the list
4. Confirm the **Status shows "Active"**
Your domain is now ready to be used for publishing landing pages.
***
## Common Issues
### Domain still shows Pending
DNS propagation may take **a few minutes up to 24–48 hours** depending on the provider.
### Incorrect Host Format
Some DNS providers expect:
```text theme={null}
lp
```
Others expect:
```text theme={null}
lp.yourdomain.com
```
Follow your provider's interface format, but ensure the **intent matches the instructions**.
CNAME Not Allowed on Root Domain
If your provider does not allow CNAME records on root domains:
* Use a **subdomain (recommended)**
* Or connect your domain using **Cloudflare**
## Step 1: Open Domains in Settings
1. In your **LanderLab dashboard**, go to **Settings**.
2. Click the **Domains** tab.
3. You will see the **Domains list** and the option to add a new domain.
## Step 2: Click Add Domain
Click **Add Domain** in the top-right corner.
If you do not see this button, you likely **do not have admin permissions**.
## Step 3: Choose Manual DNS
In the **Add New Domain** window, you will see two connection options:
* **Cloudflare (Recommended)** – automatic DNS configuration
* **Manual DNS** – configure DNS records manually
Select **Manual DNS**.
## Step 4: Enter Domain Details
Fill in the required fields:
| Field | Description |
| :------------------ | :---------------------------------------------- |
| **Domain Provider** | Select your provider (GoDaddy, Namecheap, etc.) |
| **Subdomain** | The subdomain you want to use (example: `lp`) |
| **Domain** | Your main domain (example: `yourdomain.com`) |
| **Workspace** | Choose where the domain will be available |
Workspace options:
* **All Workspaces** – any workspace can publish to this domain
* **Specific Workspace** – only selected workspace can use it
Click **Add Domain**.
### Root Domain Notes
Some domain providers **do not allow CNAME records on root domains**.
Because of this, Manual DNS usually requires a subdomain such as:
```text theme={null}
lp.yourdomain.com
www.yourdomain.com
```
If you want to use the root domain (`yourdomain.com`), you can:
* Connect the domain using **Cloudflare** (recommended), or
* Use a **subdomain like www** and redirect the root domain to it.
## Step 5: Add the DNS Records
After clicking **Add Domain**, LanderLab will open the **Domain Verification window**.
You will be asked to add DNS records.
Typically you will see two records:
| Record Type | Purpose |
| :---------- | :-------------------------------- |
| **CNAME** | Routes the subdomain to LanderLab |
| **TXT** | Verifies ownership of the domain |
### Add the records in your domain provider
1. Log in to your **domain provider dashboard**
2. Open **DNS Management** or **Zone Editor**
3. Create the records exactly as shown in LanderLab:
* Match the **Type** (CNAME / TXT)
* Match the **Host / Name**
* Match the **Value / Target**
Tips:
* Do **not include** `https://`
* If a record already exists with the same host, **edit or remove it to avoid conflicts**
## Step 6: Verify the Records
1. Return to the **Domain Verification window** in LanderLab
2. Click **Refresh**
If the records are correct and DNS propagation has started, the verification step will continue.
## Step 7: Add the SSL Record (HTTPS)
After the first records are verified, LanderLab will prompt the next step:
A **final SSL DNS record** will appear.
### What to do
1. Wait a few minutes
2. Click **Refresh**
3. Copy the **SSL record** shown
4. Add it to your DNS provider (same process as before)
5. Return to LanderLab
6. Click **Refresh**
Once verified, **HTTPS will be enabled for your domain**.
## Step 8: Confirm the Domain is Active
After all records are added:
1. Go to **Settings → Domains**
2. Click the **Refresh icon**
3. Locate your domain in the list
4. Confirm the **Status shows "Active"**
Your domain is now ready to be used for publishing landing pages.
***
## Common Issues
### Domain still shows Pending
DNS propagation may take **a few minutes up to 24–48 hours** depending on the provider.
### Incorrect Host Format
Some DNS providers expect:
```text theme={null}
lp
```
Others expect:
```text theme={null}
lp.yourdomain.com
```
Follow your provider's interface format, but ensure the **intent matches the instructions**.
CNAME Not Allowed on Root Domain
If your provider does not allow CNAME records on root domains:
* Use a **subdomain (recommended)**
* Or connect your domain using **Cloudflare**